
Collection Manager is an interface provided by PracticeSuite to enable easy and consistent follow-up on accounts receivable. It helps the Accounts Receivable to follow up on a claim at regular intervals until the claim closes. Thus, provider collection increases while reducing provider expenditure on claim processing.
Key Points to Note
* RCM workflow configuration is implemented in Collections Manager. The system will load only those claims assigned to the team of which the user is a part. To learn more about RCM Workflow configuration and its benefits, click here.
* A variety of search criteria are provided in the Collection Manager home screen so that users can categorize and filter the claims.
* Excel and CSV export options are provided in Collection Manager to export the data. CSV files are lightweight and, hence, export faster and take less load on the computer and application resources.
Fields in Coll.Mngr Excel file
* The flexible drag feature allows users to adjust the grid size of the search section, category section, and bottom claim listing section.
* A manual refresh button ![]() is provided at the top right-hand side of the collection manager home screen to refresh the category listing. This is to prevent the auto-reload of the entire data on each update or save of a claim or line. Users will need to click the refresh option to have their update displayed on the screen.
is provided at the top right-hand side of the collection manager home screen to refresh the category listing. This is to prevent the auto-reload of the entire data on each update or save of a claim or line. Users will need to click the refresh option to have their update displayed on the screen.
* Users can view the work queue activities of a claim in Collections Manager under the newly added Action Hx tab in Denials Workshop.
Collection Manager Home screen
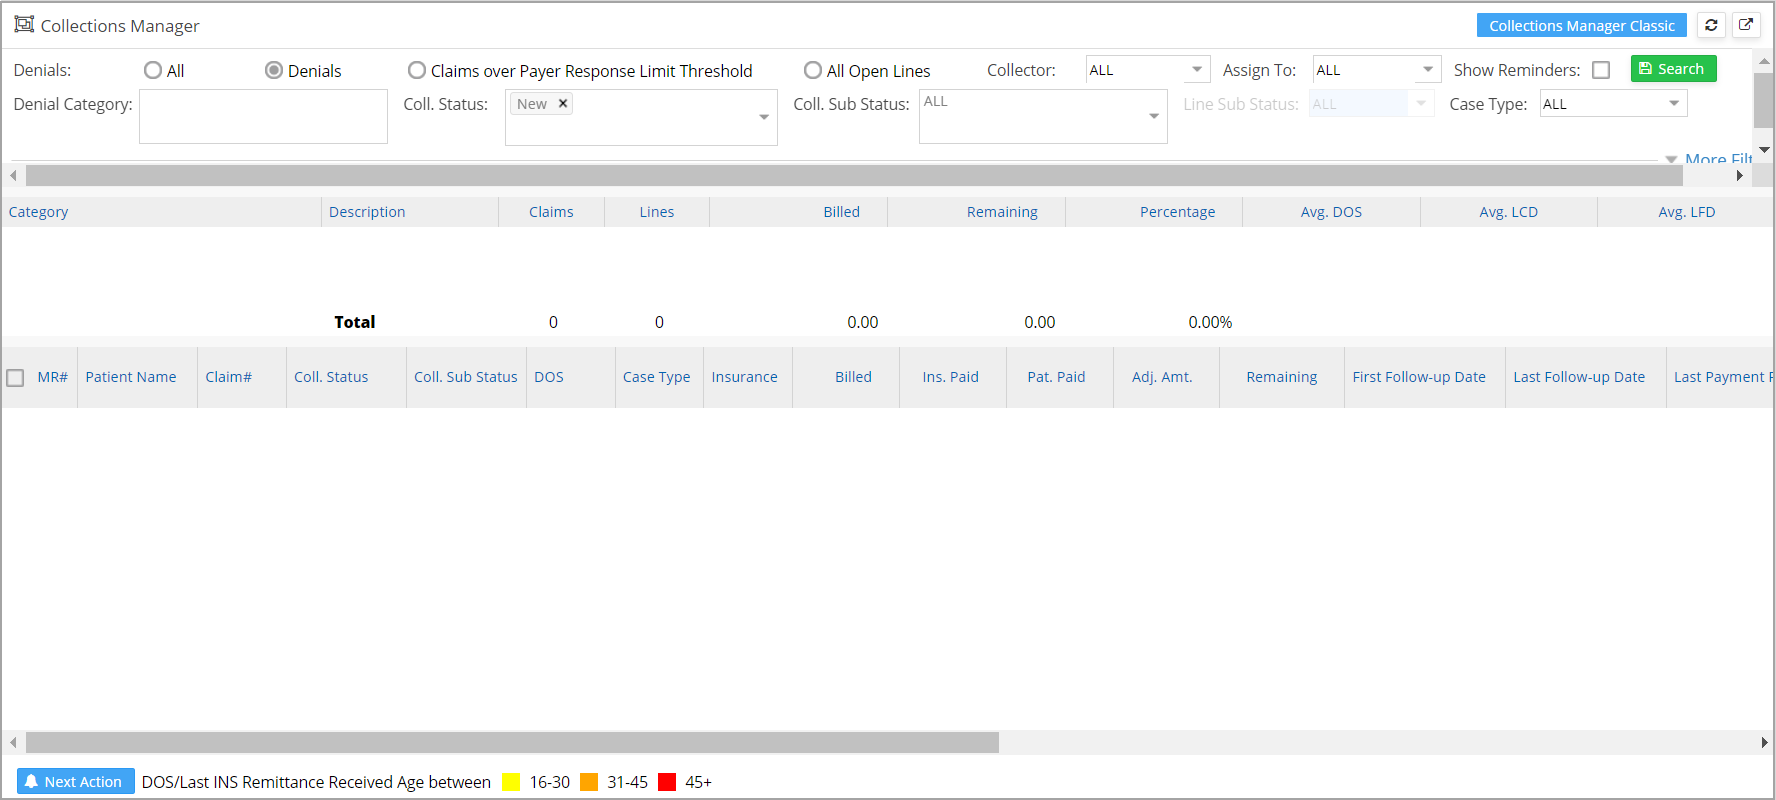
Search Criteria Section
Collection Manager has various search fields which help to filter the claims based on the requirements.

Click on ![]() to view all the filtering options explained in Table 1.
to view all the filtering options explained in Table 1.
| Search Criteria | Description |
| Denials | This radio button is used to filter claims which have been denied. |
| Claims over payer response Limit Threshold | This filters claims for which no response has yet been received even after the threshold is reached. The default claim response limit can be set up at Advanced Setup-> Billing Options. |
| All | This is used to display all claims under both ‘Denials’ and ‘Claims over payer response Limit Threshold’. |
| All Open Lines | This radio button displays all claims that have a balance (remaining) amount. Denied and no response claims are separately listed under their respective denial and no response categories. The remaining open claims will be shown in the respective payer categories. |
| Denial Category | Helps filter claims that fall under a specific denial category. This is a multi-selection field where multiple denial categories can be selected from the drop-down. |
| Coll. Status | Helps to filter claims based on the collection statuses-NEW, PENDING, RESOLVED, etc. This is also a multi-selection field. |
| Coll. Sub Status | Helps to filter claims based on the collection sub statuses (Claim Resubmitted, Paid EOB requested, Paid ERA in Transit, etc.) This is again a multi-select field. |
| Legal Entity | Select a Legal Entity from the drop-down to display claims in that LE. |
| Provider | Select a Rendering provider to filter based on the Rendering Provider |
| Patient | Type in the first three characters of the patient name or MR # and select an appropriate patient to filter for a particular patient. |
| CPT | To filter claims according to procedure code. Multi-select field |
| ICD | To filter claims with the given ICD codes. Multi-select field. |
| Modifier | Provide modifiers to filter the claims. Multi-select field |
| Show Claims in Next Action Queue | This, if checked, displays claims already pushed to the work queue. |
| Aged between: DOS/LCD/LFD | Claims can be filtered according to days from DOS, LCD(Last Claim Date), and Last Follow-up Date. |
| Date between: DOS/ Claim Date | Filter claims according to whether their DOS and/or claim date fall in the given date range. |
| A/R Method | Web/Calling/VOB. Select one from the drop-down |
| Amt > | To filter claims with amounts more than the specified value |
| Collector | To filter claims by the user who works on the claims in the collection manager |
| Assigned To | To filter claims by the user to whom a task has been assigned in the collection manager. |
| Case Type | To filter claims by Case type |
| Show Reminders | Show claims for which reminders have been set |
Table 1
Category Listing
All claims assigned to a user either manually or based on the pre-set rules will be automatically loaded for the user when the Collection Manager is opened, without the user either having to select his username or hitting the Search.
If any search parameters are provided, results are displayed accordingly.

Claim Listing
To view the claims in any category, click anywhere on the category line, and the corresponding claims are listed as shown in Image 4.
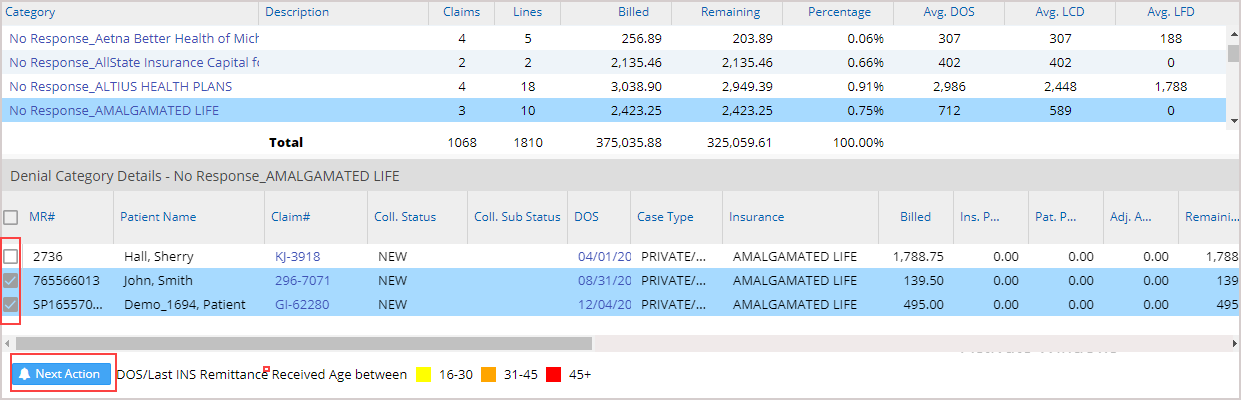
1. Multiple claims can be selected in the selected category (through the multi-select option) for adding a collection note and to record the collection activity for all the selected claims; see Image 4.
2. If a claim is rebilled to the same payer insurance level, Collection Manager sub status, First Follow-up Date, and Last Follow-up Date of the previous claim will show up in Collection Manager. These fields will cease to appear when the payer level changes.
3. Once a claim is touched, it will be removed from the listing.
4. Click on the button ![]() (highlighted in Image 1.2a) to open a popup window to add the information; refer to Image 4a. The info entered in the popup will apply to all the selected claims.
(highlighted in Image 1.2a) to open a popup window to add the information; refer to Image 4a. The info entered in the popup will apply to all the selected claims.
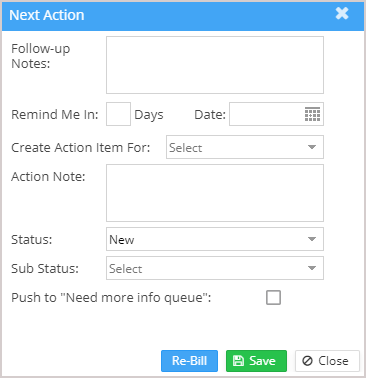
Image 4a
Color Codes in claims listing
Age since DOS and Age since Last INS remittance received fields are color-coded to indicate the priority of the claim, as shown in Image 5.

Different color codes in Collections Manager
| Color on DOS and Last Remittance Received | Indication |
| Yellow | 16-30 days |
| Orange | 31-45 days |
| Red | More than 45 days |
Table 2
Click anywhere on the claim line to open the encounter line for follow-up. The Denials Workshop screen will pop up with details of the invoked encounter.
The different sections of the denials workshop are numbered (as highlighted in Image 6) and explained below.
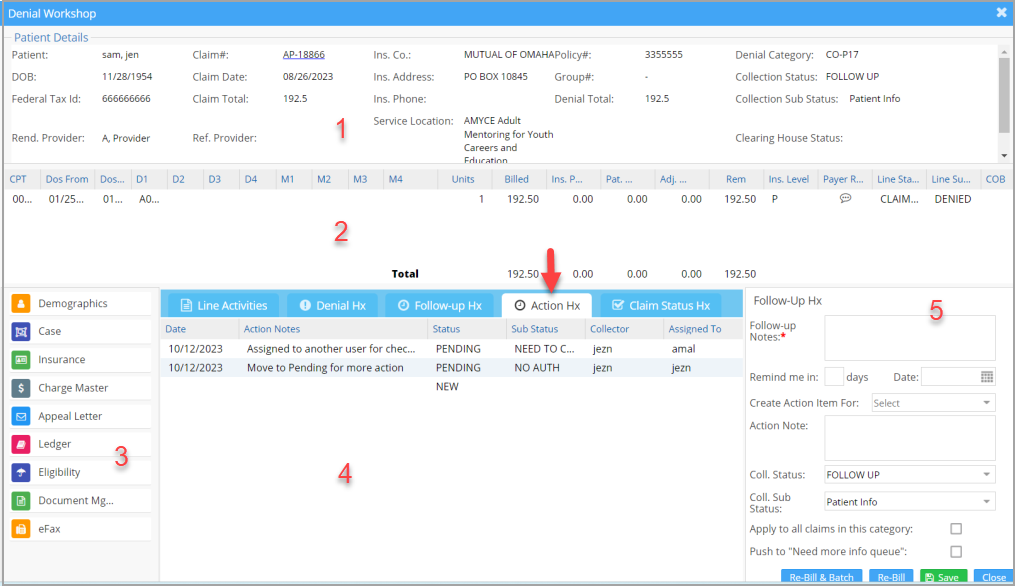
1. Patient and Claim details:
Patient demographics and claim details can be found in this section.
2. Encounter lines and its details:
Encounter line details can be found in this section.
3. Links:
Help in navigating to other pages such as Patient Demographics, Case, Insurance, Charge Master, Ledger, Eligibility, Document Management, and eFax. To learn how to fax from the Collections Manager, click here.
4. Claim History and previous notes:
This section has five tabs: Line activities, Denial History, Follow-up History, Action Hx, and Claim status history.
Action Hx: The claim activities from the WorkQueue can be viewed in this tab.
5. Follow up notes and status section:
This section lets you update notes and tag follow-up status and sub-status for future follow-up. The claim status and sub status can be updated here.(Follow-up note is mandatory for every save.)
Each collection status can be linked to one or more collection sub-statuses. Selecting a collection status in the Collection Manager screen will bring up a specific set of sub-statuses preset from the Billing Lookups. To link collection status and sub status, go to Advanced setup->All Lookups->Billing Lookups. Select the collection sub-status on the left pane. For each sub-status, choose one or more collection statuses from the newly created Collection Status column, which is a multi-select combo box (see Image 7).
