
ERA Screen
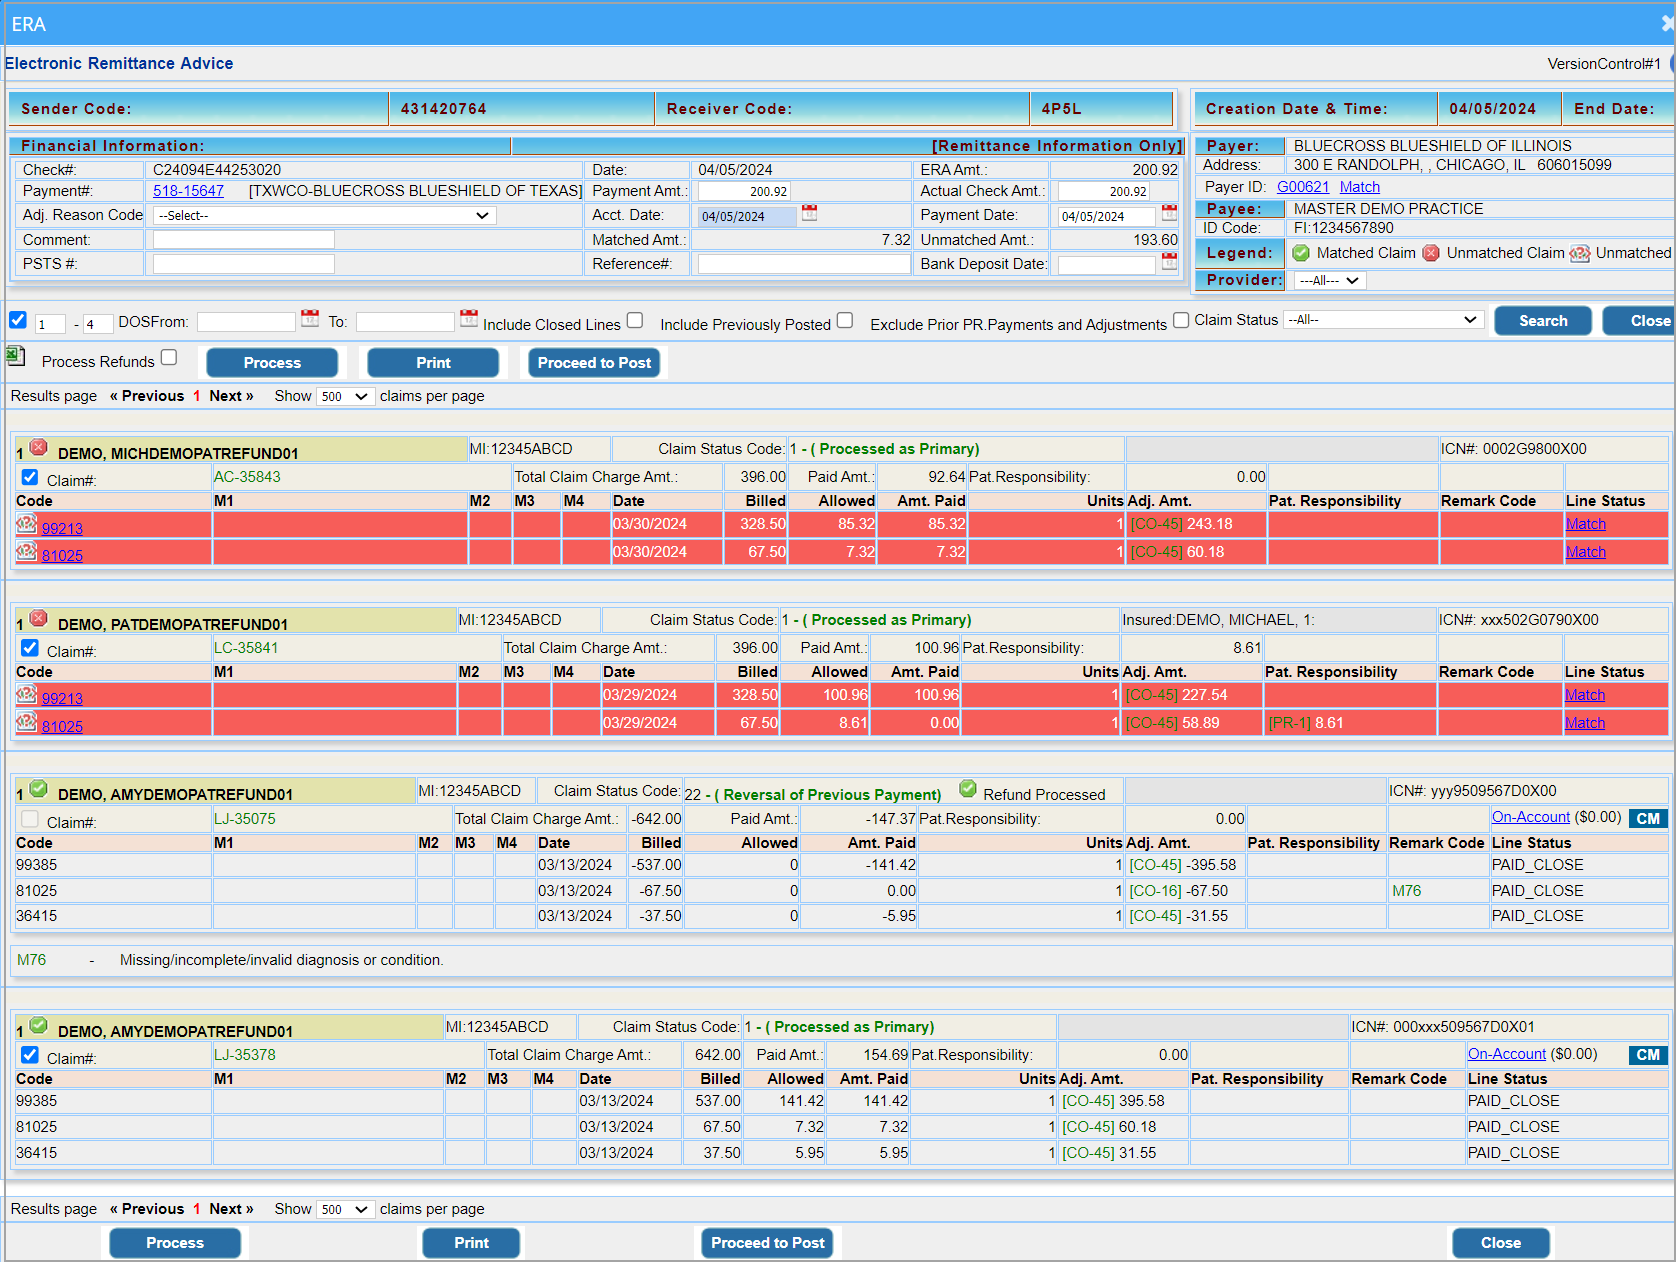
Click on any ERA on the ERA listing page to open the ERA screen. The ERA screen has the Payment Entry Section on the top left, payer and payee details displayed on the top right, and claim listings beneath. Filters are also provided to filter out or expand the claim selection.
Payment Section: The first step in ERA posting is to process the payment, whereby a payment entry is created. The payment entry section has fields similar to Payment Master and lets you make a payment entry corresponding to the ERA received without having to go to the Payment Master screen. On clicking the ![]() button, a payment number is generated. Once processed, observe the amounts displayed in the Matched Amt. and Unmatched Amt. fields. Unmatched amounts correspond to claims not submitted from PracticeSuite, and such claims can never be posted from the system. Change the payment amount to equal the matched amount, and again click on
button, a payment number is generated. Once processed, observe the amounts displayed in the Matched Amt. and Unmatched Amt. fields. Unmatched amounts correspond to claims not submitted from PracticeSuite, and such claims can never be posted from the system. Change the payment amount to equal the matched amount, and again click on ![]() . This will update the payment with the new amount. Now start the posting.
. This will update the payment with the new amount. Now start the posting.
Filters:
| Filter | Description |
| To check and uncheck the claims easily, provide an ordinal number in both fields. e.g., if the user provides the number as in the given image, claims in positions 1 to 5 will be checked | |
| DOS | Provide the DOS date range |
| Include Closed Lines | If checked, closed lines of the claims will also be listed |
| Include Previously Posted | If checked, previously posted lines will be listed |
| Exclude Prior Pr. Payments and Adjustments | If checked, primary payments and adjustments will not be added to the paid and adjusted amounts. |
| Claim Status | To filter claims by their status: Processed as primary, Processed as Secondary, Denied, etc. |
A sample ERA page
Note: Bank Deposit Date field was recently added to ERA header.
Posting ERAs :
1. Click on the Payer or the Open ERA button of the ERA to be posted. This opens the ERA page, as shown in Image 1.
2. Initially, each patient record on the ERA page has a ![]() mark to indicate that it is an unmatched claim. Click on
mark to indicate that it is an unmatched claim. Click on ![]() button to create a payment entry and to match claims. Once processed, all matched claims will have a
button to create a payment entry and to match claims. Once processed, all matched claims will have a ![]() mark and all unmatched lines will be highlighted in red, as in Image 2.
mark and all unmatched lines will be highlighted in red, as in Image 2.

COB Automation
When the claim status code indicated is 19 (COB is for a crossover claim), and if the secondary insurance indicated in the ERA is not present in the patient’s record, the system will automatically create secondary insurance for the patient as part of the auto-posting process to facilitate the COB posting and efficiently move the line(s) to secondary responsibility.
For the above automation to occur, in the Billing Options set-up page, the ‘Auto create COB payer from ERA’ option should be set to YES. The adjacent field named Default COB Payer Name will have the pre-set value “Default from ERA.”. Practices can change this for any payer of their choice.
If the default from the ERA option is selected, the system will use the secondary insurance name and patient insurance ID presented in the electronic remit to create secondary insurance for the patient.
However, if the practice provides an insurance name in the default COB payer name, this payer will be picked up for creating a secondary payer instead of the payer in the COB info.
If secondary insurance is already present in the patient demographics, the system will simply add insurance to the case.
In the process of adding secondary insurance for the patient, if the insurance company is not present in the insurance master, the system will first auto-create the insurance company with generic information. Please note that users will need to complete any missing secondary insurance information in both the insurance company master and inpatient insurance records.

Negative payments
To prevent inadvertent auto-posting of negative amounts by users that can result in posting errors, the claim selection checkbox in the ERA screen is disabled when a negative amount is present in the remit. Below are a couple of the negative ERA posting scenarios where the system will prevent the selection of the claim for auto-posting:
1. If the claims status code is 22 (indicating negative payment or adjustment),
OR
2. If the Paid Amt. is a negative amount; see Image 3.1

However, if the sum of adjustments is a negative value, the claim can be selected for posting, but the system will display a warning in the ERA posting screen. Users will need to make the necessary corrections and post the ERA.
Exception: ERAs with CO-144 and OA-94 negative adjustments can be auto-posted.
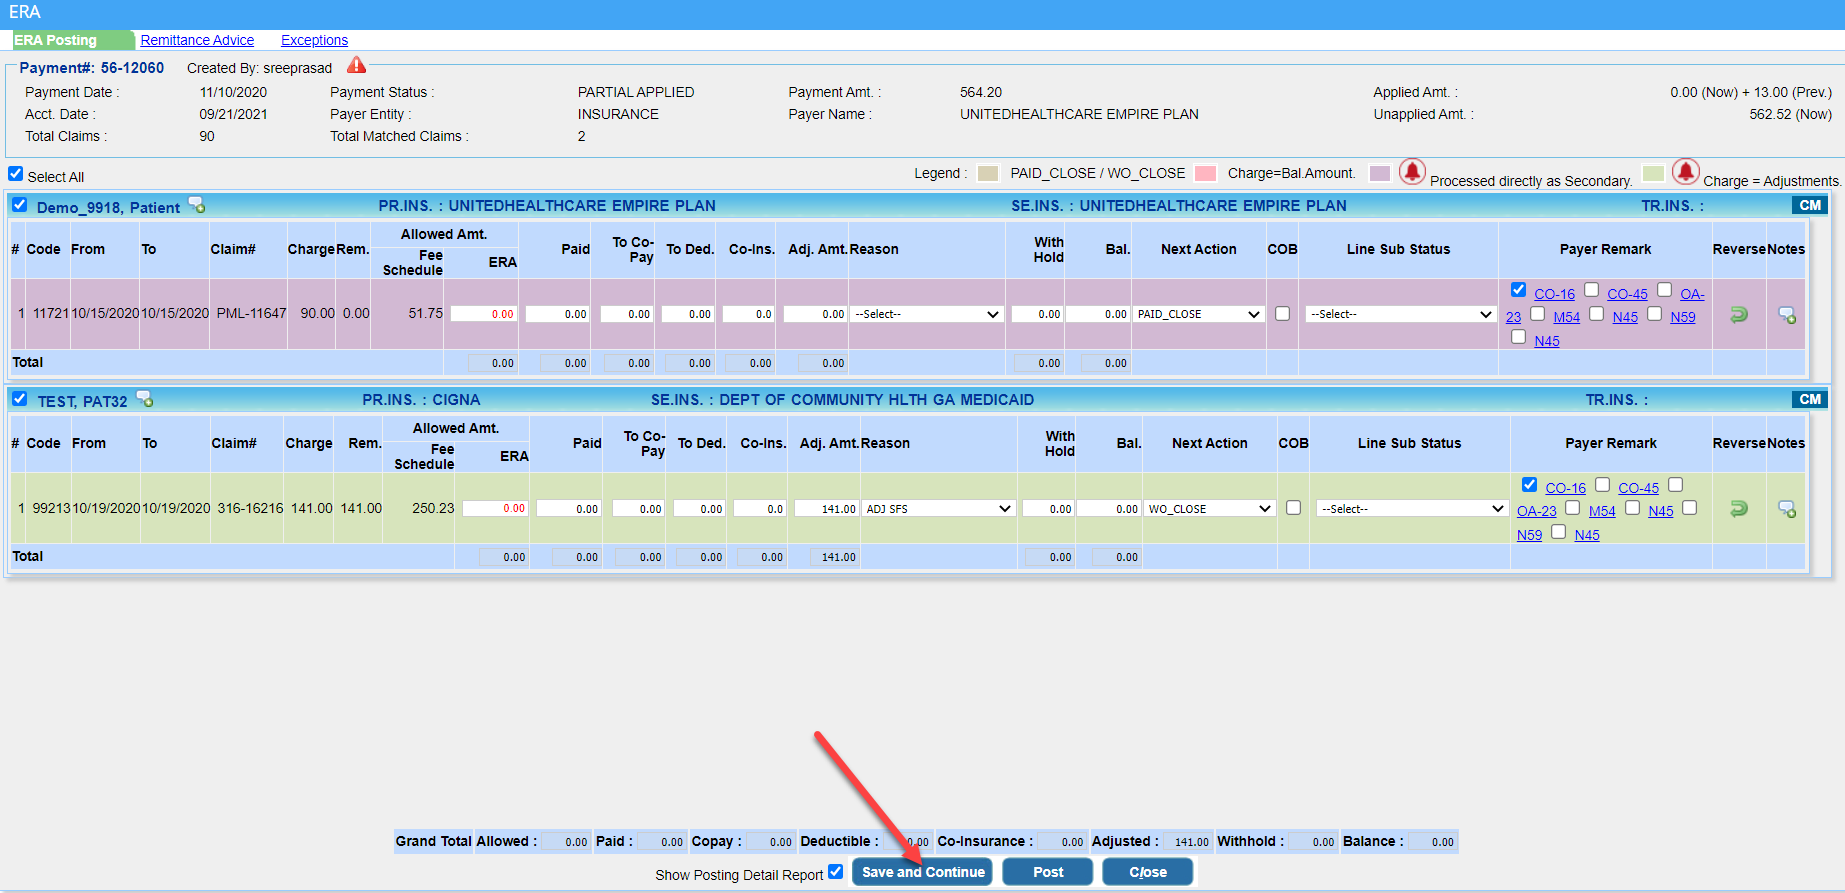
3. Click on ![]() button. The ERA Posting screen opens for the patients having
button. The ERA Posting screen opens for the patients having ![]() mark, as shown in Image 4.
mark, as shown in Image 4.

4a. The user can selectively check the items for posting. Check-boxes are provided (see item marked 8 in Image 4) so that users need not post the ERA completely in one go; they can select the items that need to be posted and complete the rest later. This is helpful when the ERAs are large. But users have to exit and reopen the ERA to continue posting.
4b. Another method by which users can conveniently post large ERAs in parts is by using the new “Save and Continue” option (highlighted in Image 4a) added to the ERA Posting screen. Users can click on this option to leave the ERA partially posted and return later to complete the posting from where they left off. Users can continue posting the remaining payments without having to exit the ERA posting screen.
5. Allowed Amount(ERA) will be red-texted if it is less than the calculated allowed amount based on the fee schedule and orange-texted if it is higher. Also, a mouseover on ‘Allowed Amt (Fee Schedule)’ will display per unit allowed and the calculated allowed amount based on the number of units.
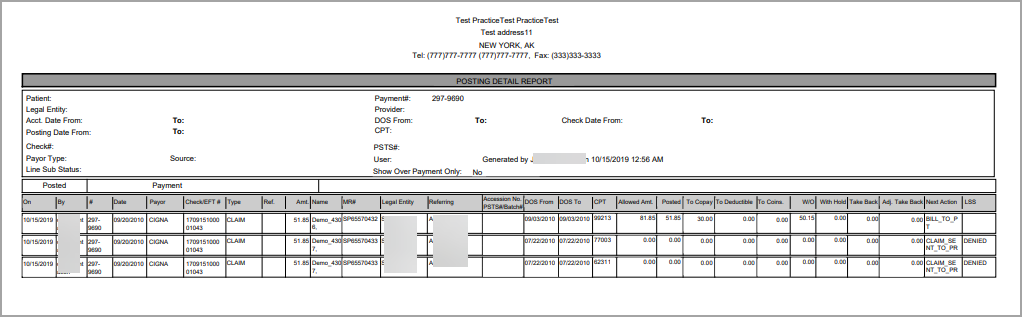
6. Click on ![]() button at the bottom of the screen to post the ERAs. To view the Posting Detail Report immediately after posting the items, check the box Show Posting Detail Report; this action opens the report as in Image 7.
button at the bottom of the screen to post the ERAs. To view the Posting Detail Report immediately after posting the items, check the box Show Posting Detail Report; this action opens the report as in Image 7.
7. When denials are auto-posted from the ERA, the system will ignore the contractual adj code (CO-45) or a patient responsibility code ( PR-1; PR-2; or PR-3) and instead attach the subsequent remark code.
Options/Links available in the ERA Posting screen
Each posting line on this screen is colored according to the legend given in Table 2.
| Color | Description |
| PAID_CLOSE / WO_CLOSE | |
| Charge=Bal.Amount | |
| Processed directly as secondary | |
| Charge = Adjustments |
Table 2
Different options and links available in the ERA Posting screen are labeled in Image 4 and described in Table 3.
| Option/Link | Description |
| 1 | This link at the top-left part of the screen takes the user to the ERA screen. It can be used as a reference. |
| 2 | Opens the Recalls & Alerts screen |
| 3 | Payer Remark |
| 4 | Reverses the payment |
| 5 | To add line notes |
| 6 | Exceptions link to a page where all unmatched claims are listed. This separate listing helps users quickly identify claims that failed to match/post from the ERA. |
| 7 | Link to Charge Master |
| 8 | To select the items for posting; |
Table 3