Practicesuite handles the entire scheduling needs of the practice through a module called Scheduler. To schedule an appointment, follow the below-given steps.

1. Select Scheduler from the main menu.

2. The Scheduler screen opens up, as shown in Image 1.

Image 1

3. To select a particular Legal entity/provider, click on the Search button on the right end (highlighted in Image 1). A popup screen, as in Image 2, opens up.

Image 2

i. If you have multiple Legal Entities in the system, select the relevant Legal Entity.

ii. Select All Providers to list all the Providers of the chosen legal Entity in the scheduler screen. To schedule only for a particular provider, select the Provider from the list. Close the Search screen.

Table 1 shows the different ways to view appointments in the scheduler.​

Field  Description
 Day wise listing of appointments
 Week wise listing of appointments
Month wise listing of appointments
 Appointments are displayed provider wise.
 Calendar button to select a day.
Move to the previous day/week/month depending on what the user has selected from 
Move to the next day/week/month depending on what the user has chosen from

 Current day appointments are displayed

Table 1

Scheduling Appointments for New Patients

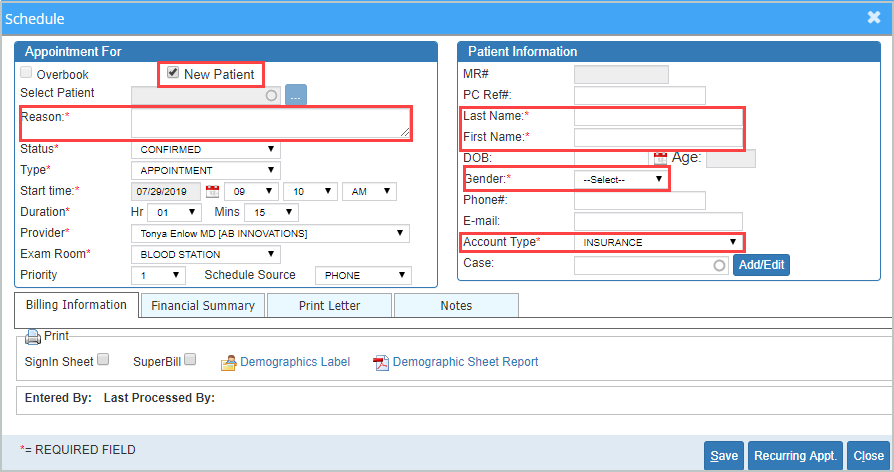
1. Under the required provider, click on the time slot at which the appointment needs to created. The Schedule screen opens up. See Image 3.

Image 3

2. Under Appointment For section, click on New Patient checkbox.

3. Enter Patient Last Name, First Name select Gender, and an Account Type in the Patient Information section.

4. Enter a Reason for the visit. Enter all other fields marked as mandatory. Other details like Email, DOB can be entered later from the patient demographics.

5. Click on Save.