![]()
Overview of Charge Master
The charge master/edit charges screen is the primary screen for editing a patient’s charges. The left pane displays all encounters of the selected patient grouped by case. Clicking on any encounter will list the diagnosis codes, the procedure codes and their corresponding charges, the billed amount, the paid amount, the current line status, etc., and these can be edited. All line activities related to each line in the encounter, including claim generation, payment posting, refunds, and reversals are captured in the Line Activity log in the Charge Master.
To view the Charge Master screen, select Charges from the main menu, then click on Edit Charges. When the Charge Master opens, select a patient from the Patient drop-down in the header. All the encounters of the patient will be listed on the left pane. Select an encounter to view and edit the details.

Key Functions of the Charge Master
The Charge Master plays a vital role in managing encounter-related data and workflows. It can be used to:
- Edit existing charges
- Add new procedure codes to a specific encounter
- View all activities tied to an encounter—across case level, encounter level, and line-item level
- Create new encounters
- Assign claims to designated users
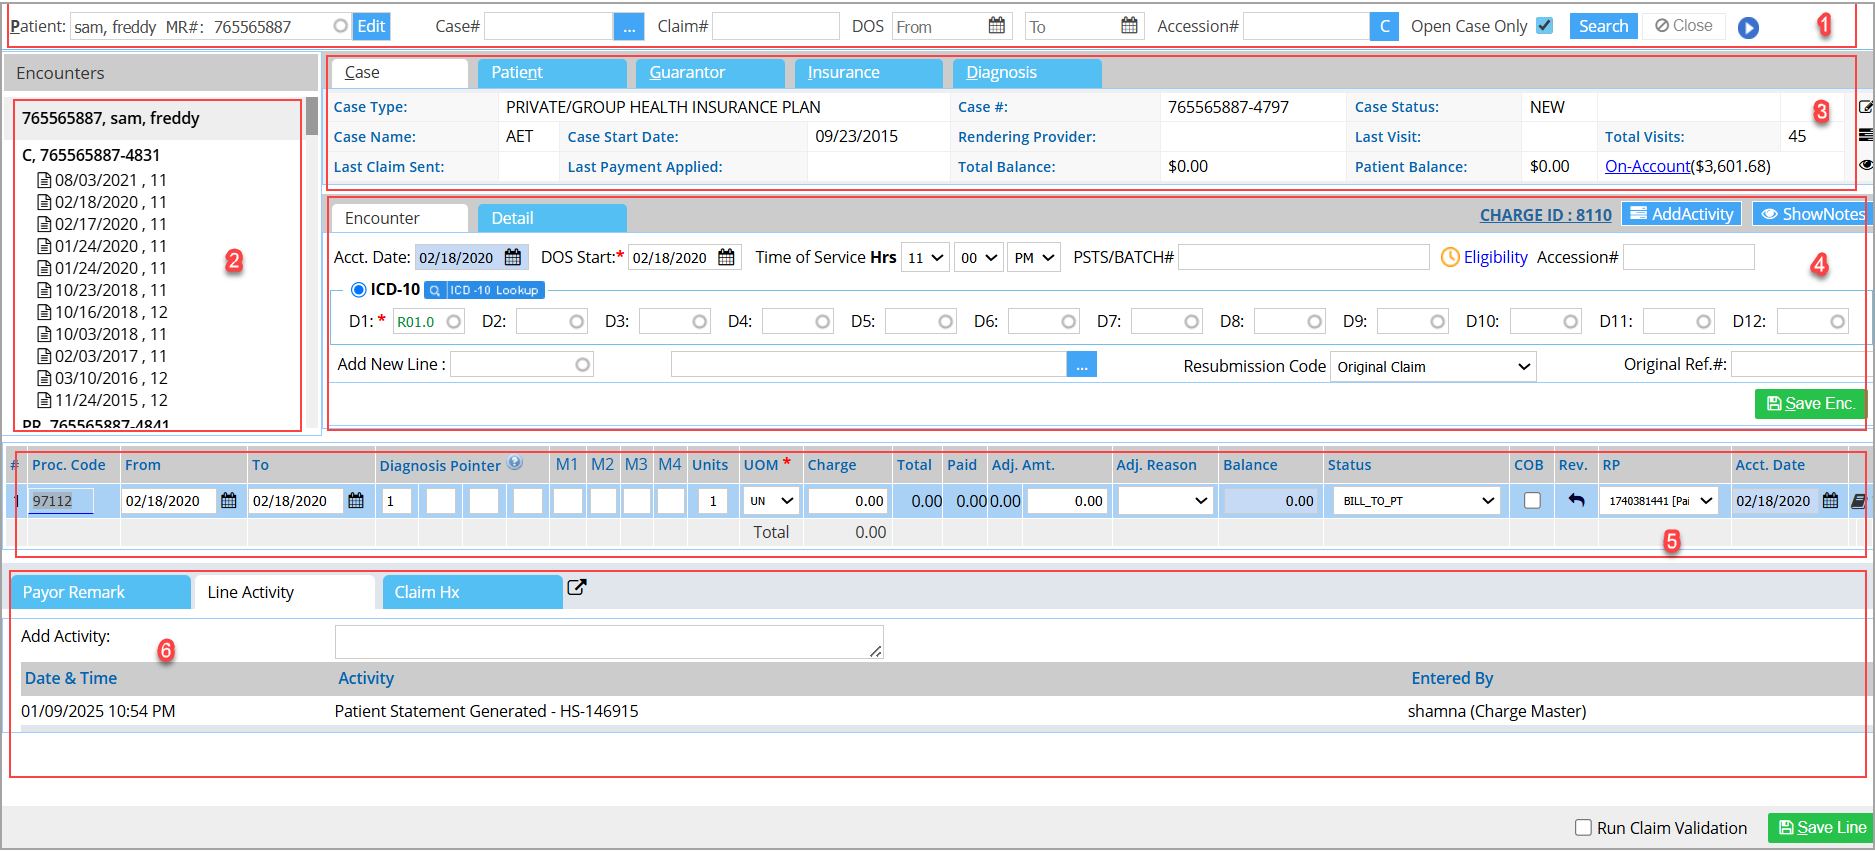
Section 1-Search Parameter Section
1a. Enter either the first three characters of the patient’s name or MR # in the Patient field. This is a smart search field. (To know more, click here.) To make changes to the patient demographic data, click on the Edit button beside the Patient field.
1b. Case#, Claim#, DOS, ACCESSION# are other search filters. The OPEN CASE ONLY check box is used to display only the open cases of the patient.
Section 2- Encounter List Section
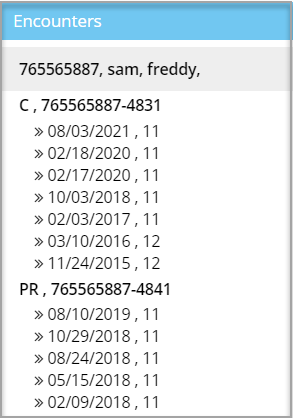
The first level shows the information of the patient retrieved through the search criteria. This level displays the MR# of the Patient, Patient Name and Date of Birth. On pointing the mouse over this level, this information is displayed as a tooltip.
The second level shows information of the cases related to the patient. This level displays the Case Type, Case number, and the Doctor’s Name. On pointing the mouse over this level, this information is displayed as a tooltip.
The third level shows information about the Encounter. This level displays the Date of Service and Place of Service (Code). On mouse hover, the procedure codes of the encounter are displayed (marked by an arrow in Image 1).
Section 3- Case, Patient, Guarantor, Insurance, and Diagnosis Details
3.a. Case tab (Image 3a) displays the case details like case#, Case name, Case Type, Start date, Last Claim Sent, Last Payment Applied, etc. Edit the selected case by clicking ![]() beside the case section. Click on
beside the case section. Click on ![]() to insert the case activity notes if required. To view any activity on a case, click on
to insert the case activity notes if required. To view any activity on a case, click on ![]() icon.
icon.

3.b. Patient tab (Image 3b) displays the patient demographic information like patient name, MR#, DOB, Phone number, Address, email, etc. This section also provides an Installment Plan option. The button helps to create an installment plan if the patient wishes to pay in installments. The Installment Details screen also displays all previous installments availed by the patient.

3.c. The Guarantor tab (Image 3c) displays details of the guarantor of the patient in the particular case selected. Relation to the patient, name, address, phone number, etc. are some of the fields in this tab.

3.d. Insurance tab (Image 3d) displays the primary, secondary, and tertiary insurances and the corresponding plans, balances, copay amounts, etc. of the selected case.

3.e. Diagnosis tab (Image 3e) displays the ICD codes included in the selected case. To add new ICD codes to the case, click on ![]() icon. When the case screen opens, select the Others tab and add the required codes in the fields D1, D2, etc. Up to 12 diagnosis codes can be inserted in a case.
icon. When the case screen opens, select the Others tab and add the required codes in the fields D1, D2, etc. Up to 12 diagnosis codes can be inserted in a case.

Section 4- The Encounter Tab
The encounter tab (shown in Image 4) has many purposes explained below.

4a. View/edit Encounter & Clinical information:
Encounter information such as DOS Start date, Acct. Date, Time of Service, etc., can be updated here. Click on Save Enc button to save the changes.
The Show notes icon can be used to track any changes made to the Accession # field. Accession # creation and update will be recorded here.
The eligibility check status of the encounter will be indicated as follows:
![]() (clock symbol) = Verification Pending
(clock symbol) = Verification Pending
X (red X) = Eligibility Check Failed/Errored
![]() (green check) = Successful and has Active Coverage
(green check) = Successful and has Active Coverage
Users can access the clinical note directly from the Charge Master screen. Icons similar to those present in the EHR screen ![]()
![]()
![]() depict the status of the chart; see Image 4a.
depict the status of the chart; see Image 4a.
4b. Add new encounters to the selected case-To add a new encounter to a case, click on the relevant case on the left pane. Add Date of Service Start, Time of Service, ICD-10 codes for the encounter. For all procedure codes to be entered, repeat the following: In the Add New Line field (see Image 4a), enter the required procedure codes and click on ![]() . All procedure codes will populate line-by-line in the encounter lines section. Enter the rest of the fields, such as Diagnosis, units, UOM, etc. and finally click
. All procedure codes will populate line-by-line in the encounter lines section. Enter the rest of the fields, such as Diagnosis, units, UOM, etc. and finally click ![]() button.
button.
4c. Add new procedure codes to an existing encounter- To add a procedure code to an encounter, select the encounter from the left pane. In the Add New Line field (see Image 4a), enter the required procedure code. Click on ![]() . The procedure code will populate on a new line in the encounter lines section. Enter the rest of the fields, such as Diagnosis, units, UOM, etc., and finally click
. The procedure code will populate on a new line in the encounter lines section. Enter the rest of the fields, such as Diagnosis, units, UOM, etc., and finally click ![]() button.
button.
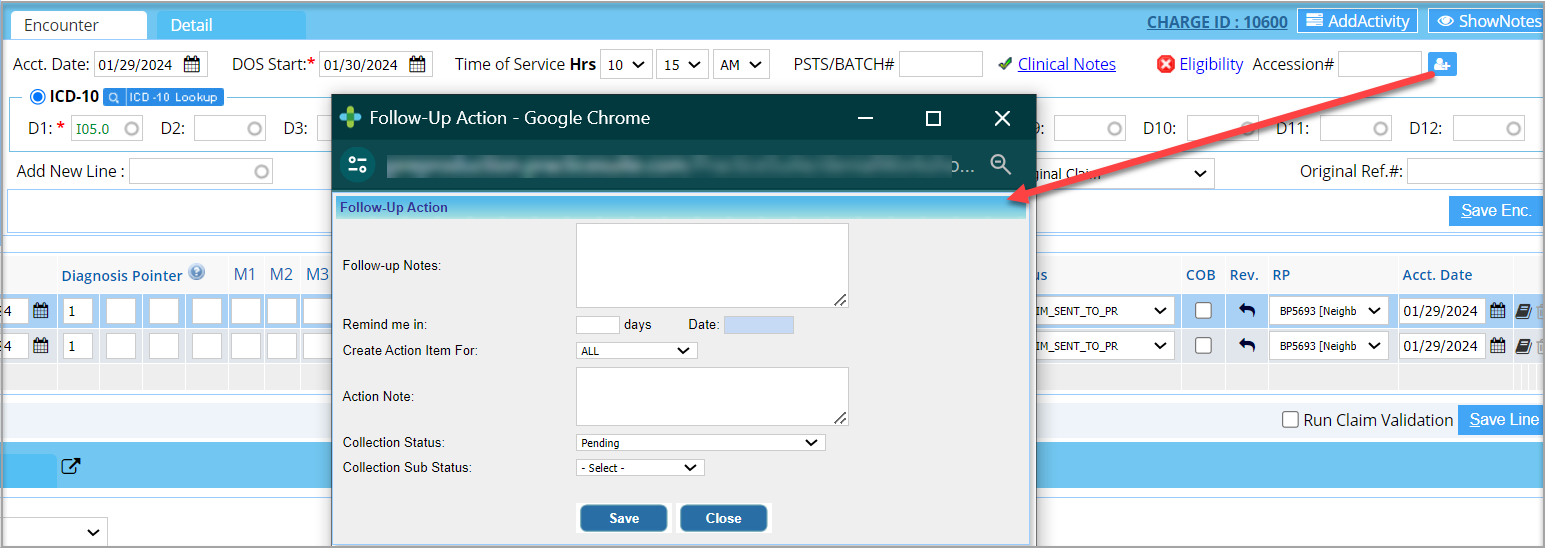
4d. Assign claims to users- A user icon is provided next to the Accession# field (see red arrow in Image 4a). Click on the icon to open the Follow-Up Action pop-up (see Image 4b) where the assignee can be selected and any additional notes can be added. The assigned claim will fall into the user’s worklist in Collection Manager.
4e. Detail tab contains Main, Condition, Accident, Ambulance, Others, which include fields populated from the Others tab of the case screen. Enter the Rendering Provider and update relevant fields as required. The Others tab also has a Do not Send Statement checkbox to exclude the encounter from sending patient statements.
Section 5- Encounter Lines
The section marked 5 in Image 1.2 displays the Encounter Lines corresponding to the procedure codes. Each line shows the procedure code, DOS Start and End date, diagnosis pointers, modifiers, units, Charge, Total amount, Amount paid, Adjustment amount, adjustment reason, balance, etc. (See Image 5). All the fields are editable except Total and Paid.
| Field | Description |
| Proc. Code | The procedure codes used in the encounter will be listed here. Click on the procedure code to edit it. |
| DOS | Provide the DOS range for the procedure code |
| D1, D2, D3, D4 | Enter the diagnosis code reference number(pointer). Use pointers in declining level of importance to service line. Acceptable values are 1 through 12. |
| M1, M2, M3, M4 | Select the modifiers for the procedure code. You can select up to four. |
| Units | Enter the number of units |
| UOM | Select the Unit of Measurement |
| Charge($) | The charge per unit will be displayed here. Expected Amount from the applicable fee schedule will be displayed as a tooltip on mouse-hover. |
| Total($) | The total amount for the procedure will be displayed here. |
| Paid | The amount received by the practice for the procedure to date |
| Adj. Amt. ($) | Adjustments, if any, will be displayed here |
| Adj. Reason | If any adjustment amount has been entered, a valid reason for the adjustment should be selected from the list provided. |
| Balance | The Remaining amount will be displayed here. (Total amount- paid amount) |
| Status | Click in this box to change the claim status, select an option from the list. |
| COB | Check the box if it is a COB claim |
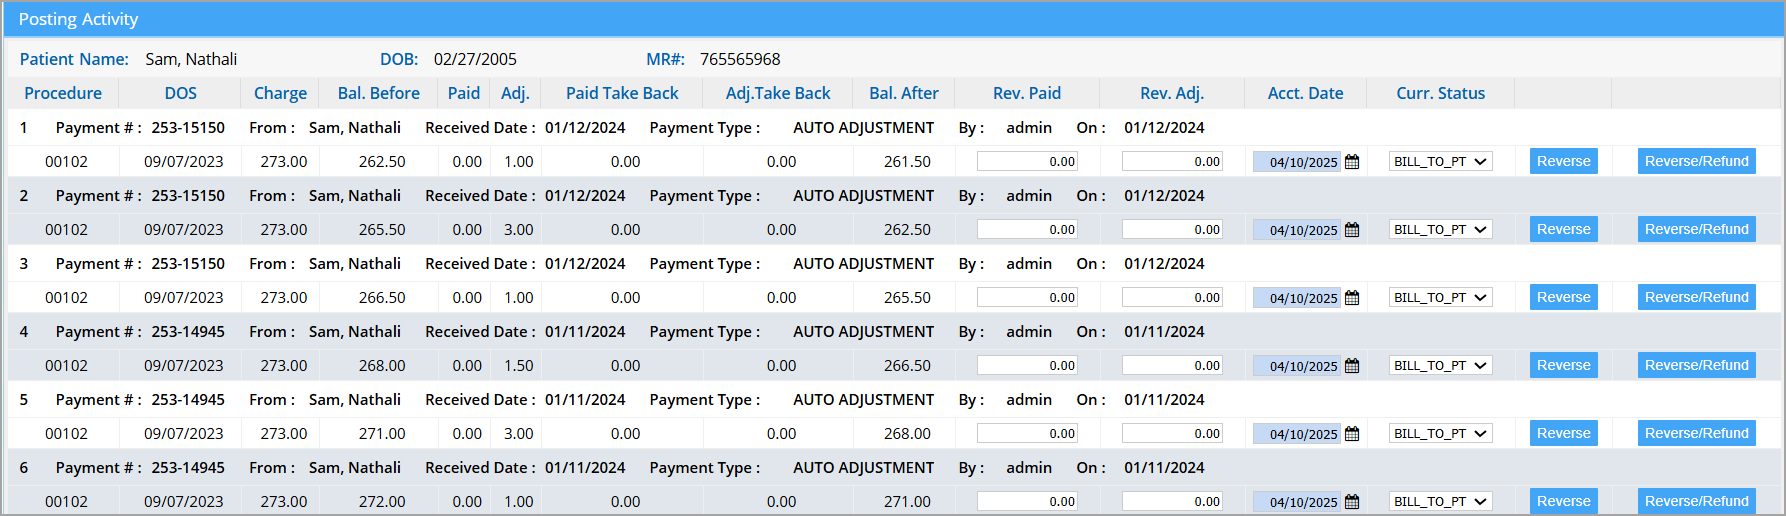
| Rev. |
This opens up the posting activity screen where users can reverse a payment posted on the line; see Image 5a |
| RP | Rendering Provider; You can change this by selecting another one from the drop-down |
| Acct. Date | Displays the accounting date for the line. |
| Insert line note here | |
| Use this to delete the line |
After making the necessary changes, click on ![]() button. As in the charge entry screen, superbill forms such as HCFA 1500, CMS 1500 can be printed, and the Claims Validation rule can be run while saving the encounter.
button. As in the charge entry screen, superbill forms such as HCFA 1500, CMS 1500 can be printed, and the Claims Validation rule can be run while saving the encounter.

To learn more about how to set the status of a line according to the billing workflow, click here.
Posting Activity for the Line
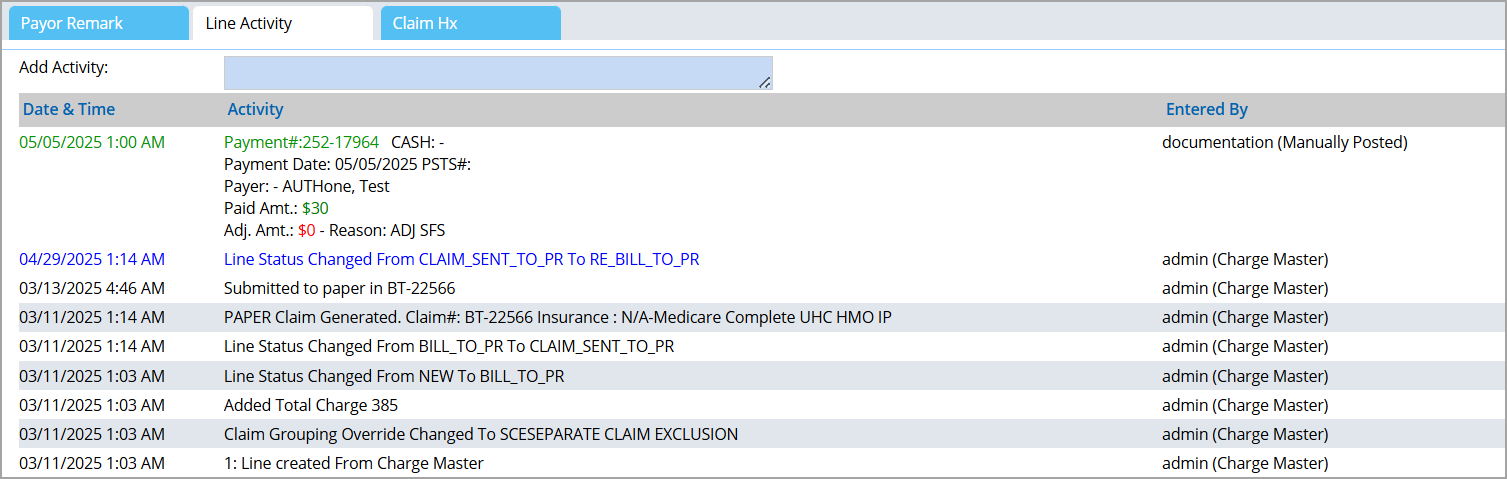
Section 6-Line Activity Log
1. All updates and payments of each encounter line are logged in the Line Activity tab for later reference. This log also displays the Collection status, sub-status, and follow-up notes from the collection manager. Any change made to the line sub-status will also be recorded as an encounter activity.
2. The payment postings in the system can be traced to a single activity in the Charge Master. This activity will show all the details of the posting. Additionally, users can view all adjudication codes present in an ERA line in the line activity in Charge Master, along with the corresponding amounts. The description of each code will appear as a tooltip on mouse hover.
3. Even if the ERA does not include the denied charge lines, the system can still capture the denial codes from the claim header after the posting and display them within the Line Activity screen.
4. The Date & Time and Activity in the Line Activity screen will be color-coded as in Image 6a. Furthermore, we can enter additional notes to the log through the Add Activity field.
5. When the refunds are posted, the source and target payment numbers and the amount are captured in the line activity.
6. Any update on Resubmission Code and Original Ref# fields will also be recorded by the system as an encounter activity.
Payer Remark
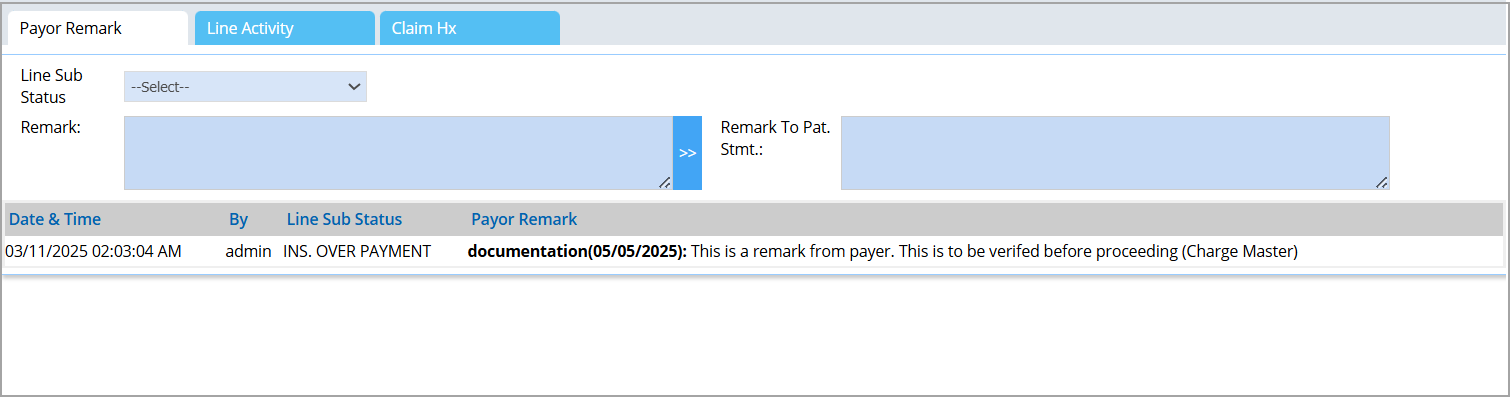
The Payer Remark tab (shown in Image 6b) displays the remarks entered from various screens. Also, the line Sub Status can be set from the Payer Remark. Click on the Line Sub Status drop-down to set the status. Any remarks on the sub status can be provided in the Remark field. For lines set to BILL_TO_PT status, any remarks to be included in the Patient Statement can be provided in the Remark To Pat. Stmt field.
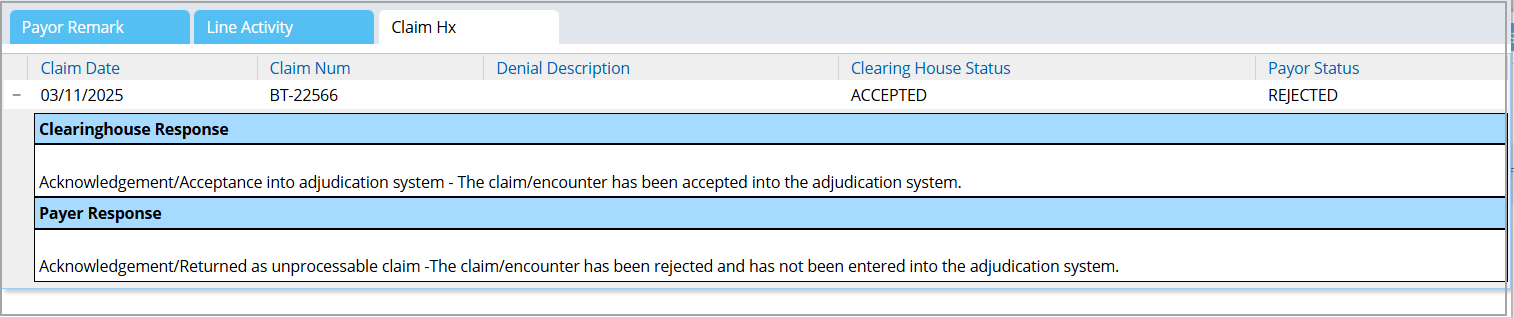
Claim History
The Claim History tab gives users a quick and convenient way to review past claim submissions and their clearinghouse/payer status. This tab replicates the functionality of the Claim Hx tab in the Collection Manager screen, encapsulating the claim submission history, clearinghouse communications, and payer status updates.