

PracticeSuite takes into consideration that each practice has its own way of Customer Relationship Management, MR number generation, and date and number formatting. Also, time zones, financial year, payment setups (especially for credit cards) can be different in different practices. Hence, PracticeSuite permits the configuration of various options independently for each practice. This enables users of different practices to log in to PracticeSuite and use the system according to the practice-specific configuration, thus making the software more user-friendly. These settings can be done/altered only by users with admin capability.
1. Select Setup from the main menu and then choose Practice. Select the required practice from the list of practices shown on the left. Now click on ![]() button on the top right part of the screen.
button on the top right part of the screen.
2. The Practice Options-General tab opens up, as in Image 1.
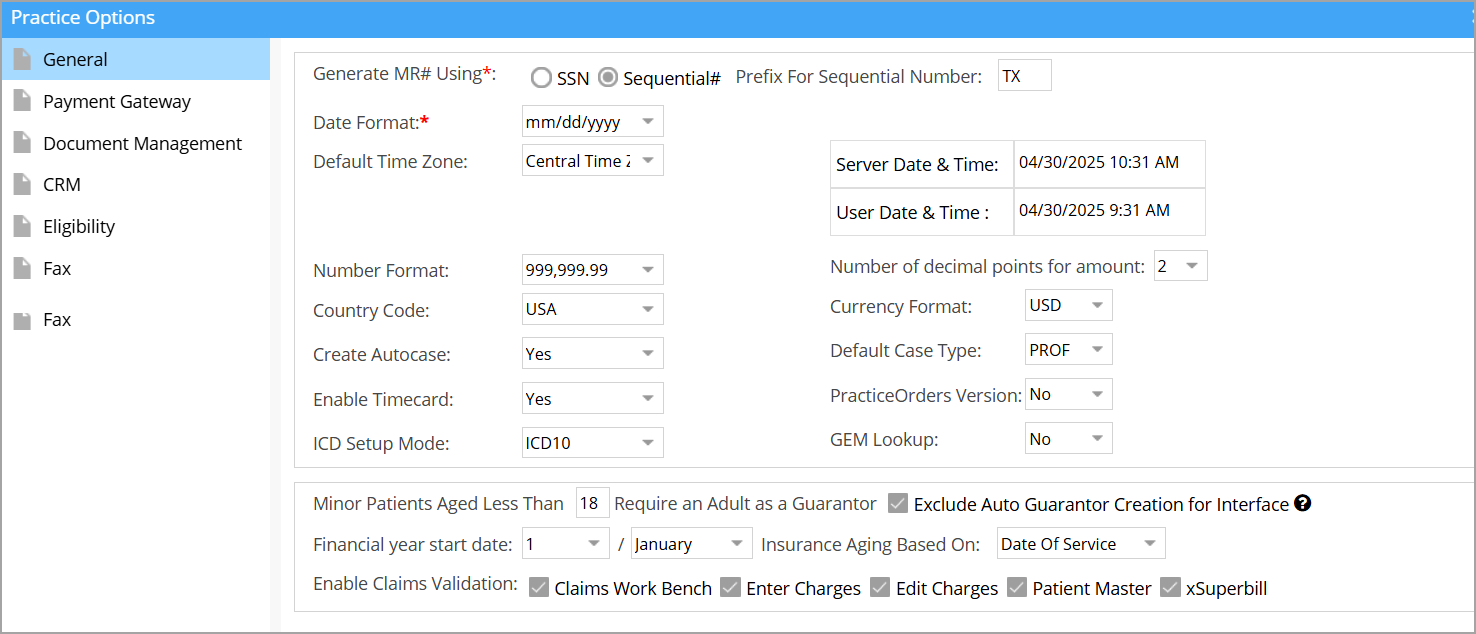
The following explains the various customization options available in the General tab of Practice Options page.
1. Generate MR# Using: This is used for generating the MR number of the particular practice. MR numbers can be generated in two ways: either using a patient’s SSN (Social Security number) or sequentially by selecting Sequential#. In the case of sequential generation, a prefix can also be attached, if preferred, which is a combination of 5 alphanumeric characters(A-Z, 0-9). No special characters are allowed as the prefix. If SSN is selected, the prefix field is disabled denoting that no prefix can be inserted.
2. Date format: Date format can either be set to mm/dd/yyyy (month/day/year) or dd/mm/yyyy (day/month/year).
This date format is reflected in every screen of the software where there is a date field, and the system mandates every manual entry of date field according to the format set here.
3. Default Time Zone: According to the geographical location of the practice, the appropriate time zone can be selected from the drop-down listing various US time zones. A table displaying Server Date & Time and User Date and Time is shown here to demonstrate the time difference between the server and the user for the selected time zone.
4. Number Format: Select the preferred number format from the drop-down of various number formats.
5. The number of Decimal points for Amount: This indicates the number of digits to be displayed after the decimal point in case of the amount. Select an appropriate number from the drop-down.
6. Country Code: Select the country of the practice.
7. Currency Format: Select the currency for the practice.
8. Create Autocase: This is a Yes/No option permitting the user to configure whether a case needs to be automatically created whenever insurance is added for a patient.
9. Default Case Type: This is used for setting the default case type. Select the type of case from the drop-down (professional/Institutional).
10. Enable Timecard: If Enable Time Card is set to Yes, the system will non-intrusively record the check-in time of every user. If set to No, the system will not record the time.
11. ICD Setup Mode: This drop-down is used to choose the standard for ICD code entry during charge entry and wherever applicable. If ICD 9 is selected, only ICD 9 codes would be allowed in the Diagnosis field during charge entry. For ICD 10, ICD 10 codes alone would be allowed to enter in the Diagnosis field. Dual-mode implies that both ICD 9 and ICD 10 would be allowed to enter.
12. GEM lookup: PracticeSuite provides GEM lookup link to help the user in finding the correct ICD code wherever ICD codes are to be entered. This is a page listing all the ICD 9 codes and the corresponding codes in ICD 10. This would be useful for providers who are familiar only with ICD 9. This enables a smooth transition for providers from ICD 9 to ICD 10.
13a. Minor patients aged Less Than: This field is used for entering the maximum age up to which a patient is considered minor according to the practice. A minor patient requires a guarantor.
13b. Exclude Guarantor Creation for Interface: This setting provides additional flexibility in managing patient records imported. Users can control whether the guarantor needs to be added via the interface or prevented.
14. Financial Year Start Date: Here the start date of the financial year for the particular practice can be configured.
15. Insurance Aging based on: Insurance aging will be based on either of the option selected from the drop-down: Date of Service or Last Claim date.
16. Enable Claims Validation: Checkboxes are provided for each of the pages Claims Workbench, Enter Charges, Edit Charges (applicable to both Charge Master & UB04 Charge Entry Screens), Patient Master and xSuperbill. The selection of the checkbox corresponding to a page would mean that the Claim validation option would be available on the specific page. Thereupon, the validation rule runs on the page if the user selects the checkbox for Run Validation, and a warning message is displayed for claims that are not valid, specifying the reason for their invalidity. Deselect the pages where the validation rule does not need to be applied.