How to Make a Payment Entry from the Manual Posting Screen
Payments are primarily processed through the Payment Master. However, the Manual Posting screen also allows users to enter payments directly. This enables both creation and posting of payments within a single interface. The following article outlines the procedure for entering payments via the posting screen.
1. Select Payments from the main menu and click on Manual Posting.
2. The top section of the manual posting screen is the Payment section. Click the New button beside the Payment (highlighted in Image 1) to create a new payment.
3. A few fields, such as Legal Entity, Acct. Date, Entry Date, and Method, automatically populate.

Important fields in the Payment Section
| Field | Description |
| Legal Entity | Legal Entity of the User |
| Provider | Defaults to ALL |
| Status | Default value is NEW |
| Acct. Date | Payment Accounting date; Defaults to current date |
| Entry Date | Payment Entry date; Defaults to current date |
| Pmt date | The date that you actually received the payment. |
| Pmt Type | Options are Co-Pay, Deductible, Co-insurance, Claim, self-pay |
| Payer | Select payer Type from dropdown; Patient/ Guarantor/ Insurance/Attorney/others |
| Name | Type in the first three letters of the payer name and select from the list that appears |
| Method | Defaults to Cash; Other Options are check, credit card, and EFT Pay. |
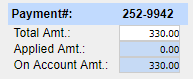
| Total Amt | Total amount in the payment; the payment# generated will be displayed on top of the Total Amount field. |
4. Fill up the required fields. When the cursor is moved outside the payment section, Payment # is generated and displayed in the payment# field, highlighted in Image 1. A sample payment# generated is shown in Image 2.