Provider Master
Features
1. To access Provider Master, go to the Setup module from the main menu and click on Provider.
2. To add new providers, you need to contact our sales team or support team.
3. Existing providers are listed on the left pane. Click on any provider on the left pane to edit it.
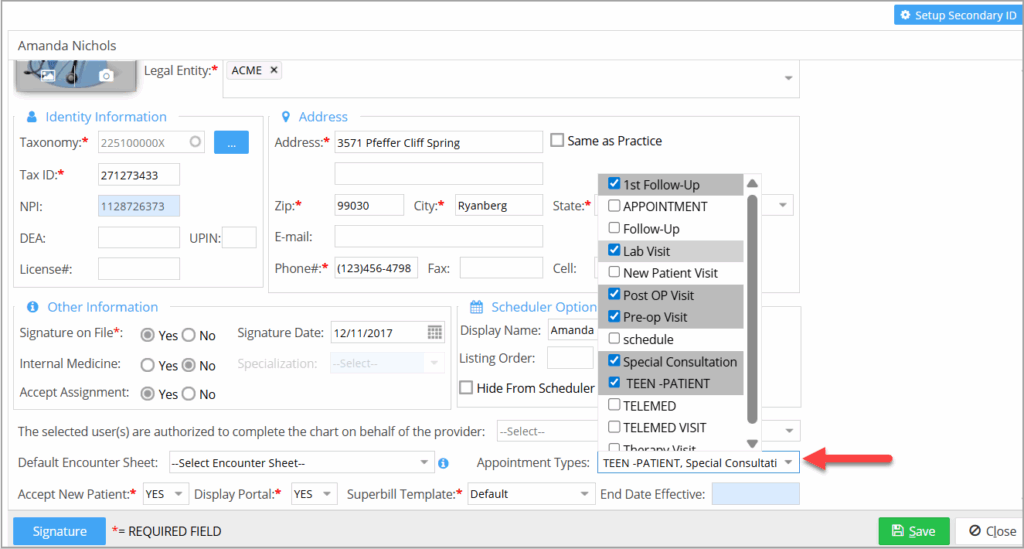
4. A multi-select Appointment Types dropdown has been recently added to the Provider Master screen. Users can assign one or more appointment types to each provider.
- When appointment types are set up for a provider, only those specific types will appear in the Scheduler for that provider.
- If no appointment types are configured, the Scheduler will default to showing all available appointment types.
5. Currently, the max length for the provider’s last name, first name, and middle name in the Provider Master is set to 60, 35, and 30 characters, respectively.
6. Taxonomy, tax ID, NPI, DEA, and license # can be entered in the Identity Information section. For security reasons, only admins are permitted to edit the NPI/DEA license number.
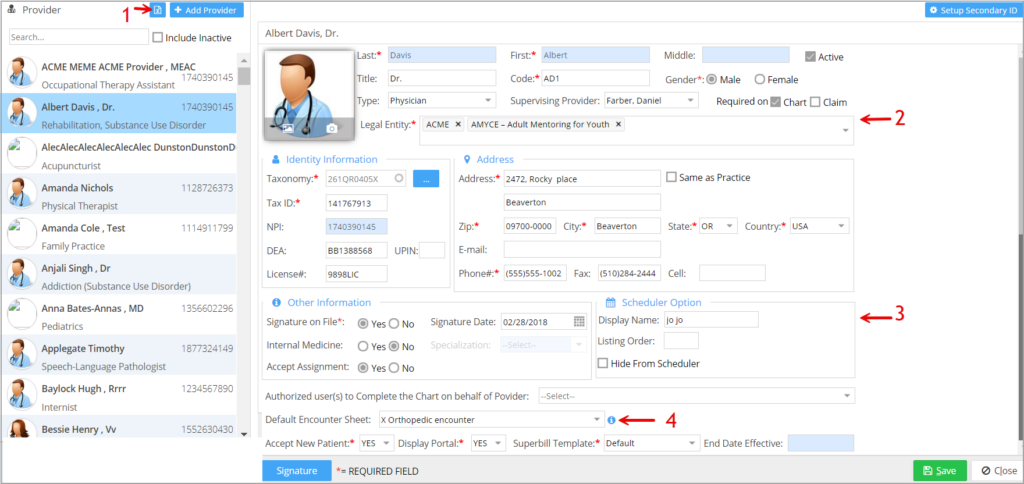
7. The Legal Entity drop-down is a multi-select drop-down field; select the legal entity/entities that are to be assigned to the selected provider from this drop-down; see highlighted portion 2 in Image A.
8. Providers are listed in alphabetical order on the scheduler page. To change the provider display sequence, enter the Listing Order number in the Scheduler Option section (see highlighted portion 3 in Image A). For example, if you want this provider to be listed in the second column on the Appointment Scheduler, type 2 in this box and click on Save. If two or more providers are assigned the same ordering number, they are listed in alphabetical order. Click on the Hide From Scheduler checkbox to hide the provider from showing up in the scheduler.
9. If a specific encounter sheet is to default for this provider while charting, select one from the Default Encounter Sheet drop-down.
10. The Export to Excel option is provided in the Provider Master screen (see highlighted portion 1 in Image A). The Excel file contains the provider details and info on the Start Date Effective, End Date Effective, Created User, Creation Date, Modified By, and Modification Date.


