eFax
The electronic fax feature in PracticeSuite, implemented in association with Telnyx, would enable customers to send and receive electronic fax messages. eFax encompasses numerous features.
eFax Features
1. Multiple fax numbers can be set up for a single account, and users can switch between the subscribed fax numbers if needed.
2. Covering Letter: Covering letters can be included in the fax. Custom cover letters can be created from the letter master. Clients can use the system tags provided to populate the information in the letter. Set the group Code for the letter as FAX_COVER_LETTER so that it becomes available in the Covering Letter drop-down
3. Fax Document against a Patient: The incoming fax document can be mapped to a patient with ease. The document would then be saved in the patient’s document manager section and retrievable for future use.
4. Send Fax to Referring Provider: The user can search for the referring provider name in the fax compose window and easily send the document to them with a single click.
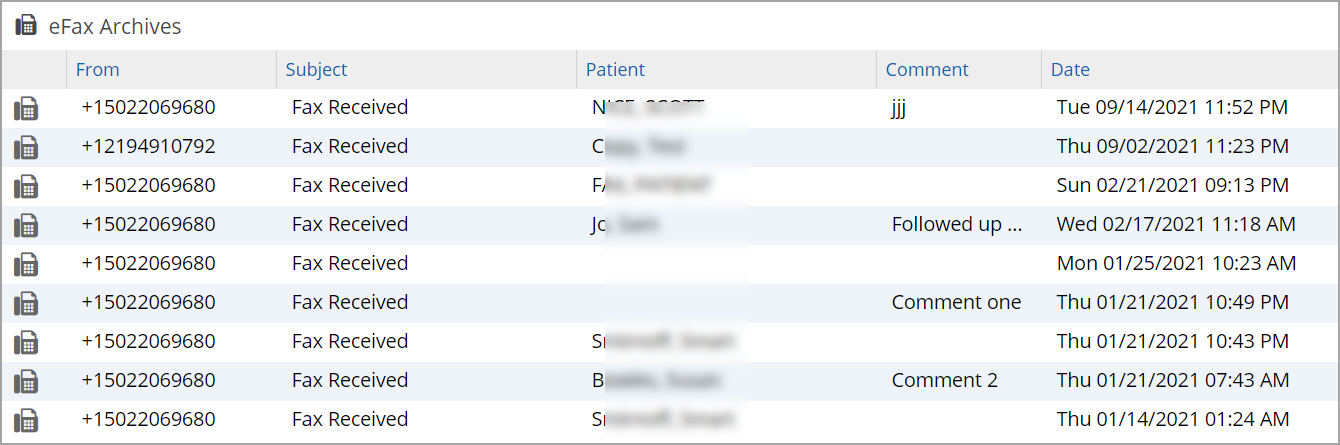
5. Archive Functionality: The user can archive old or unimportant faxes in an archive folder.
6. Fax EHR Docs: The user can send EHR-related documents (Visit HX, CPOE, letters, etc.) over eFax.
7. Comments: The user can add any number of comments against each fax. This will help different users in the specific account identify each fax and work on it.
8. Clients can port their existing Fax number – Clients can use their existing fax number to send the fax by porting the number to Telnyx.
9. Fax Report: PracticeSuite also provides a report to view outgoing and incoming fax details.
10. Mark as Read option: The user can mark a fax message as read after working on it.
11. Resend Option: PracticeSuite provides you with the facility to resend failed efax Messages (see section Fax Sent Box below).
12. Easy and Convenient: To send a fax from PracticeSuite, only the fax number and the attachment are mandatory.
13. Faxes can be assigned to users: Users can view the fax assigned to them in the ‘My faxes’ folder.
14. Users can delete faxes, and the deleted items are moved to the ‘Trash’ folder. The activity (user, date of deletion, etc.) is logged in the eFax audit log.
15. The eFax screen is equipped with an auto-refresh feature. The screen refreshes itself on every update, and the user need not manually refresh the screen for every change.
eFax Setup
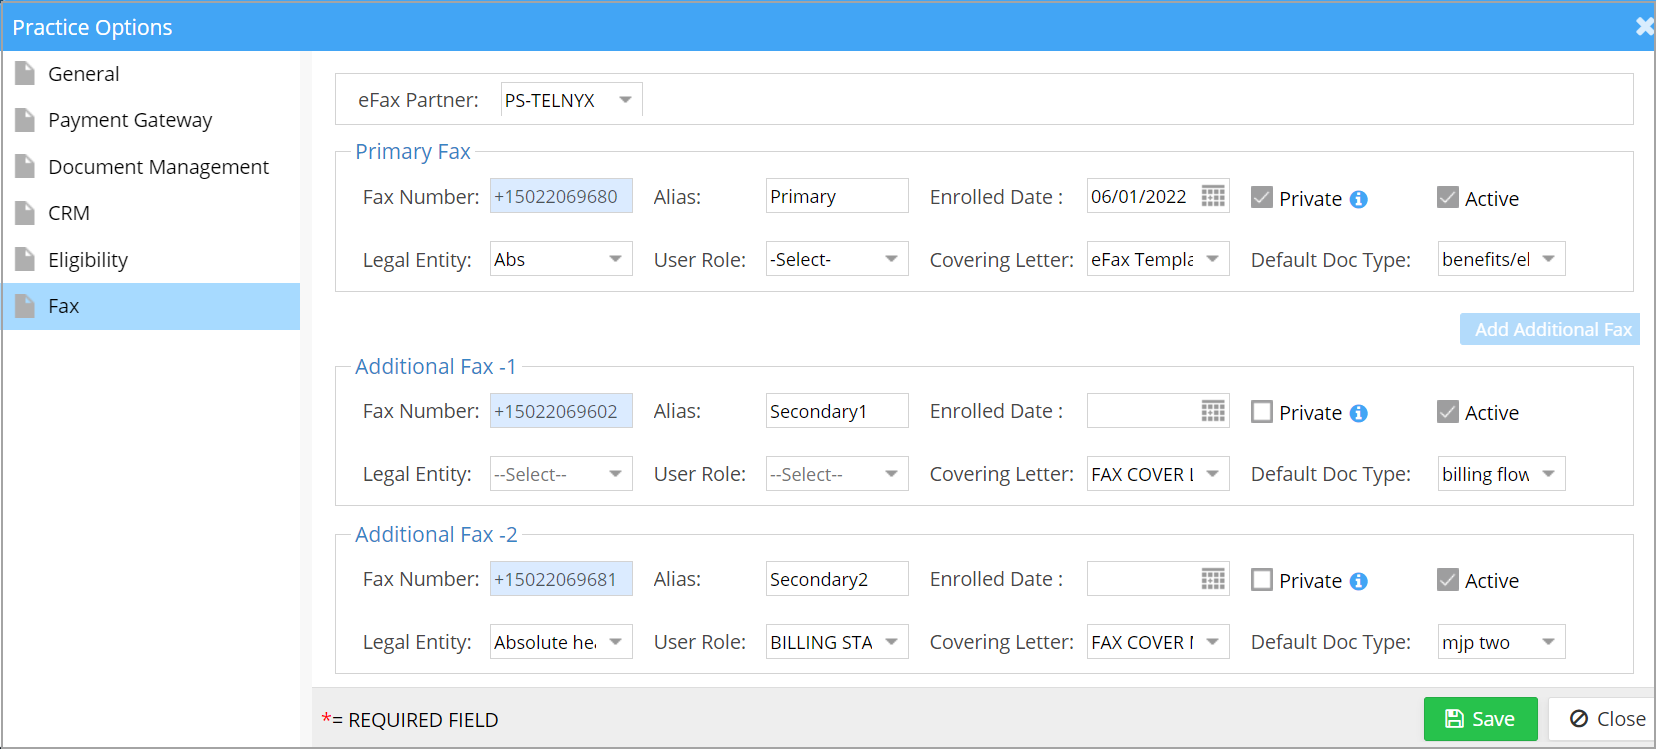
1. The primary fax and the secondary faxing numbers can be configured under Practice->Practice Options->Fax (see Image 1).
2. The table explains each setup component in detail. These values get defaulted while composing Fax.
*Note: Practices have to contact our Implementations team for setting up primary/additional fax. Once configured, users can edit all fields except the Fax number field.
Fax Setup Fields
| Setup Component | Description |
| Fax Number | This will be used as the sender number. |
| Alias | Provide an alias name for the sender’s fax number |
| Enrolled Date | Include the date when the practice gets enrolled for eFax |
| Covering letter | Select an appropriate template from the drop-down. You can even create custom covering letters from the Letter Master using system tags. It is to be noted that the group code should be FAX_COVER_LETTER. |
| Default Doc Type | Select the document type from the list; this will be the default value in the Compose Window and Document Manager. |
| Private | Check this box if the fax is private for the given LE and user role and is not to be shared |
| Active | Click on it to remove the fax from the system |
| If the fax entry information is not yet saved in the system, use this icon to remove it. |
eFax Inbox

1. The eFax window can be opened by clicking on the message icon ![]() on the top-right part of the home screen. This will open the inter-office messages screen. Click on eFax on the left pane to open the eFax Inbox.
on the top-right part of the home screen. This will open the inter-office messages screen. Click on eFax on the left pane to open the eFax Inbox.
2. The fax messages in the Inbox are organized based on the received time. Other information provided in the Inbox listing is: From, Subject, Patient, Comments, Date (and Time). Any text added in the Comments field will show up here.
3. The following manipulations can be done to a received fax message:
a. View the fax message
b. View the document attached
c. Map a patient
d. Mark as read
e. Archive the fax message
f. Add a comment
g. Assign a fax to another user.
h. Rename the document
4. The user can use the Pagination feature to navigate to old Fax messages.
View a Fax message
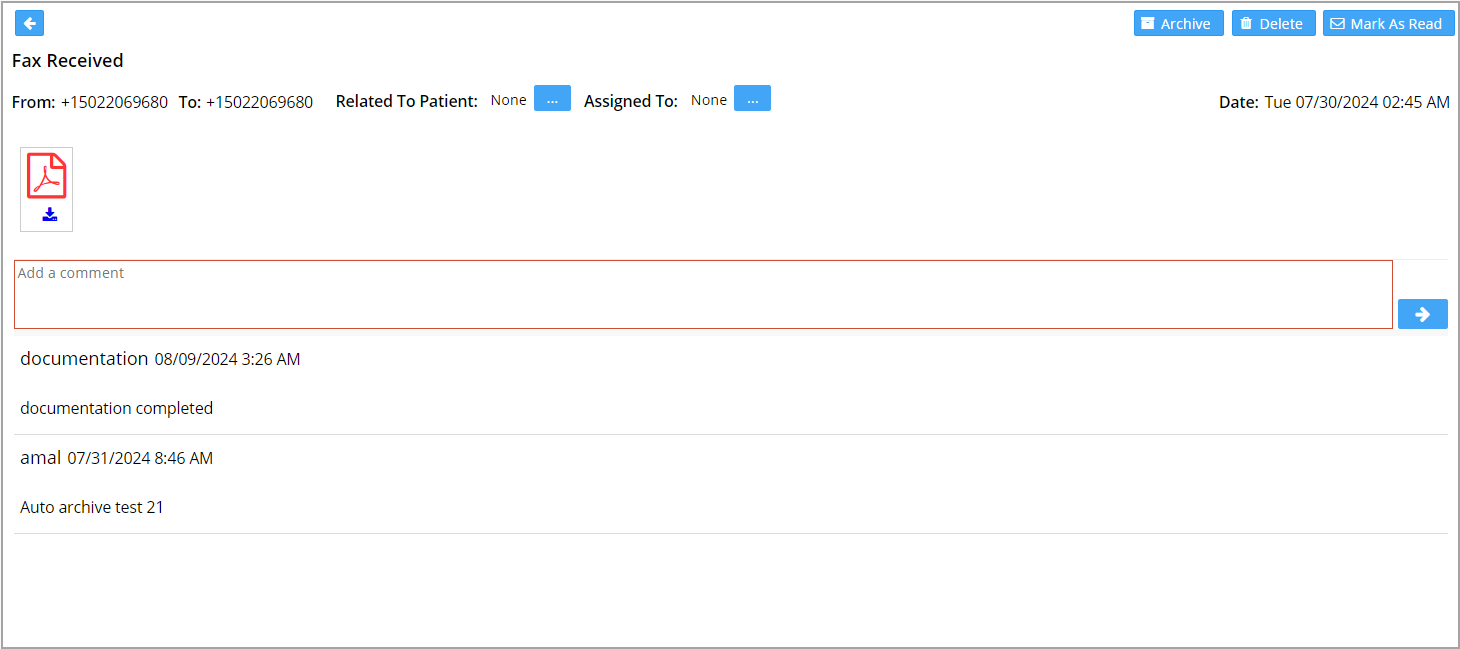
To view a fax message received, click on the fax message from Inbox; a window opens as in Image 3.
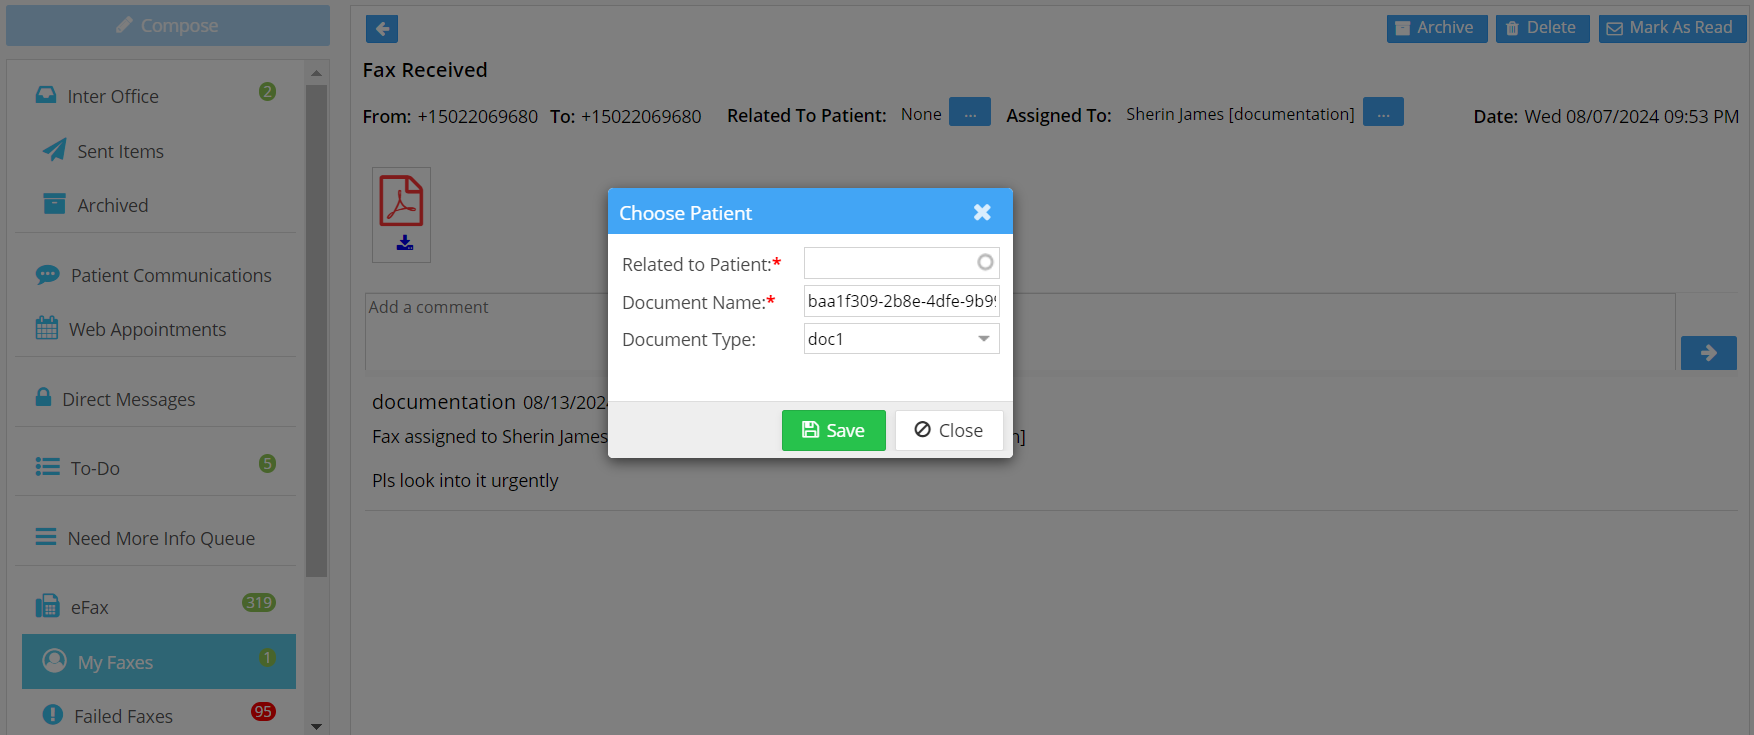
Patient Mapping
When a patient needs to be mapped or the mapped patient needs to be changed, the user can use the ‘Choose’ button. This will open a pop-up window, as in Image 4. ‘Related to Patient’ is the field where a patient can be searched and selected.
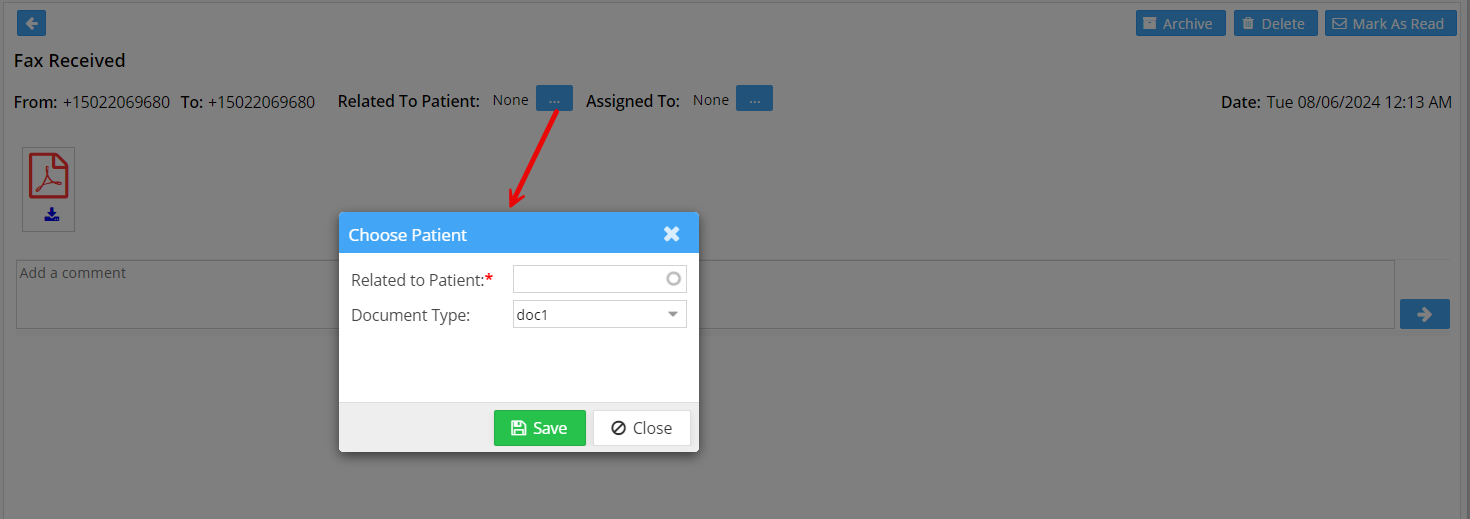
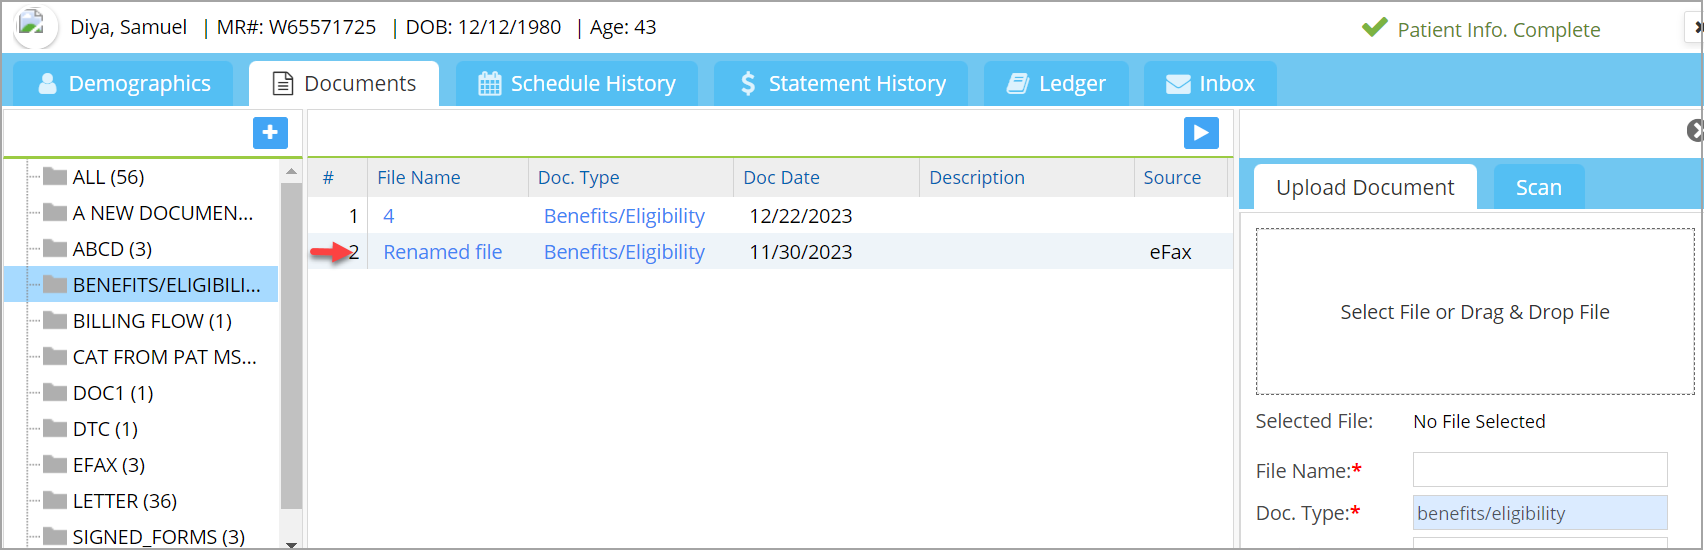
Once the fax is associated with a patient, the fax document will be shown under the selected category in the patient’s document manager with the new name and doc type see Image 5.
Assigning Fax to Another User
From the fax message screen in Image 3, click on ![]() beside the ‘Assign To’ to open the “Assigned To” pop-up.
beside the ‘Assign To’ to open the “Assigned To” pop-up.
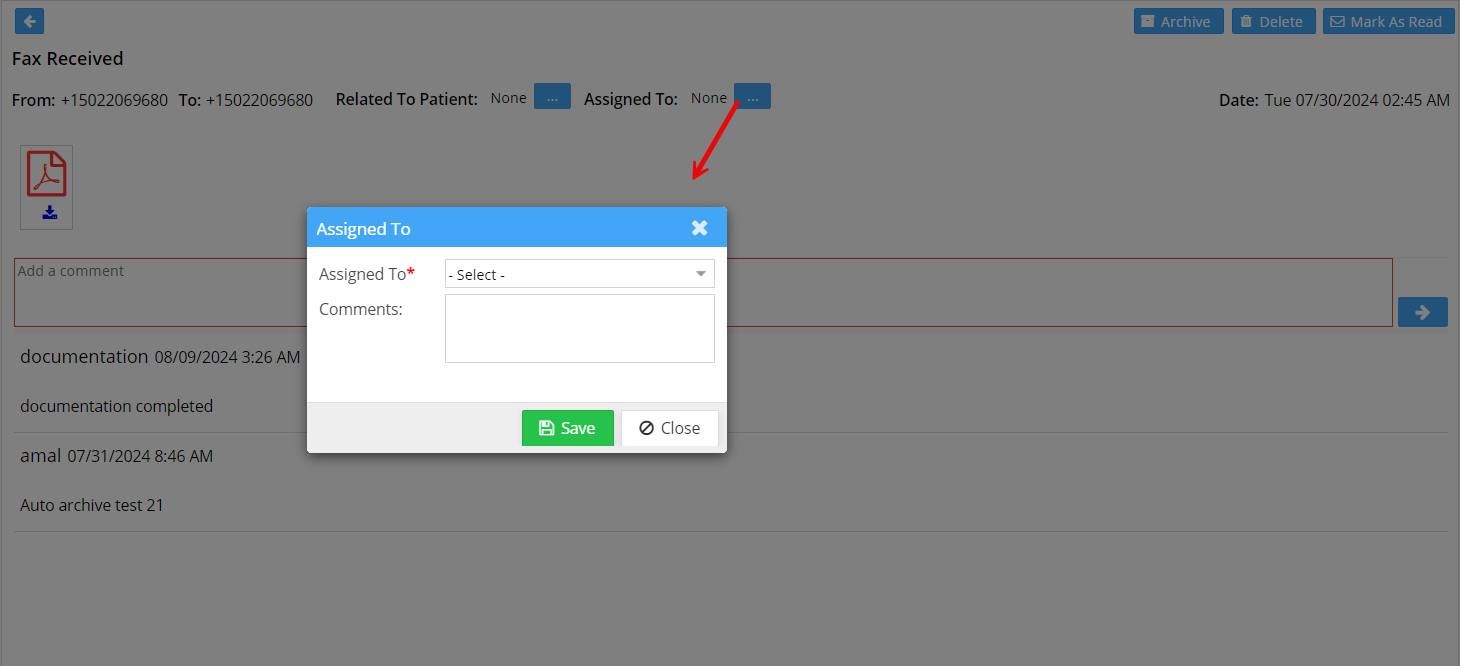
Select a user from the “Assigned To” drop-down (see Image 6), enter comments if needed, and hit “Save” to complete the user assignment. A confirmation message will appear on the screen: “Fax User Updated Successfully.”
My Faxes
All faxes assigned to a user will show up in the user’s My Faxes folder. The unread fax count is displayed as an orange-colored bubble. Additionally, a task gets assigned to the user in the ‘To Do’. From My Faxes folder, users can rename a document as well; see Image 6a.
Composing a Fax Message
To create a new Fax message, click on the eFax icon and click on compose button ![]()
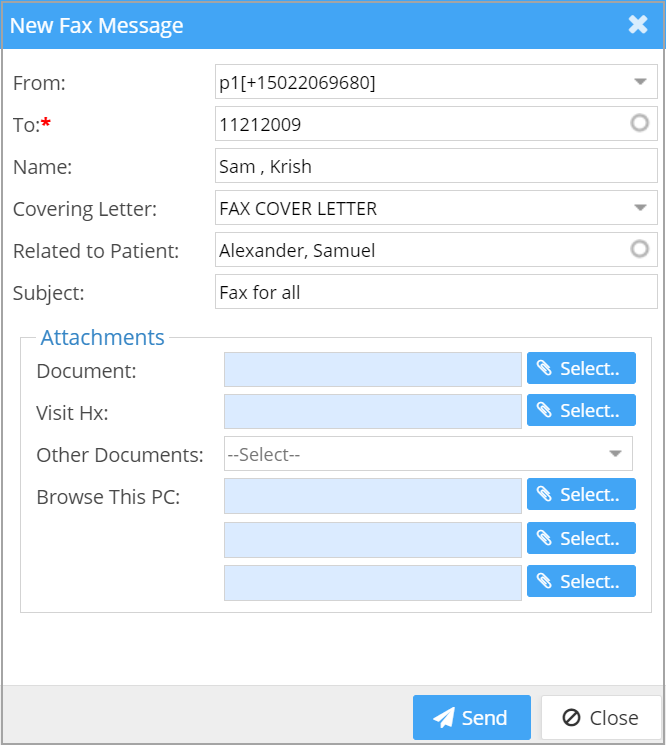
Fields in the Compose Screen
| Field | Description |
| From | If the user’s role has a fax number set up in the Practice Options page, this will show up here. Otherwise, click on the drop-down to list all the primary and secondary fax numbers set up in the account and select one. |
| To | Enter the fax number or referring provider name. If the selected ref provider has a fax number associated, the number will be populated into this field. |
| Name | Once the user selects a ref provider, the corresponding provider name will appear in the Name field. Users can also type a name into the field. |
| Covering Letter | Covering letters (template) can be added from the Letter Master screen and selected from the drop-down. |
| Related To Patient | Associate to a patient by searching with Name or MR#. |
| Subject | The subject of the fax message is entered here. |
| Attachments | |
| Document | Grayed-out by default, however, this becomes editable on selecting a patient in ‘Related to Patient’ field. This option allows the users to select the patient’s documents uploaded in Document Manager. Any number of files can be attached but the total file size should not exceed 50 MB. |
| Visit Hx | Grayed-out by default, however, this field becomes editable on selecting a patient in ‘Related to Patient’ field. This option allows the users to select a visit note from EHR. Any number of files can be attached but the total file size should not exceed 50 MB. |
| Other Documents | a. Demographic sheet—to directly attach the patient’s demographic sheet to the fax message. b. Clinical Summary- to attach the clinical summary PDF to the fax. |
| Browse This PC | Used to browse and select files in the user’s computer. Max of three additional files can be selected. |
Supported File Types: IMAGE/JPG/JPEG/PNG/GIF, HTML, TXT, PPT, PPTX, XLS, XLSX, PDF (DOC/DOCX types are currently not supported).
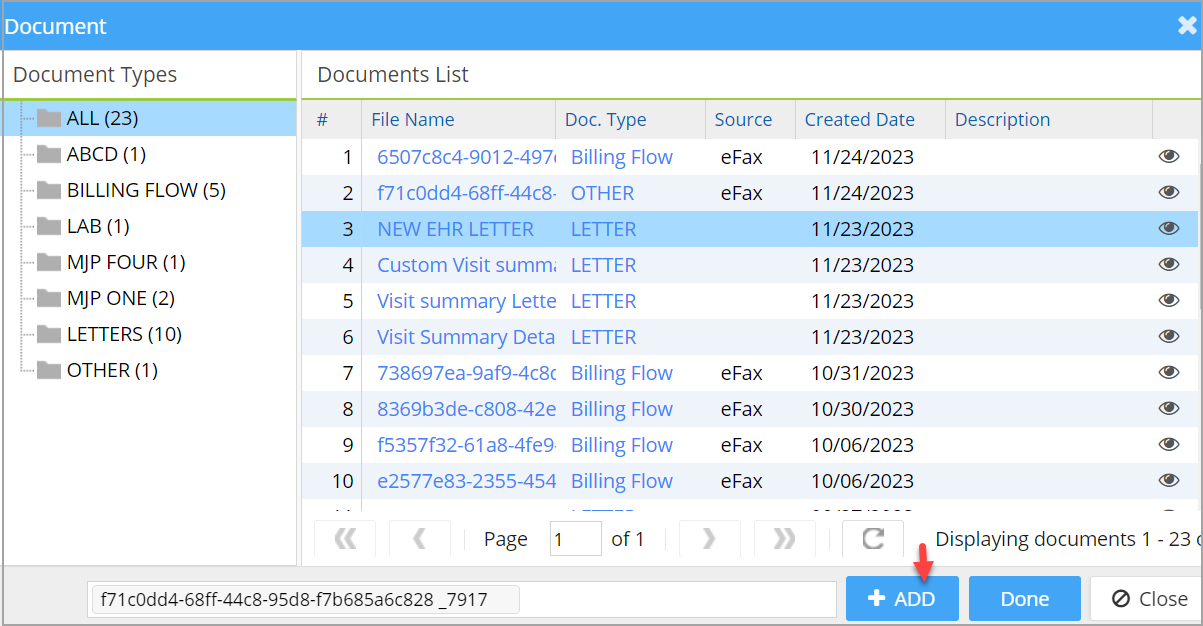
Attaching Documents from the Patient’s Doc. Manager
Multiple patient documents can be attached to the fax message (max. 50 MB in one submission). To attach files, click on the ![]() beside Document in the attachment section to bring up the patient’s document manager screen. Once the required files are selected, click on the + Add option and thereafter hit the option Done to attach the files to the fax message.
beside Document in the attachment section to bring up the patient’s document manager screen. Once the required files are selected, click on the + Add option and thereafter hit the option Done to attach the files to the fax message.
Faxing Copy of Lab Result
Users can fax the actual copy of the lab results they receive in the Lab Hub. When results arrive in the Lab Hub and are processed in the system, a PDF copy sent from the lab is automatically saved in the Doc Manager under the document type LAB RESULTS. If such a document type does not exist, a new one will be created. Users can also fax these documents from here. The file name will be in the following format:
<Lab_Name> Lab <Test Date(mm-dd-yyyy)>.pdf
Fax Statuses
An eFax message can be in any one of the statuses shown in Table 1.
| eFax Status | Description |
| Initiated | This is the initial status of a message |
| Queued | This is an interim status when the user clicks Send and the message is waiting to be sent. |
| Failed | This status appears when the message fails to get sent. |
| Requeued | If the user clicks on Resend, the message shows up with a requeued status. |
| Delivered | This status shows up when the message gets successfully delivered. |
Table 1
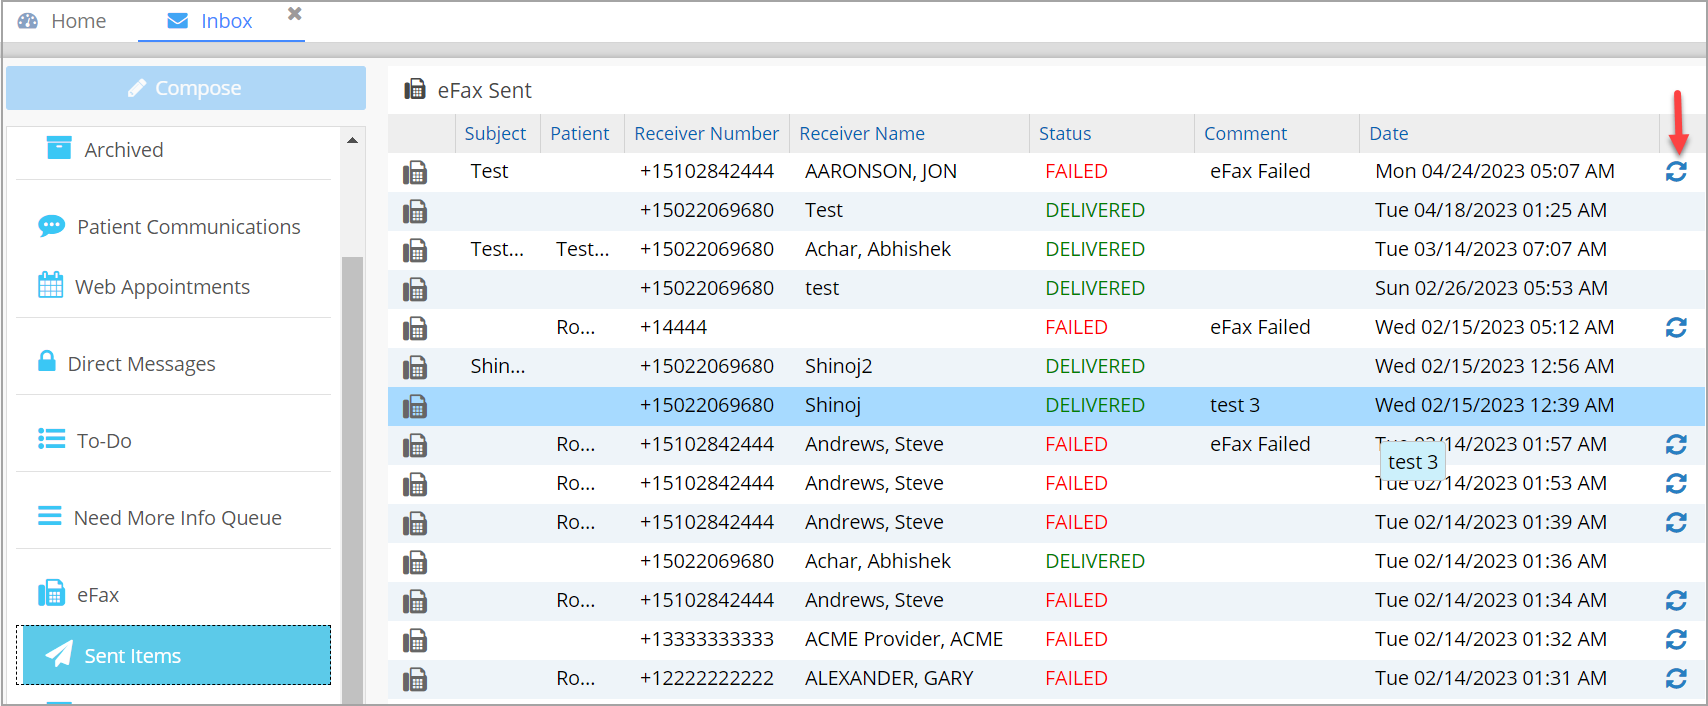
Fax Sent Box
Users can view the list of sent fax messages in the Sent box. 1. The Sent items listing has the following info: Subject, Patient Name, Receiver number, Receiver name, Status (Queued/Delivered/Failed), Comment, and Date. 2. For failed messages, users have the option to Resend the message; Click on the ![]() icon on the far right (highlighted in Image 8). 3. If the user opens the fax from the Sent box they will have all the options in the Inbox except the Archive and Mark as Read options.
icon on the far right (highlighted in Image 8). 3. If the user opens the fax from the Sent box they will have all the options in the Inbox except the Archive and Mark as Read options.
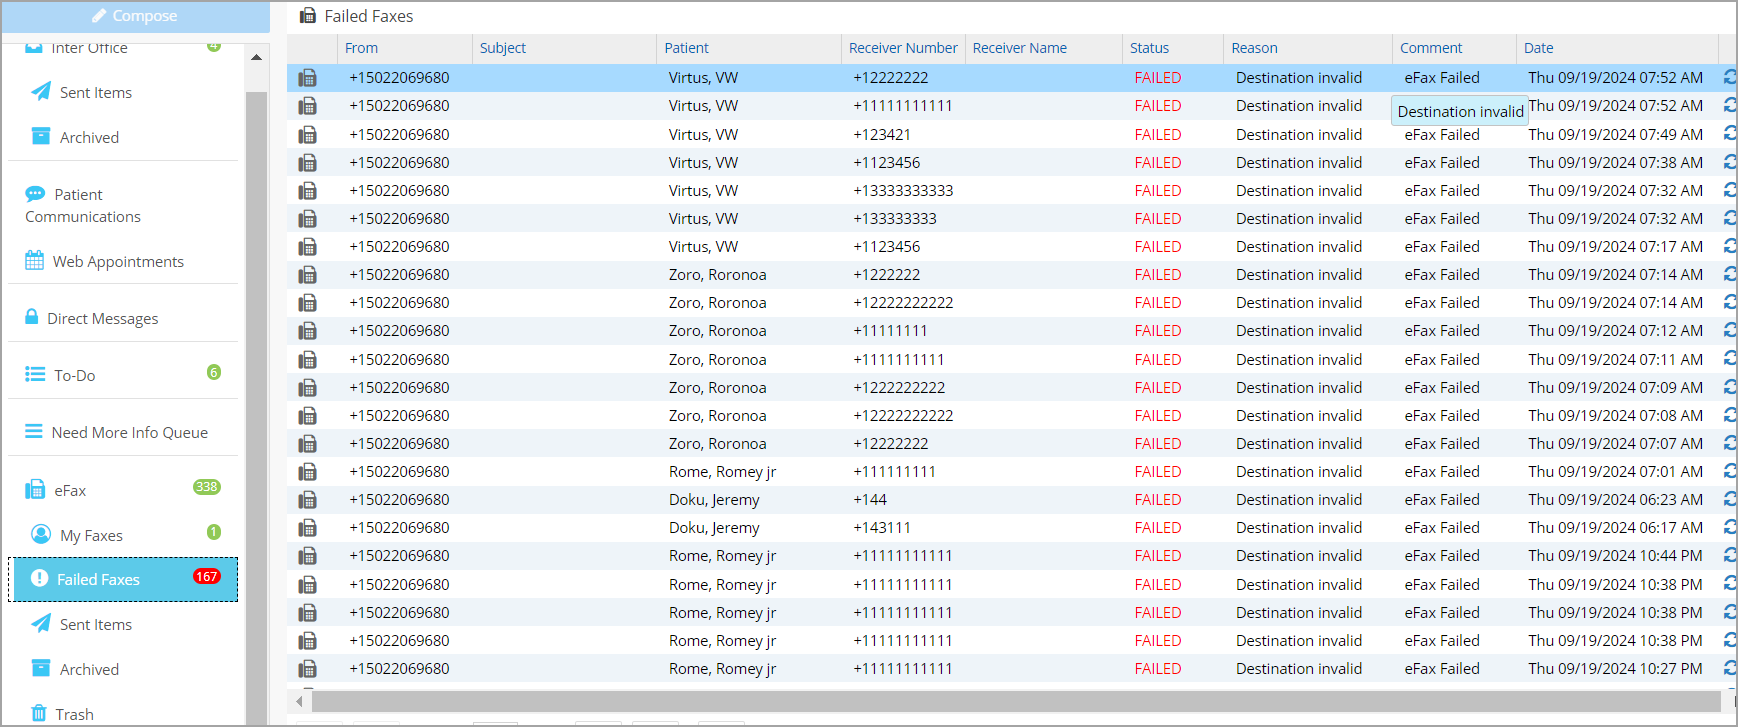
Failed Faxes
The eFax module includes a Failed Fax bucket to list all failed faxes. The total count of failed faxes will also be displayed in red next to the folder name. All failed faxes automatically move to this new bucket. Users can also conveniently resend failed faxes from this location. The exact reason for delivery failure will be shown under the ‘Reason’ header.
Trash
This folder holds the deleted fax messages.
Fax Transaction Report
E11. Fax Transaction Report provides details on all fax transactions done in the system. See Image 10 for a sample report. Fax Date and status (Queued/Delivered/Failed) are the search filters along with an option to choose between Inbound and Outbound. Click here to learn more about E11 report.

eFax in EHR
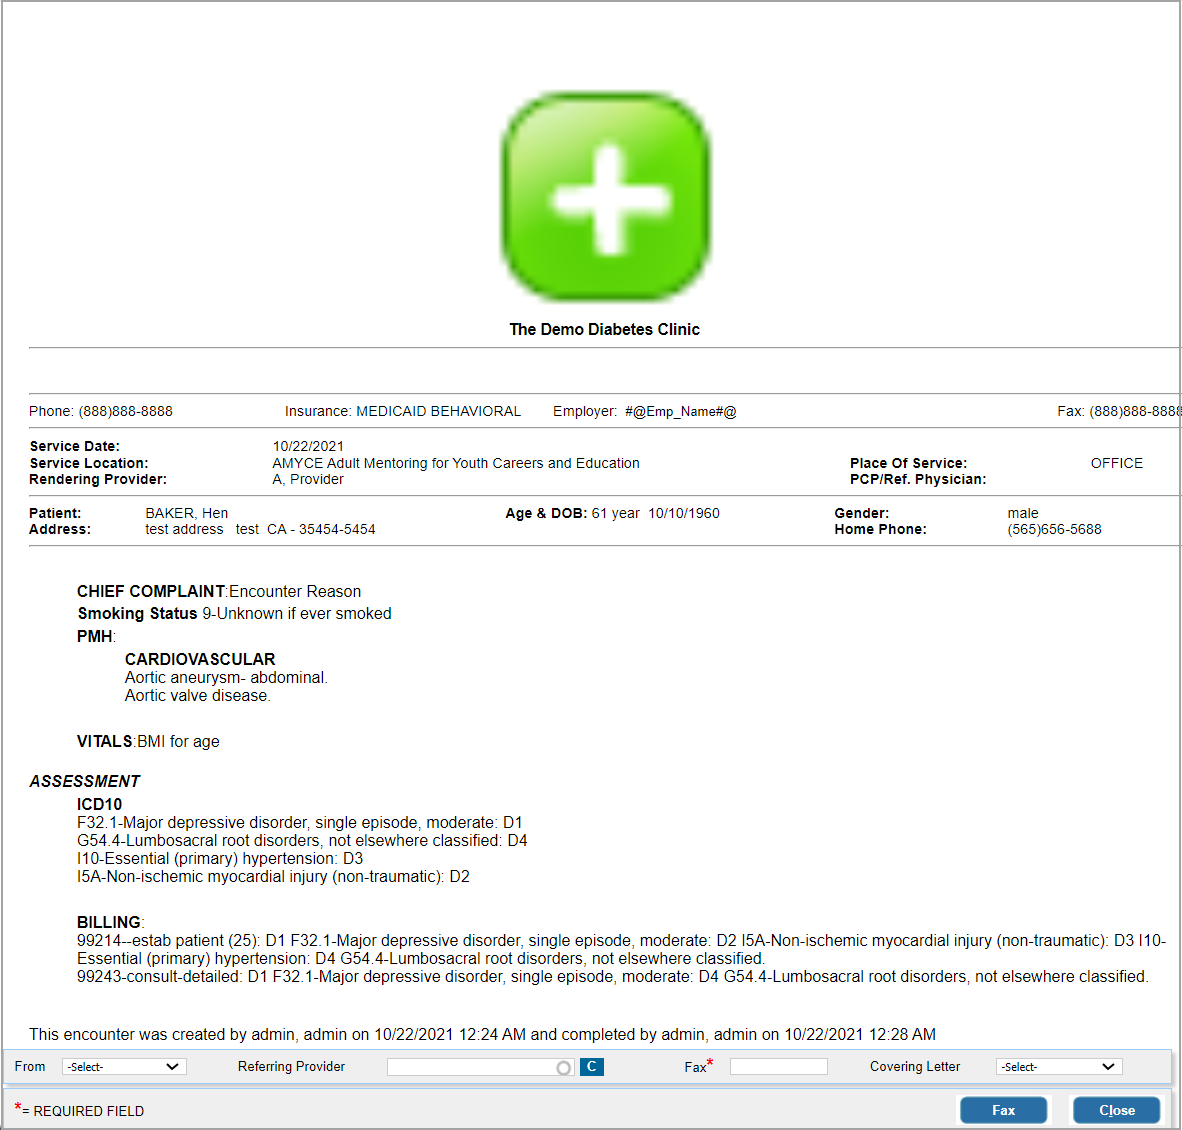
Once your practice gets enrolled for eFax, all EHR pages that have the fax messaging functionality will automatically use efax. To fax visit notes and lab orders, a covering letter can be selected from the Covering Letter drop-down provided beside the Fax button. Covering letter templates are created from Letter Master. Users can select the template for the covering letter from the Covering Letter drop-down.