

ERA
Electronic Remittance Advice (ERA) is an electronic version of the paper Explanation of Benefits (EOB), which allows you to auto-post payments as opposed to manually posting them.
How to Access ERAs
To view and process the ERAs in the system, select Payments from the main menu, and then click on ERA Posting. The ERA Listing page opens up, where all ERAs received are listed with the most recent on top. Provide appropriate search parameters to filter the ERAs. ERA Date, Payer, Status, Payment #, and Check # are some of the search fields.
Search Filters Section of ERA Listing Page

Sort Options
Users can sort the list in either ascending or descending order. The following fields can be used for sorting:
| Creation Date (Default) |
| Payer |
| Check Date |
| Check Amount |
| Check Number |
| Payment Type |
ERA Listing
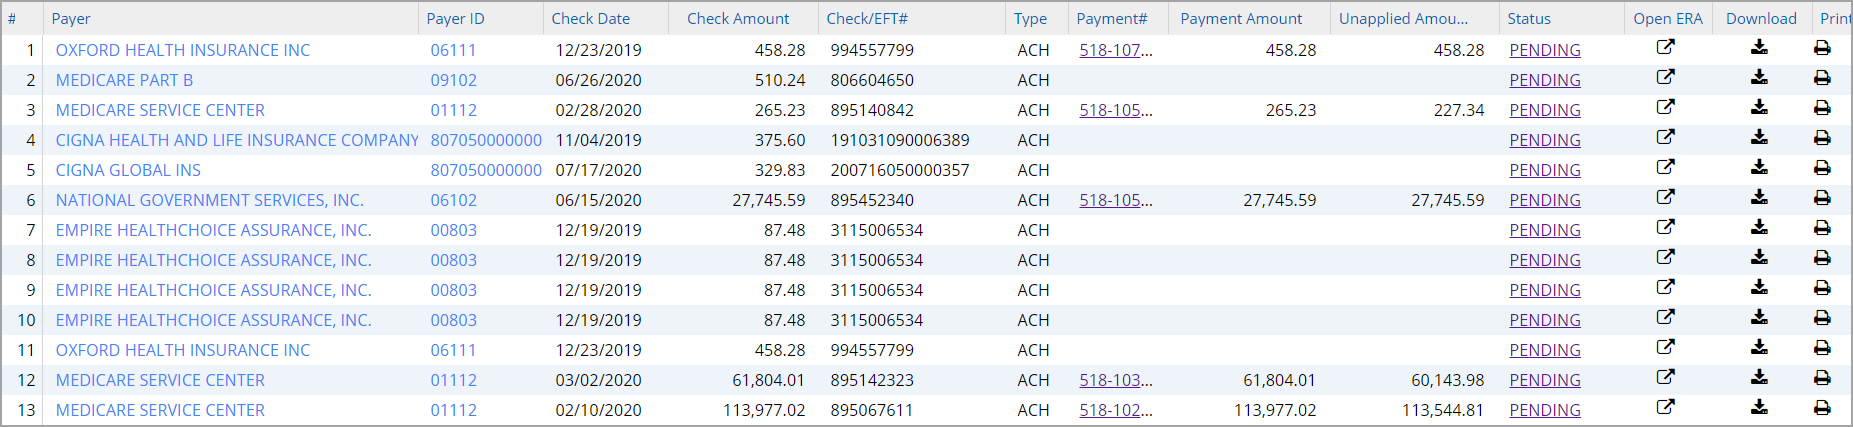
Columns of the ERA Listing
| Column | Description |
| Payer | Name of the insurance. This is a hyperlink that opens the ERA screen for posting. |
| Payer ID | Unique ID of the payer |
| Check Date | The date specified in the check |
| Check Amount | The amount specified in the check |
| Check/EFT # | Check number /EFT number |
| Type | This is the payment method code. The different payment method codes are ACH (Automated Clearinghouse), BOP (Financial Institution Option), CHK (check payment), FWT (Federal Reserve Funds/Wiretransfer-nonrepetitive), NON (Non-Payment Data) |
| Payment # | The unique number created for the payment in the system |
| Payment Amount | The amount for which the payment was made |
| Unapplied Amount | The amount unapplied in the payment |
| Status | PENDING/PROCESSED/VOID. Clicking on the status will open a drop-down. To change status, select another status from the drop-down. Users can also void ERAs by selecting VOID from the drop-down. |
| Open ERA |
Opens the ERA screen in a pop-up page for posting |
| Download |
To download the ERA file into the system. |
| Print |
This will print all payments and reversal payments, which means that all items in the claim will be printed, whereas the Print option in the ERA posting screen will print only checked claims. |
Table 1
Different Options Available in the ERA Listing Screen
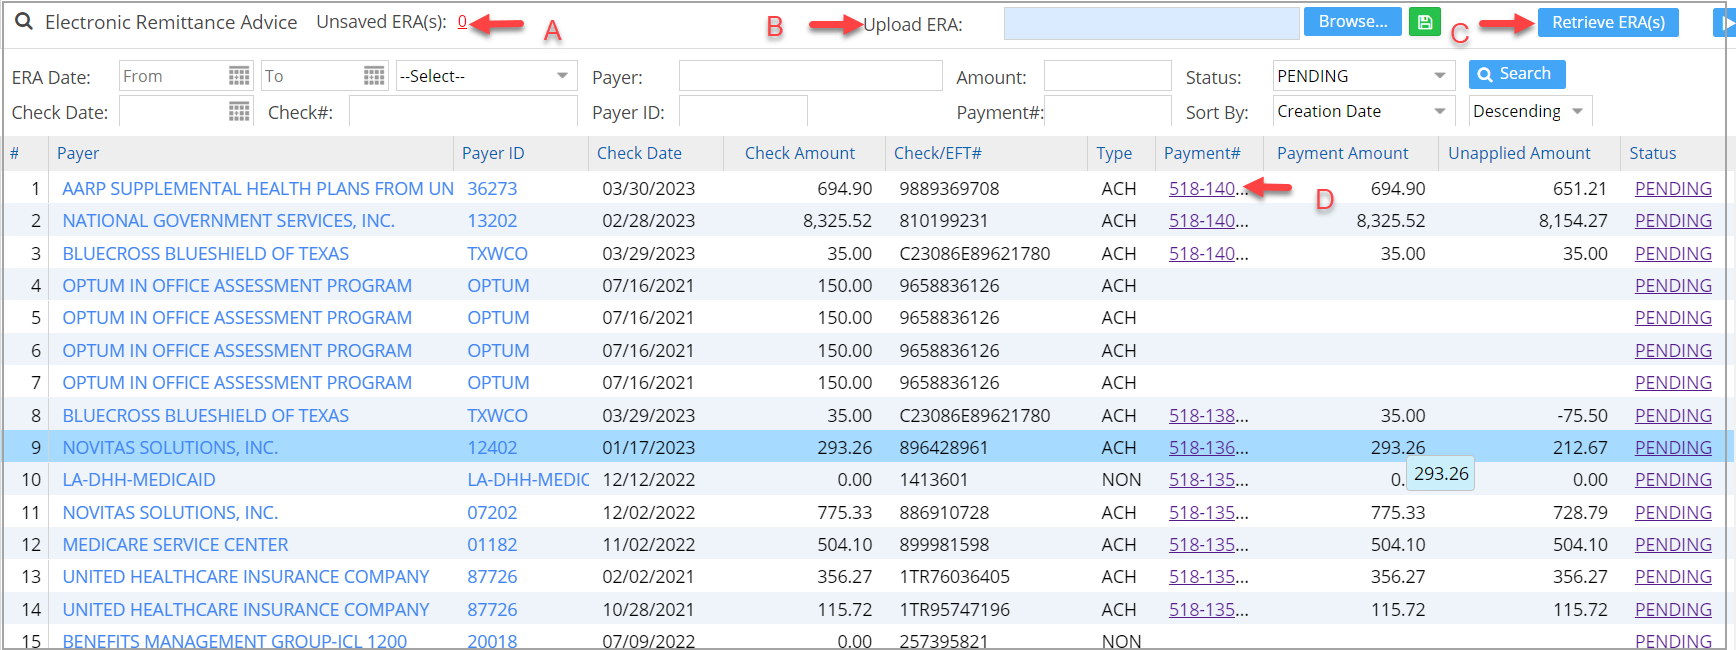
A. Erroneous ERAs due to syntax or semantic errors in the 835 file structure would show up in the Unsaved ERA(s) (labeled A in Image A). Clicking on the unsaved count hyperlink will open the file information in a pop-up window.
B. ERAs can be uploaded into the system using the Upload ERA option. Click on Browse and choose the file. It can be saved through the ![]() button beside the Browse button (refer to label B in Image A).
button beside the Browse button (refer to label B in Image A).
C. The system automatically retrieves ERAs once a day. If a user wants to specifically retrieve ERAs without waiting for the next day, he can do so by clicking the ![]() button available on the top right of the page (labeled C in Image A).
button available on the top right of the page (labeled C in Image A).
D. Payment# in the report column is a hyperlink (label D in Image A) that opens the Payment Entry screen.