Lab Hub Features
1. Lab Hub is the latest enhanced lab page in PracticeSuite that has an order tracking facility. Lab Hub can track all orders and send the pending orders to the lab conveniently.
2. The system can automatically import and process new lab results without requiring manual intervention.
3. The auto-retrieval facility in the Lab Hub will auto-fetch pending lab results from all the connected labs.
4. It is possible to create lab orders directly without associating a chart with the order.
5. Lab Hub can track paper orders as well. The ellipsis![]() at the right end of the listing has an option that reads “Mark as Complete”. Users can utilize this option to flag a paper order as processed and complete.
at the right end of the listing has an option that reads “Mark as Complete”. Users can utilize this option to flag a paper order as processed and complete.
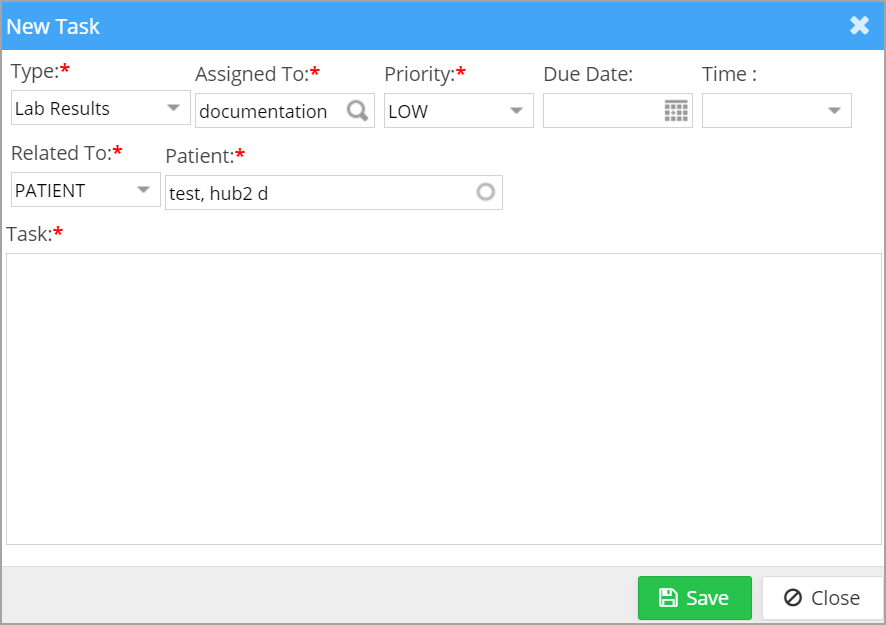
7. It is possible to assign tasks related to lab orders from the lab Hub screen.
How to Access Lab Hub
Go to EHR Advanced->Lab Hub.
OR
Go to the Clinical desktop and click on the icon in the Lab Orders pane (highlighted in Image 1).

Search Field
Description
Ordered On
To show results for lab orders sent on a specific date range
Patient
To show results for a specific patient
Lab
To show results from a specific lab
Status
To display results in the specific status (Pending Order, Sent/Completed Orders, Unprocessed Results, Processed Results). A completed order status is meant for paper orders. This option will list the completed paper orders along with the electronically sent items.
Retrieved Date
To display results for a specific date range when the results were fetched
Test Date
To display results of lab tests done in a specific date range
Provider
To display results specific to a provider
A. Similar to the XSuperbill screen, a few statuses in the lab hub are displayed as buckets with orange-colored bubbles showing the number of unread items. The newly introduced buckets are Pending Orders, Unprocessed Results, and Review Pending. The user can click on a status bucket to view the results in that bucket. B. Clicking on the ‘Ordered On/DOS’ info in the listing will take the user to the patient’s chart from which the lab order was sent, and a mouse hover will display the chart status. C. Each line will have a chart status icon, similar to the Appointments tab in the Clinical Desktop. D. If the result status is ‘Final’ as sent from the lab, the line is colored green. To view results on the lab hub screen itself, click on the E. If the results are processed in the system, a green tick mark appears near the chart status icon.![]() icon on the left side of the listing. If the results are not ready, ‘No results Available’ will show up.
icon on the left side of the listing. If the results are not ready, ‘No results Available’ will show up.
Column
Description
Ordered On/DOS
Order Date: This is a hyperlink to the patient’s chart related to the lab order. Mouse hover will display the chart status
Retrieved Date
The date on which the results were fetched (Earlier named ‘Fetched Date’)
Test Date
The date on which the test was conducted in the lab
Test Name (Hyperlink)
Name of the test ordered; this link will take you to the chart from which this order was created; If the chart is in “Completed”, the link will take you to the chart’s narration
Patient(Hyperlink)
Patient Name: Click on it to go to Patient Demographics
MR#
MR# of the patient
Ordering Provider
Provider in the chart
Lab Name
Lab from where the results are retrieved
Match Patient
This column is relevant only for unprocessed results; type in the patient name here. (A warning symbol
![]() appears on the left-hand corner of the listing for unmatched patients.). Once matched, the result can be selected for processing.
appears on the left-hand corner of the listing for unmatched patients.). Once matched, the result can be selected for processing.
Status
Status of the lab results (Details in Table 1)
![]()
Tracking/Action items (For details, see Table 2)
Table 1
Status
Description
Pending Orders
Orders in a patient’s chart that are not yet sent to the lab
Sent/Completed Orders
Orders in the chart that have already been sent to the lab
Unprocessed Results
The results are imported into the system and are pending processing. The status of the lab result will be reflected in the status field.
Processed Results
The results are imported into the system and processed. The status of the lab result will be reflected in the status field.
Review Pending
Those lab results which are processed but not yet reviewed
Table 2
Menu Item
Description
View Order
For pending orders, this shows the order details. This is unavailable for all other statuses.
View Result
If the results are processed, this option will be available, and users can view the PDF output.
Send
Submit pending lab orders to the lab.
View Requisition
Available for all orders in sent status.
View Label
Available for all orders in sent status.
Lab History
This opens the lab tab of the patient’s chart, and users can view the previous lab orders and results there.
To Do
To assign lab order-related tasks to users; Details are in the succeeding section
Mark as Complete
Used for paper orders.
Whenever a user opens the Lab Hub screen, it triggers the sync with all the labs set up in the system and retrieves pending lab results that have been available since the last fetch was done. If it is the first time that the user is attempting to retrieve the results or if the last fetch occurred more than 60 days ago, in either of the scenarios, the system can go back 60 days to bring the pending results. Additionally, users can utilize the Lab Hub simplifies the ordering process by eliminating the need for manually associating a chart to the order. The steps for the direct lab order method are summarized below. 1. New ‘Order Lab’ Button: This button is at the top right-hand side of the screen next to Retrieve Lab Results. Clicking on this option opens a dedicated page for creating new orders. 2. Enter Order Details: Users can input the required information into the form, viz. patient, provider, service location, lab name, test needed, and relevant diagnoses. 3. Automatic Chart: An HL7-LAB chart is automatically generated in the background when an order is saved. 4. Send the Order: The user can click ‘Send Order’ to open the lab order form to review and submit to the designated lab. 5. Track and Edit Orders: All the saved orders stay on the pending list. Users can make the required edits from here. To submit the order, users can click on the ellipsis at the right and then click ‘Send’. All the submitted orders will be on the ‘Sent/Completed’ list. 1. After matching the patients for the unmatched results, select the required results by checking the box provided on the left. 2. If the provider code in the result doesn’t match the provider in the system, our system compares the last name and first name and picks the provider with the matching name. If this fails, the provider assigned to that patient in demographics will be picked. 3. If the result needs to be processed under a different provider, select the provider from the “Assign it to Another Provider for Review” drop-down beside the 4. Once the result is processed, a new chart will be created for this patient in EHR with an encounter sheet named Lab Results-HL7. The level-1 component in this chart, named ‘Laboratory’ will contain the lab results. Another level 1 in the Lab Results chart is the ‘Comments’ section, where the user can add comments about the results. 1. The results page can be accessed by clicking the ellipses on the right-hand side of the listing and then selecting “View Result” from the menu. 2. Any remarks entered from the Result page will be saved under a new note type named “Lab Result” in the patient notes. 3. If the user checks the box “Mark as Reviewed”, then the status of the corresponding Lab_Results HL-7 chart will be automatically updated from “For Review” to “Complete”. 4. The ‘View Visit Note’ will be enabled only when the result is processed against the order from PracticeSuite. 5. The Lab History link will take the user to the ‘Summary’ page on the Lab Tab in the charting screen. (Same as clicking on the Lab History option on the ellipsis on the right side of the listing.)![]() at the top right-hand of the screen (highlighted in Image 2) to manually retrieve the results at any time.
at the top right-hand of the screen (highlighted in Image 2) to manually retrieve the results at any time.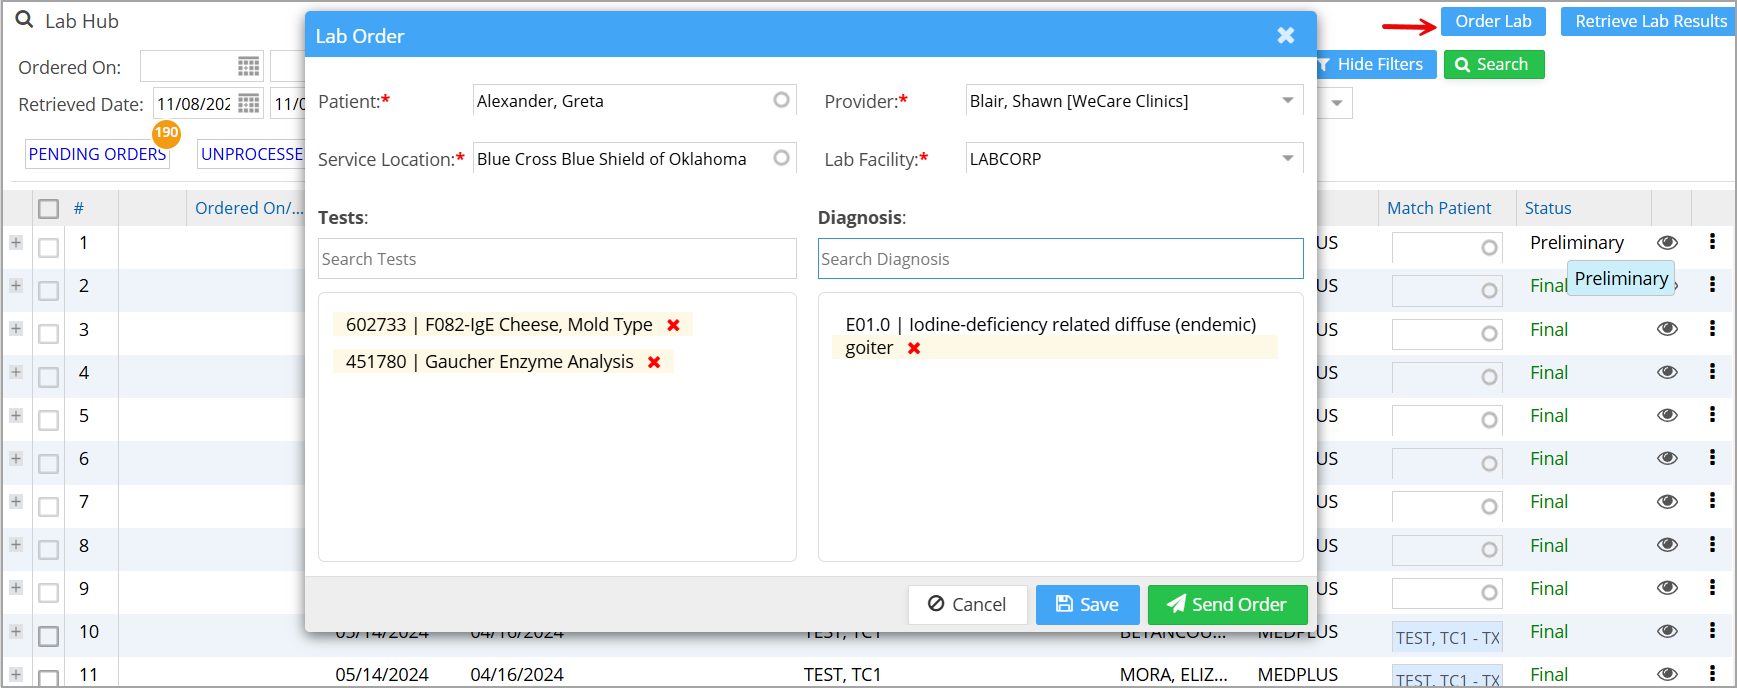
![]() button.
button.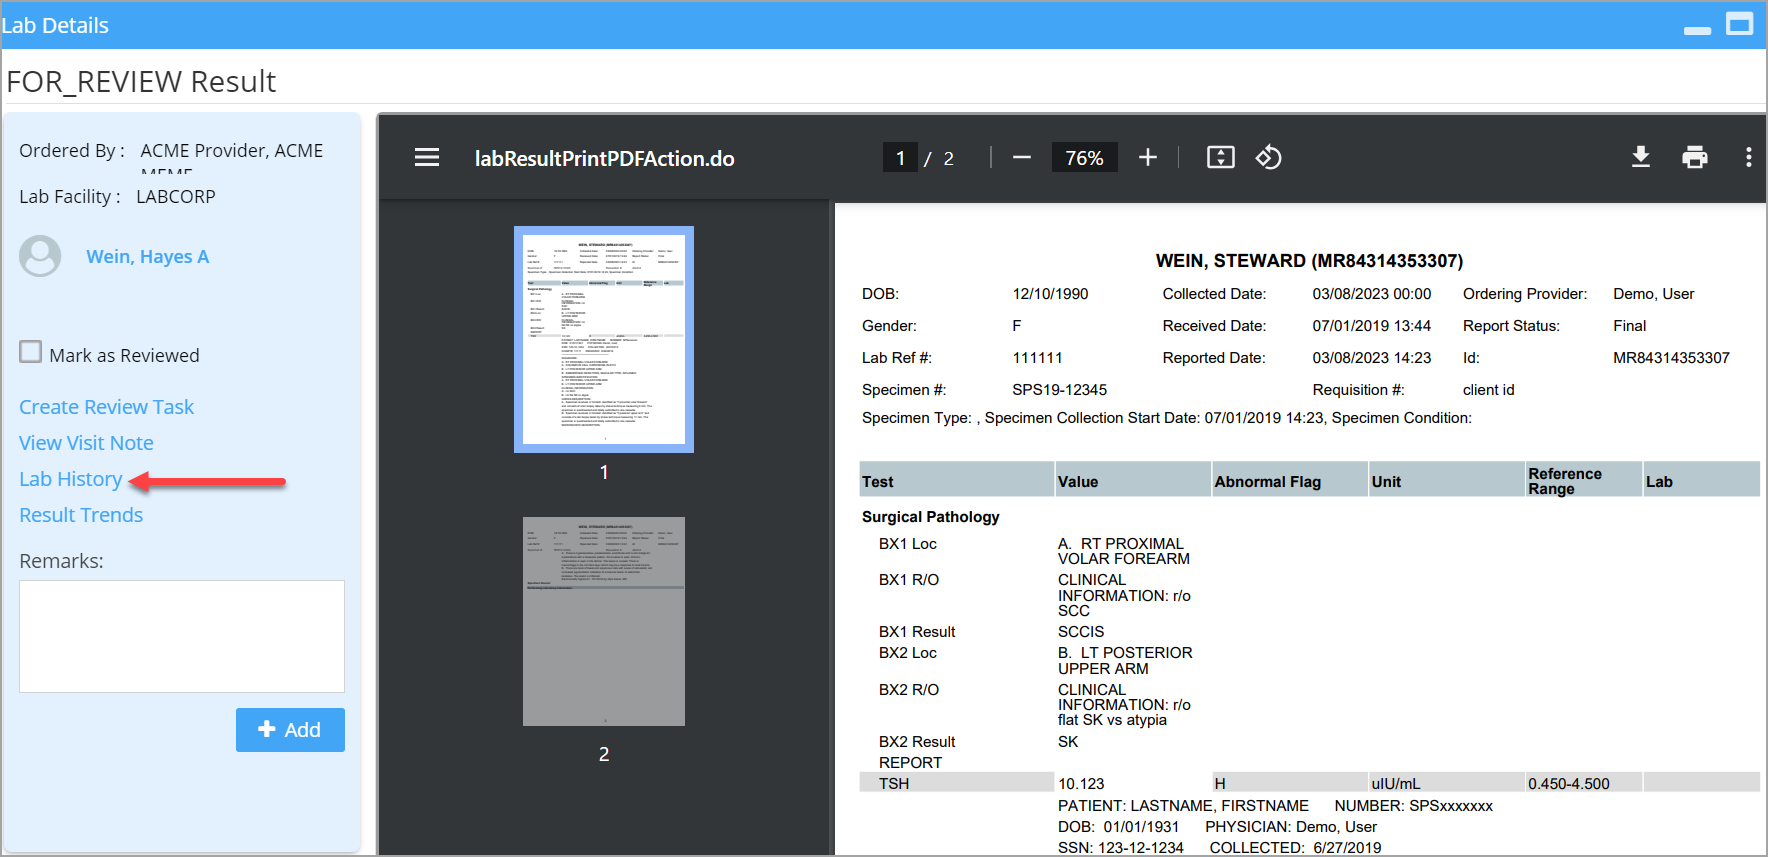
Was this helpful?