

Billing Options
This page allows you to configure various billing parameters, including claim number generation, rules for grouping claims and claim batches, and clearinghouse setup. These settings are essential for streamlined billing and accurate tracking. The page can be accessed via the Advanced Setup menu.
The Billing Options Screen
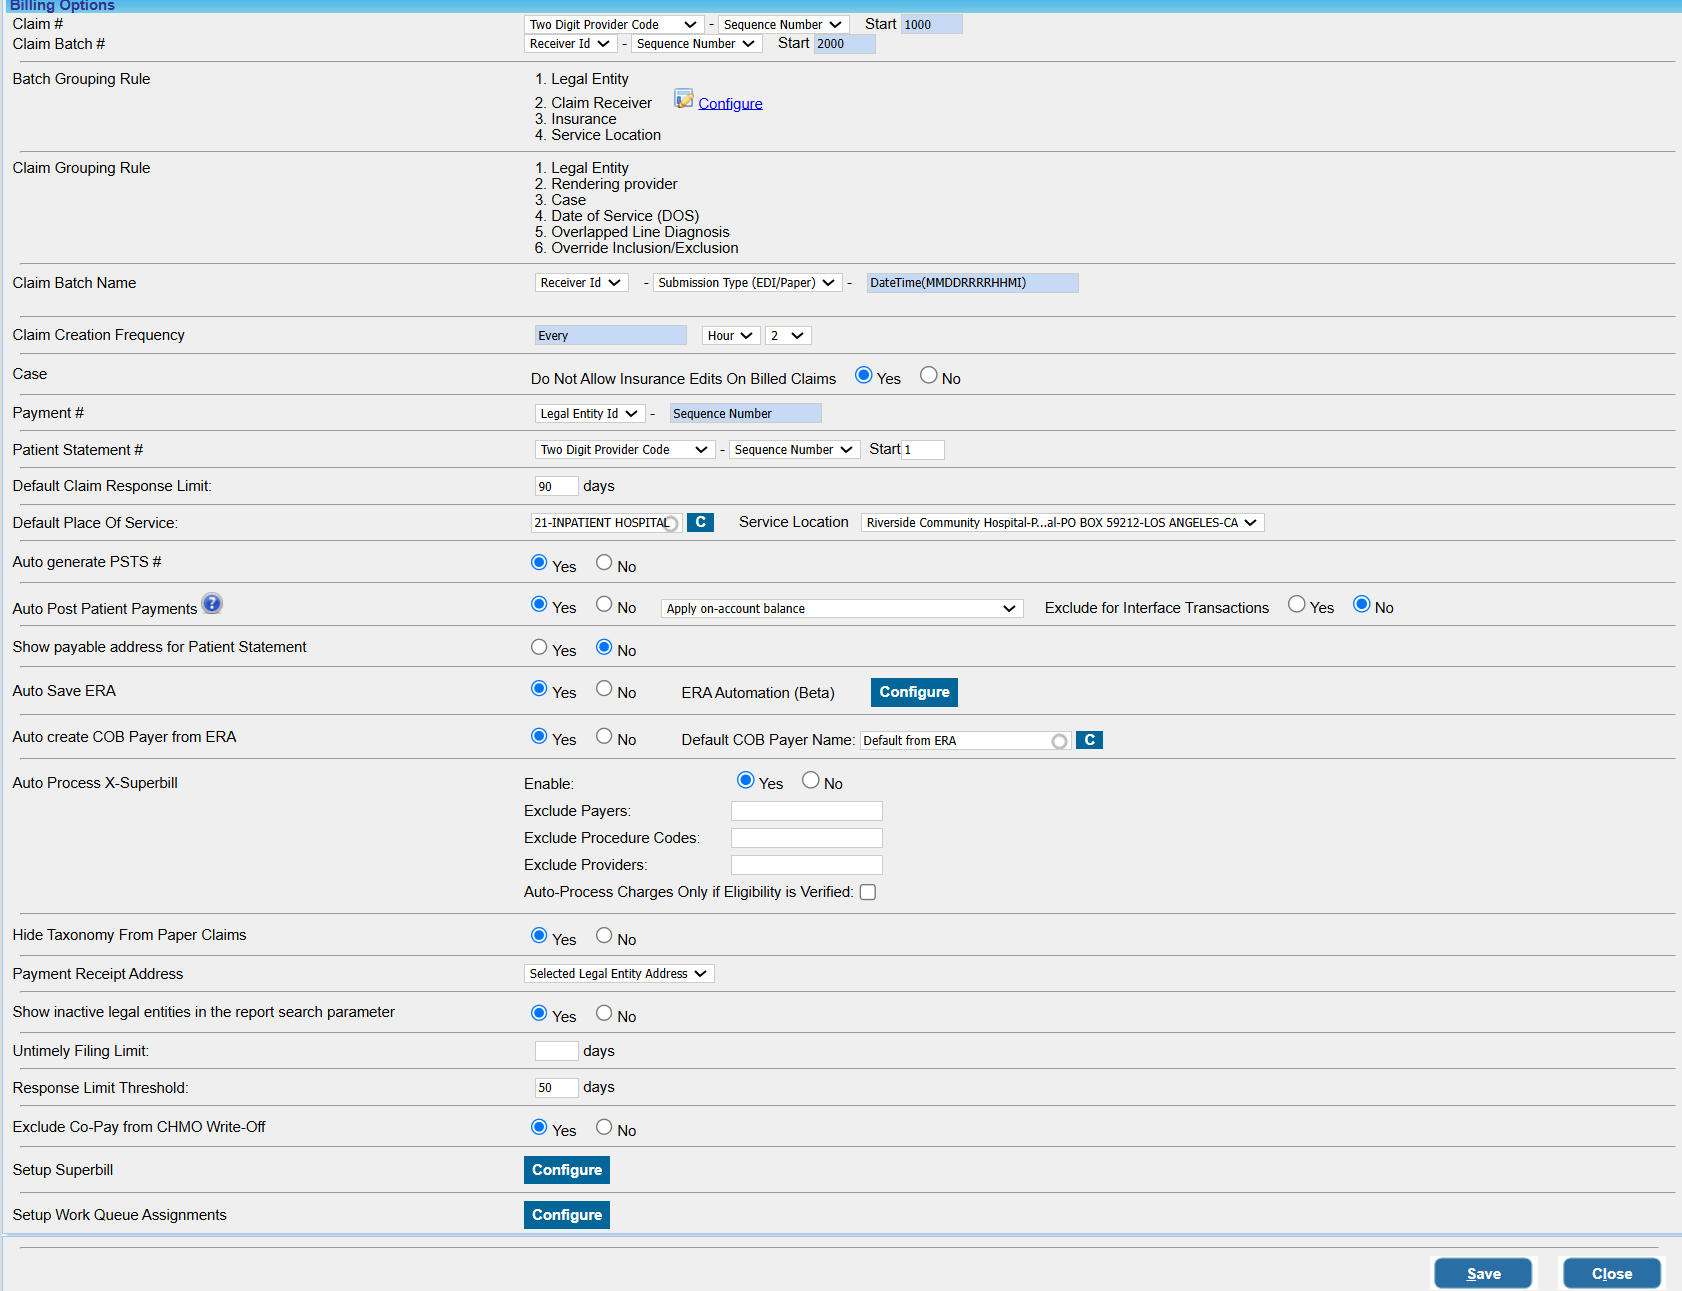
Parameter Setup on the Billing Options Page
1. Claim #: This specifies the method of claim number generation.
The first 2/3 digits of the claim number are configured by selecting one of the options below from the first drop-down box
- Legal Entity (Three-Digit LE) Code
- Two-Digit Provider Code
- Case number
Choose Sequence Number from the second drop-down and type in the starting sequence number in the adjacent text field.
2. Claim Batch #: This specifies the method of claim batch number generation.
3. Batch Grouping Rule: Claim batches are created using the following attributes: claims receiver, LE, payer ID, and service location. These are shown for informational purposes only and cannot be edited.
However, clearinghouse (EMC Receiver) information can be configured here.
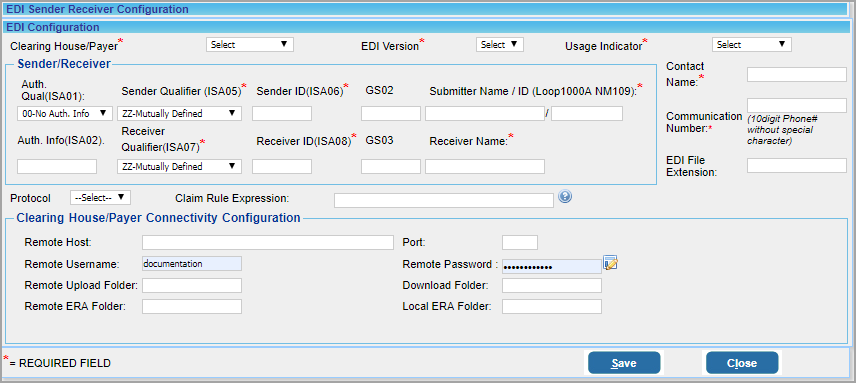
a) Configure Clearinghouse Information: Clearinghouse details can be entered/edited by clicking on the ![]() button adjacent to EMC Receiver. A new window (Image 2) opens up when the
button adjacent to EMC Receiver. A new window (Image 2) opens up when the ![]() button invoked.
button invoked.
Click on the Edit button against the clearinghouse to edit the information. To add a new clearinghouse, click on the Add button on the top. The screen below appears when the Edit/Add button is invoked.
![]()
Click on the Save button after entering sufficient details or editing existing information.
4. Claim Batch Name: This field assists in configuring claim batch names. This field has been added for future enhancements. Presently, it is not used.
5. Case: Do Not Allow Insurance Edits on Billed Claims: If the practice selects ‘Yes’, patient insurance in a case cannot be updated after claims have been sent for the insurance. On the contrary, the option ‘No’ would allow users to edit insurances on cases even after claim generation in the case.
6. Payment #: This specifies how the payment number is generated. Select the Legal Entity (LE) ID/Insure ID from the first drop-down. The payment # will be of the form LE ID/Insure ID – Sequence Number.
7. Patient Statement #: The fields against Patient Statement # define how statement numbers are formed.
The start field can be used to provide the starting number for the sequence.
8. Default Claim Response Limit: This field defines the threshold of the default claim response limit. For those insurances whose Response Limit Threshold field in the Insurance master page is empty, the system will take this field as the claim response limit.
9. Default Place of Service: This is used for setting the default value for Place of Service in the Enter/Edit Charges screen.
10. Auto generate PSTS #: PSTS is a tracking number system for creating entries such as payment entry, charge entry, and so on. The option here will enable us to set auto-generation of PSTS number. If set to Yes, a PSTS number is automatically generated, and if it is No, auto-generation will not occur.
11. Auto Post Patient Payments: If this option is enabled, it will assist in auto-posting patient payments. If an on-account balance exists and if the patient has due, the system will automatically post patient payments when the line status is set to BILL_TO_PT. This will work in Charge Entry, Charge Master, XSuperbill, and the Manual Posting Screen.
12. Show Payable Address for Patient Statement: Choose Yes if Payable to address of the practice should be provided in the address part of patient statements. If set to No, practice’s physical address will be displayed. (Both these addresses are provided on the Practice Master page.)
13. Auto Save ERA: Generally, ERAs are downloaded by clicking the ![]() on the ERA posting screen under Payments in the main menu. If Auto Save ERA is set to Yes, ERAs received from the clearinghouses will be automatically downloaded to the system.
on the ERA posting screen under Payments in the main menu. If Auto Save ERA is set to Yes, ERAs received from the clearinghouses will be automatically downloaded to the system.
14. Auto Create COB Payer From ERA: This is used to enable or disable auto-creation of COB Payer from ERAs. Select ‘Yes’ to enable the auto-creation feature.
15. Auto Process X-Superbill: This is to enable/disable X-Superbill automation. Payers, procedure codes, and providers to be excluded from the automation process can be provided in the respective fields. Eligibility verification can also be done as part of the automation. To learn more, click here.
16. Hide Taxonomy from Paper Claims: If the taxonomy ID is to be hidden/removed from paper claims, set this option to Yes.
17. Payment receipt Address: This is a drop-down list that enables you to choose between LE address and practice address. The payment receipt will have the selected address.
18. Show Inactive Legal Entities in Report Search Parameter:
When set to Yes, the Legal Entity (LE) drop-down in the following reports will include inactive legal entities:
-
I6. Posting Details Report
-
I8. Summary Encounter Line Activities Report
-
J1. System Financial Summary Report
-
J9. Daily/Month End Close Report
-
J6. Charges/Payments Reconciliation Report
-
J7. Monthly Activity Analysis Report
19. Untimely Filing Limit: Set Default Threshold days
20. Response Limit Threshold: Set Default Threshold days
21. Exclude Co-Pay from CHMO Write-Off: Set this to ‘Yes’ to exclude the copay balance from the automatic write-off feature for insurances flagged as capitated. (The system determines the copay amount to be left on the line from either the primary payment postings or the co-pay amount saved in the patient’s primary insurance plan.)
22. Setup SuperBill: This button at the bottom of the Billing Options page is used for setting up a superbill for the practice. Click here to learn more about setting up superbills.
23. Setup Work Queue Assignments: This is used to configure RCM workflow automation whereby claims and charges arriving in Work Queue and Collection Manager are automatically assigned to specific user teams as per pre-defined rules. To learn more, click here.