User creation and management in PracticeSuite is done through a module called ‘Security’. To create a new user in the system, the following steps are to be followed:
1. Click on Security on the main menu and select User. The user list will be displayed as in Image 1.
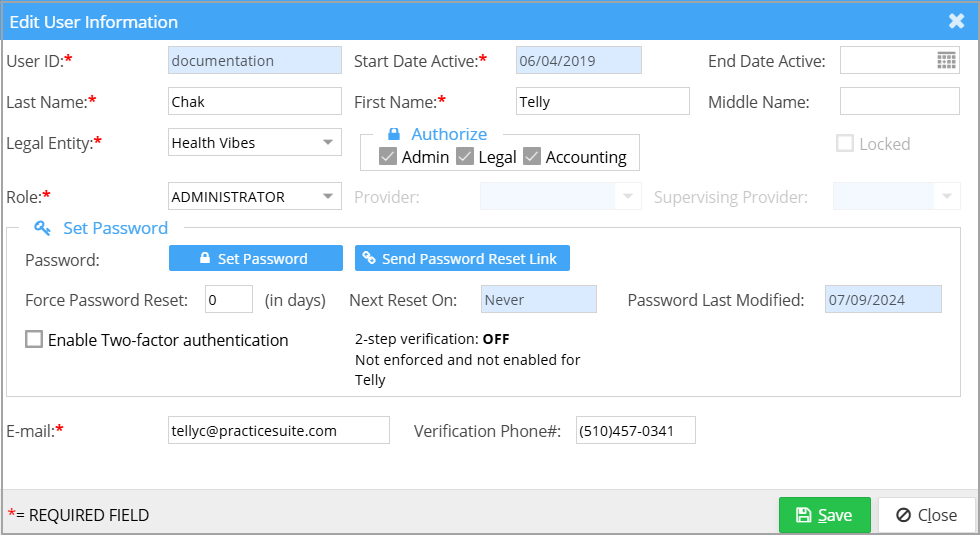
2. To create a new user, click the ![]() button. On clicking this button, the screen, as in Image 2, shows up.
button. On clicking this button, the screen, as in Image 2, shows up.
a) Enter the Last Name, First Name, and Middle Name of the user.
b) From the Role, select the required User Type from the drop-down. If the role selected is Provider, select the Provider name from the Provider drop-down (highlighted in Image 2). This is necessary to map the user name to the provider name.
c) Choose the primary Legal Entity from the list.
d) The ‘Authorize’ section is for providing special rights to the user:
Authorize Admin: Currently, this gives the user the privilege to open and edit a completed chart.
Authorize Legal and Accounting: Meant for Future Use.
e) Enter a password for this user. The password should have five alphanumeric characters, one uppercase letter, and three numerals (e.g., Mary123hi).
f) In the Force Password Reset field, enter the number of days the user will be allowed access with this password.
g) Select the Start Date Active and End Date Active for this user.
h) Enter the email address and a verification phone number.
i) To enable 2 factor authentication for the user, check the box ‘Enable two-factor authentication’. For more details, click here.
i) Click on Save.
3. To edit a user profile, click on the ![]() icon provided at the rightmost end of the user line.
icon provided at the rightmost end of the user line.


