

Manual Posting Screen
1. A manual posting screen is used to post insurance and patient payments.
1a. When the practice receives insurance payments in the form of EOBs, patients listed in the EOB are to be selected in the manual posting screen to post the payments to the relevant charges. The manual posting screen permits cash posting for one patient at a time.
1b. In the case of patient payments, either COPAY payments or SELFPAY payments made on the patient’s behalf are to be posted to the relevant charges.
2. The manual posting screen can also be used to enter payments if the payment is not already entered into the system. To learn how to create a payment entry from the manual posting screen, click here.
3. The On Account field at the bottom of the Payment Posting screen (highlighted in the bottom section of Image 1) helps users see the on-account balance on the fly even before the payments for the line(s) are applied. Similarly, the totals of Paid Amt. , Adj., WithHold, and Balance are updated as and when the relevant amounts are entered on each line.
4. When the payment is posted, it can be verified in the posting log in the payment section. The posting log shows the patients and the DOSs for which the payment was posted. For FULLY_APPLIED payments, the on-account amount will be zero on posting.
5. The manual posting screen is now enhanced to allow users to record multiple denials for a single claim line.
Search Filters in the Manual Posting Screen
| Field | Description |
| Patient | Provide the first three letters of the name or MR# |
| Claim# | To show encounter lines of a specific claim |
| DOS | Provide DOS range to filter down further |
| LE | To filter by Legal Entity |
| Process Secondary Insurance First | Check this box when the claim status is still in Claim_Sent_To_PR and the secondary insurance pays you before the primary does. |
| Show Closed Lines | Check box to show lines with statuses WO_CLOSE, PAID_CLOSE |
| Show All Lines | Check box to show all Lines |
| Auto Populate Paid Amount | Patient Payments: populates the paid amount in each line according to the remaining amount in the line.
Insurance Payments: checkbox is disabled |
Posting Patient Payments
1. The lines displayed for posting depend on the Payment Type selected in the payment section (see Table 1).
| Payment Type | Lines Listed for posting |
| CoPay, Deductible, Co-Ins | All encounter lines, both patient-responsible and insurance lines, of the patient are listed for posting |
| Self Pay | All patient-responsible lines (BILL_TO_PT) are listed for posting |
Table 1
2. Lines in IN_COLLECTION status will be displayed in peach color. Image 1 shows a sample manual posting screen.
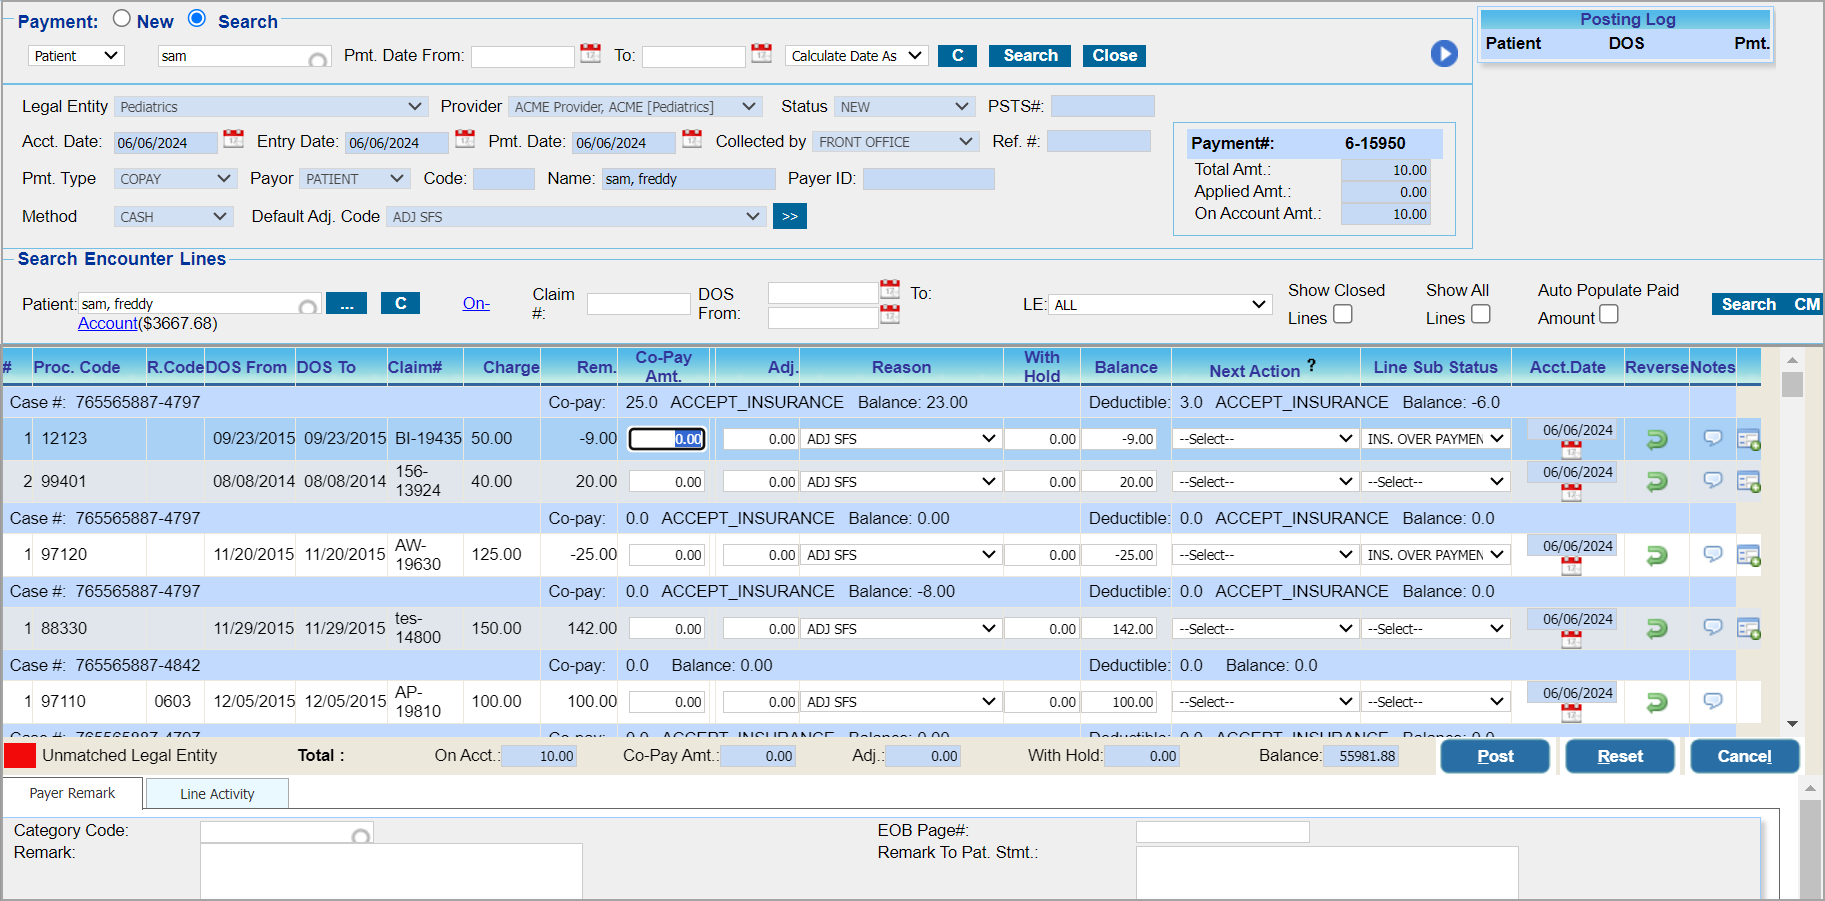
3. Enter the Co-pay Amt. and the Adjustments in the corresponding fields for Co-pay payments. In the case of Self-Pay, the Paid Amt. and Adj. fields are to be entered. Select Next Action (next responsible party in case any balance amount exists). If a balance remains, choose the “Next Action” to leave the balance to the Patient (Bill to PT) or close the line by adjusting off the remaining balance. If the balance is zero, the system sets the status to PAID_CLOSE.
4. Hit the Post button to complete the posting of the payment. To erase the entered values, click the ![]() button.
button.
Posting Insurance Payments
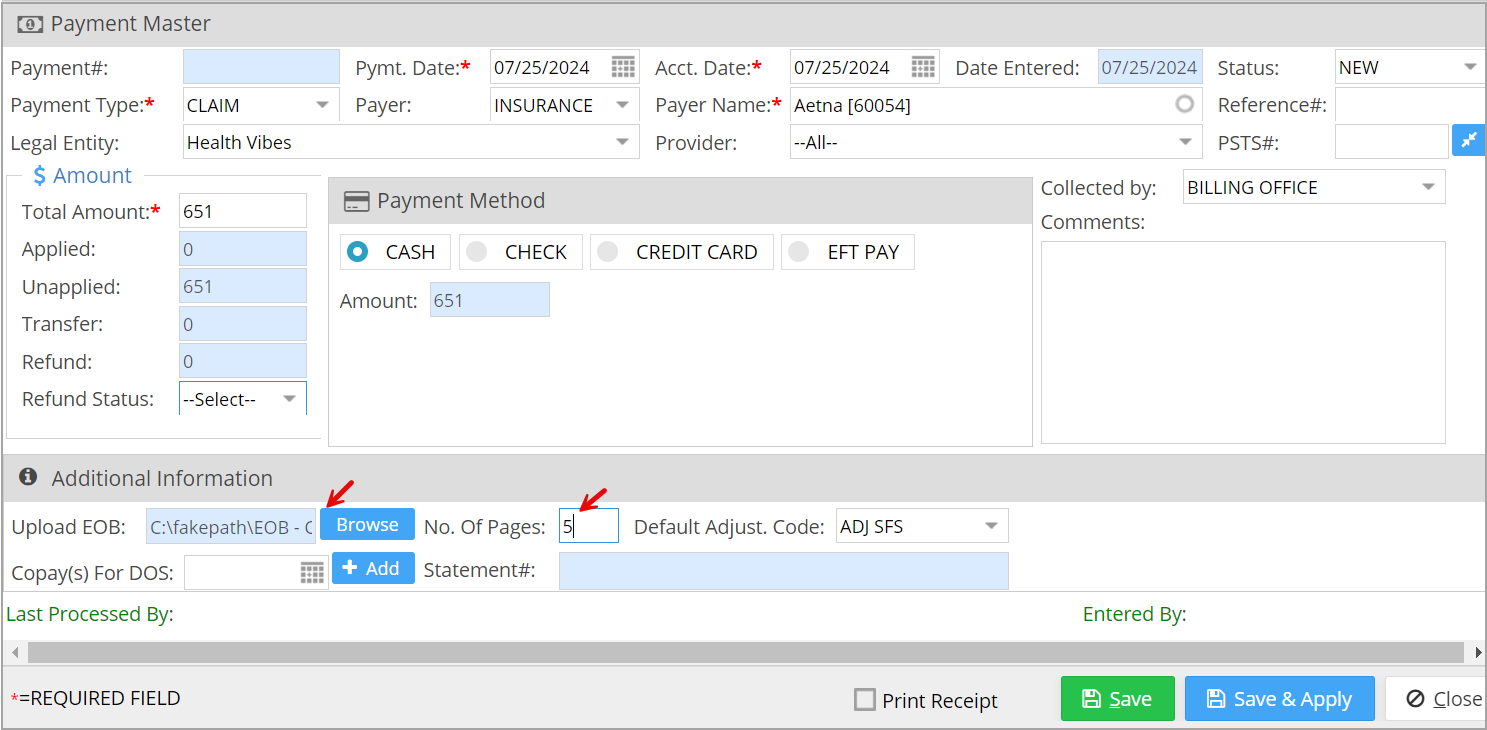
1. Enter the payment details of the claim on the Payment Master screen. Upload the EOB related to the claim on the Payment Master using the Upload EOB option provided towards the bottom of the page. Specify the total count of pages in the EOB in the field beside it.
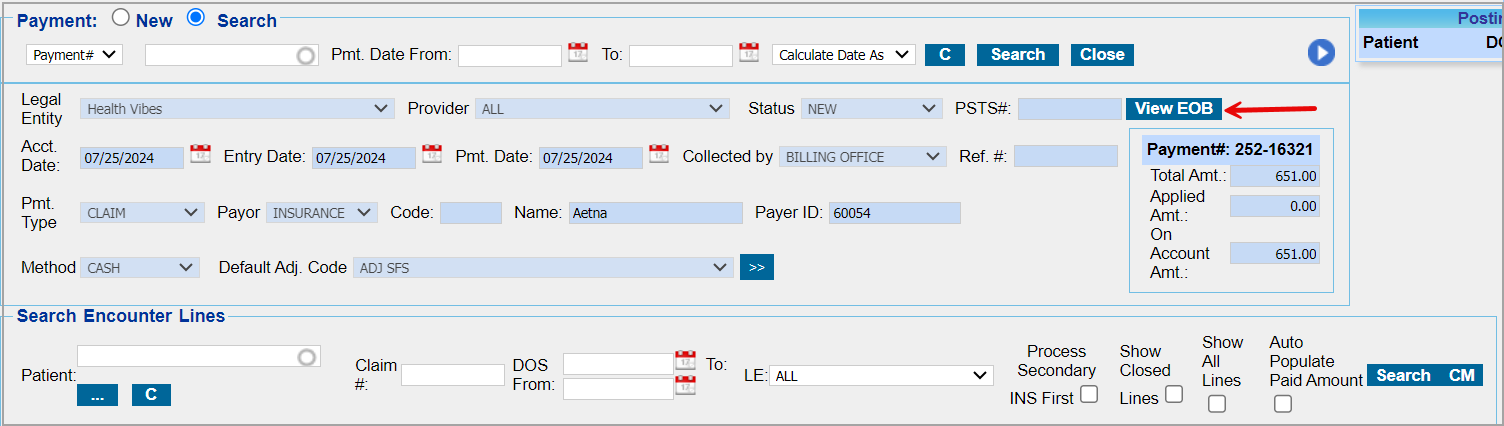
2. Click on Save and Apply to open the manual posting screen. To refer to the EOB, click on View EOB highlighted in the image below. Select the patient for posting from the patient field. Click on Search.
3. All lines billed to the insurance selected in the payment section and with statuses CLAIM_SENT_TO PR, CLAIM_SENT_TO_SE, CLAIM_SENT_TO-TR, CLAIM_REBILLED_TO_PR, CLAIM_REBILLED_TO_SE, CLAIM_REBILLED_TO_TR, etc. will be listed for posting.
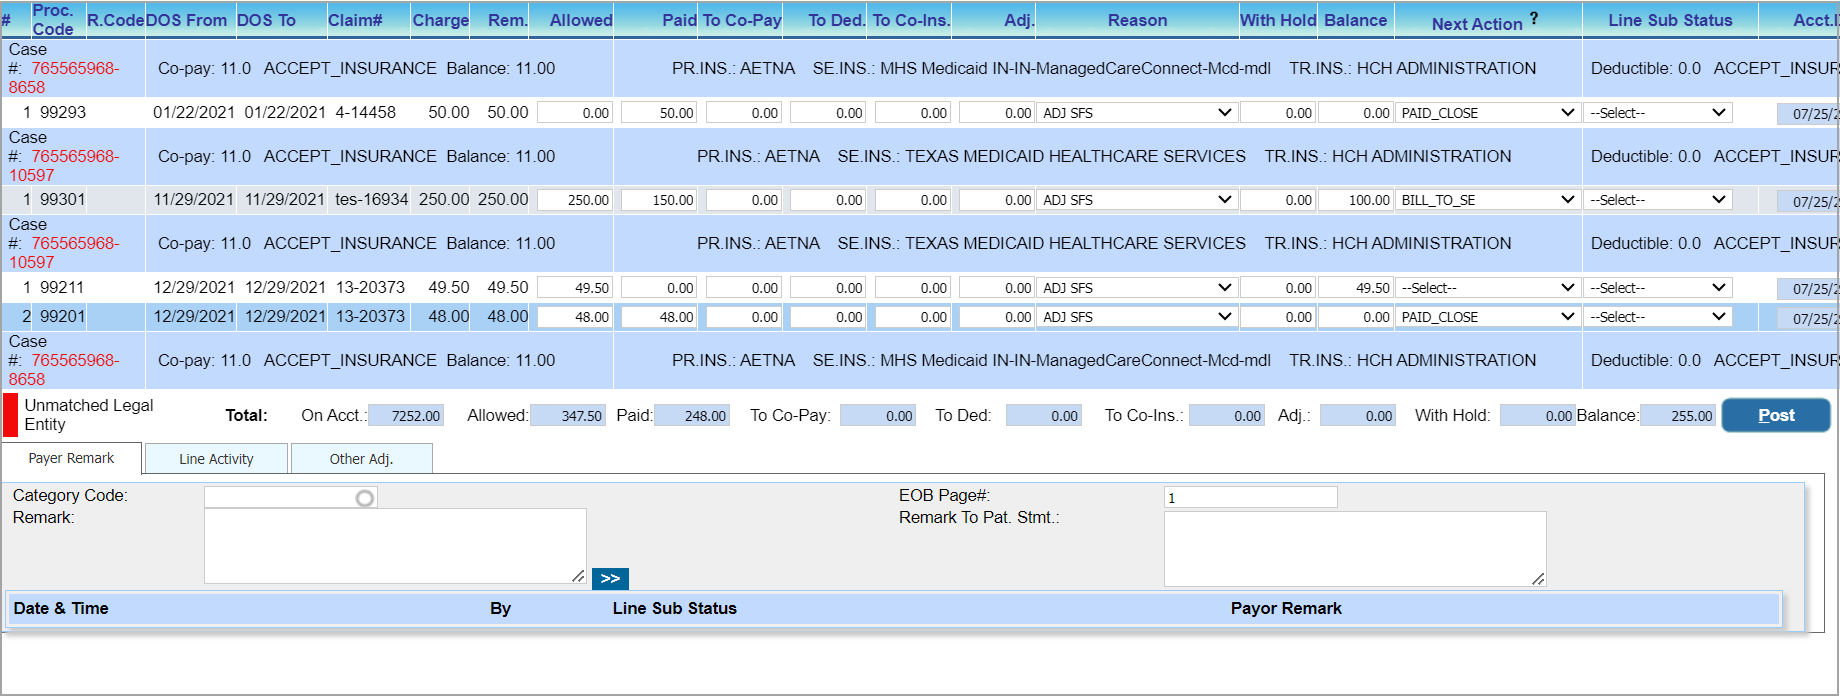
4. Enter the Allowed, Paid, and Adjustments (if any, along with the adjustment reason). The balance will be auto-calculated by the system based on the Allowed, Paid, and Adjustments entered. If a balance remains (Allowed-Paid is non-zero) after posting primary, you can choose to leave the balance to the Patient (Bill to PT), bill it to secondary (Bill to SE), or write it off using the status WO_CLOSE by providing adjustments. If there is no balance (Allowed-Paid is zero), the system sets the Next action to PAID_CLOSE.
5. The exact page number in the EOB related to the patient can be specified in the EOB Page# field in the Payer Remark section at the bottom. If there are consecutive pages related to the patient, provide the starting and ending page numbers with a hyphen in between. If a patient’s claim information is appearing on random pages, provide page numbers separated by commas. In the Charge Master line activity showing the posting process, the ‘Show EOB’ will display the exact page specified in the posting screen.
6. Hit the Post button to complete the posting of the payment. A message ‘Payment Posted Successfully’ appears.
Important columns in the Posting Screen
| Column | Description |
| Proc. Code | The procedure code for which the charge is generated |
| R Code | Revenue Code |
| DOS | DOS range for the encounter |
| Claim# | The claim number generated for the line |
| Charge | This is the original billed charge. |
| Rem | This displays the remaining charge for the line. |
| Allowed | For Insurance Payments Only—Enter the Allowed Amount in the EOB here. The allowed amount will be highlighted in red color if the amount entered is less than the allowed amount specified in the fee schedule. |
| Paid | Enter the paid amount here. |
| To Copay | Enter the copay amount, if any, here. |
| To Ded | Enter deductibles, if any, here. |
| Adj | Enter the adjustment amount here (optional); for insurance payments having more than one adjustment in a line, additional adjustments can be provided in the ‘Other Adj’ tab at the bottom of the screen. |
| Reason | If Adj. amt. is entered, the reason is mandatory. |
| With Hold | Enter the amount to be withheld, if any, here. |
| Balance | The balance is automatically calculated and displayed here. |
| Next Action? | The Next Action box indicates the action that has to be taken on a particular line. The next action for each line has to be selected before clicking the Post button. WO_CLOSE- WRITE OFF CLOSE (When Allowed Amt.-Paid Amt. -Adj. is zero), PAID_CLOSE – PAID CLOSE (When Allowed Amt.-Paid Amt. is zero) BILL_TO_PT , BILL_TO_GR, RE_BILL_TO_PR, REBILL_TO_SE, REBILL_TO_TR. |
| Acct. Date | Accounting date of posting the line |
| Reverse |
The Reverse option allows you to take back any amount that has been wrongly posted against a line. |
| Notes | To enter any notes, click on the Notes icon. |
| Click this to view the posting history of the line |
Table 3
Posting Denials
If the EOB provided by the insurance has only denials, create a zero check payment and save it in the system. For posting denials, perform the following.
A. Select the patient in the posting screen as in the case of normal payment posting.
B. In the open charge line, which is denied by the payer, set the next action to the appropriate one.
C. In the Payer Remark tab, set the line sub status to DENIED and select the appropriate category code from the Category code drop-down.
D. Click on Post.
E. Repeat Steps A to D in each denied line of other patients.
Payer Remark

a. Line sub status indicates whether the charge is in pre-collection, collection, installment, etc.
b. Payer remarks are important in the case of denials. If the line was denied, set the Line Sub Status as Denied, provide a Remark, and choose the Category Code.
c. You can also enter remarks to be entered in the Patient Statement in the Remark To Pat. Stmt field.
d. EOB Page# is the page number in the EOB that contains the selected patient info; see Image 2.
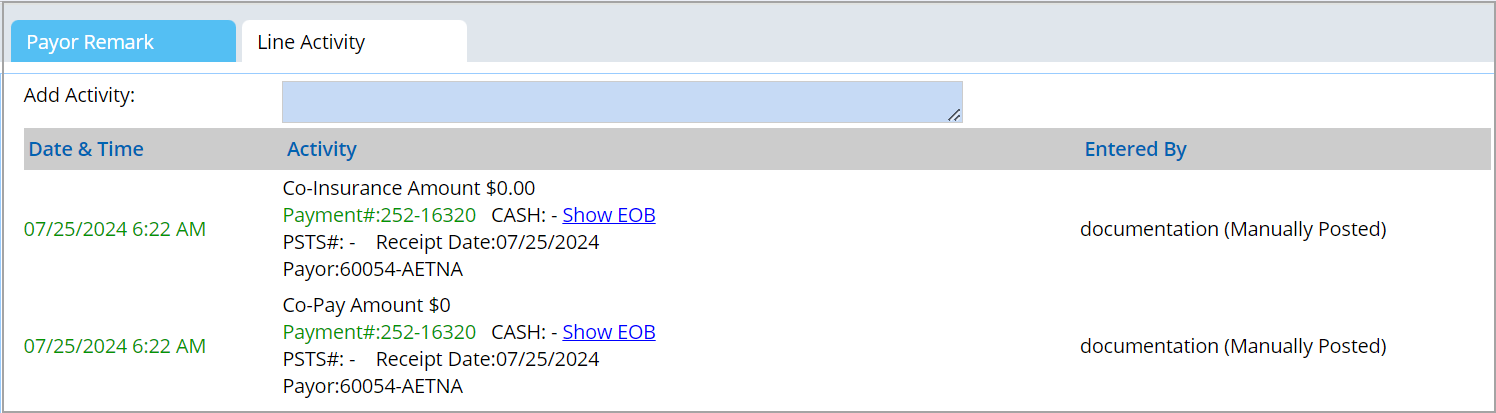
Line Activity
Line activity shows all the activities performed so far on the selected line; refer to Image 3.

Other Adj
This tab is visible for insurance payments only. In cases where more than one adjustment is to be posted against a line, additional adjustments can be provided in Other Adj. tab. Select the line having additional adjustments; choose Other Adj. Reason and enter the amount in the Other Adj. Amt. field. Click Add Row to add more adjustments.

(Please note that the line sub status, which was initially placed at the bottom of the page, has been repositioned beside the Next Action dropdown.)