The Work Queue Home Screen
About Work Queue
The work queue is primarily used as a workflow management tool to follow up on claims and charges. The work queue has charges and claims categorized according to different functions.
The workflow management in the Work Queue can be either manual or automated.
In manual mode, claims arriving in the Work Queue are manually assigned to another user. In automated mode, the claims are categorized and pre-assigned to different user teams according to different rules set by the practice. This is achieved through our newly introduced RCM workflow configuration. (To learn more on RCM Workflow configuration and its benefits, click here.)
Workflow inside the Work Queue
1. The hierarchical display of claims in the left pane of the Work Queue is as follows: Priority → Rule → Function → Worklist
2. If RCM workflow automation is done, Work Queue will load those claims that have been allocated to the user’s team(s) when the Work Queue opens. A bucket named Unallocated will display those claims that do not belong to any rule. In manual mode, when the screen opens up, all unassigned claims will be listed in the unallocated bucket.
3. Click on any worklist on the left pane to list the related claims on the right.
4. Click on a claim/charge to open the Next Action screen to follow up on the claim.
4a. To apply changes to multiple claims at once, use the NextAction button. Multiple claim can be assigned to a single user. The Work Queue status, sub status and line sub status of multiple claims can be set at once using this pop-up screen.
5. Change the Work Queue status from NEW to any other appropriate status. e.g. PENDING. Set the appropriate sub status as well.
6. Work on the claim and enter appropriate follow-up notes, or reassign the claim to another user in the system using the Next Action screen.
7. The assignees can see the claims under the appropriate statuses the next time they open the Work Queue.
Key Highlights of our Work Queue Module
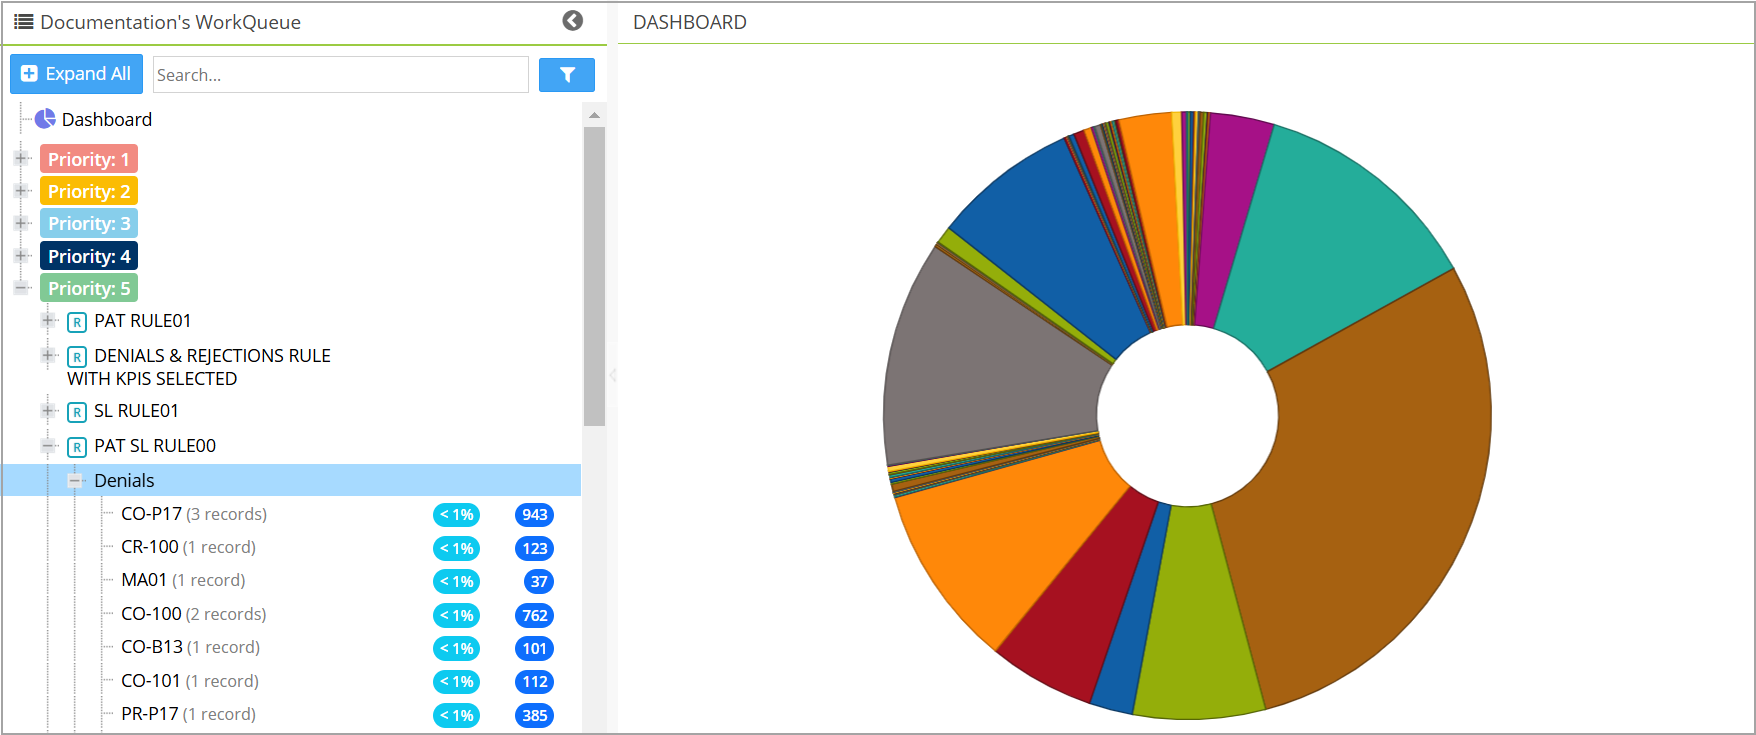
* The enhanced Work Queue screen has a dashboard section for a quick view of the major functions and displays the worklists under each function on the left pane (Image 1).
* Work Queue has an offline CSV export option beside the search filters to export the entire work queue data. The fields within the report mirror the Collection Manager’s Worklist Report. This report is useful for supervisors to review both actioned and unresolved worklists. When ready, the report can be viewed from the Favorite tab inside Report Central.
* New work queue statuses can be added from the billing lookup screen.
To add a new status, go to All Lookups->Billing Lookups, select WORKQUEUE_STATUS, click ![]() and enter the required information, and hit save to have the new status added to the list.
and enter the required information, and hit save to have the new status added to the list.
* Collection Manager activity can be tracked from within the Work Queue module without the user having to move out of the Work Queue screen. For this, the Follow-up Hx tab of Collections Manager is brought into the Next Action screen beside the Action Hx tab.
* Users can view only their assigned worklists, ensuring the worklists remain private and maintaining focus and attention to their tasks. Only supervisors and administrators can have access to all worklists. The supervisors (designated Level-1 and Level-2 on the Teams settings screen) retain visibility of the overall user’s tasks and access to the Assigned To filter to view other users’ tasks.
* The Unallocated and Need More Info Queue lists will only appear if the user selects the Show Unallocated checkbox under the More Filters section.
* A quick search box has been added to the left pane, allowing users to instantly type keywords to search for all items, including rules and worklists. The search results are organized and displayed under their respective headings, making it quick and convenient to locate specific items.
* The priority headers on the left-side pane will be listed with colored badges corresponding to their priority, this visual enhancement makes it easier for users to identify and respond to high-priority items at a glance. The priorities will have the following color codes: Priority 1: Red 2: Orange 3: Blue 4: Dark Blue and 5: Green.
* Rule headers will have ![]() prefixed to the rule name.
prefixed to the rule name.
* The two bubbles on the left pane indicate the total remaining balance of all the claims in the category and the A/R%. This will not be shown for incomplete patients and eligibility-failed patients, where these metrics are not applicable.
* The left pane can be hidden by clicking ![]() on the header. Additionally, an expand and collapse option has been provided for all the levels in the tree structure, including a Collapse All at the top.
on the header. Additionally, an expand and collapse option has been provided for all the levels in the tree structure, including a Collapse All at the top.
* To clearly distinguish between line status and sub-status, items with a status of HOLD will now be prefixed with Line Status, while line sub-statuses starting with HOLD_**** will be prefixed with Line Sub Status.
* A Resolved status is introduced, providing users with the ability to move items between statuses as needed to better reflect workflow progress.
* Two new columns have been recently to the dashboard: Last Claim Date and Insurance Level. These columns allow instant visibility to the most recent claim submission date and determine the insurance level (primary, secondary, or tertiary) associated with the claim.
* Enhanced pagination- Work Queue can now support 500 entries per page; earlier this was 25.
Key Functions in the Work Queue
| Key Functions / Categories | |
| Appointments/Scheduler | a. Seen but not billed b. Missed Appointments |
| Charges | a. Failed and inactive eligibility b. Unbilled Charges c. Untimely filing d. Errored Charges – CCI and Internal Claim Validation Errors e. All Hold lists- Also includes HOLD buckets related to the newly released Insurance Discovery program. (HOLD_DISCO_ERROR, HOLD_DISCO_HIGHCONF, HOLD_DISCO_LOWCONF) |
| Claims | a. Error Batch b. No Response Claims c. Clearing house rejections (CH rejection codes and descriptions will be displayed) d. Payer rejections (Payer rejection codes and descriptions will be shown) |
| Denials | a. CO 256 |
| Payments | a. Underpayments (Less than fee Schedule expected) b. Overpayments (both Insurance and patient) |
| Patients | a. Incomplete Patients b. Eligibility Failed |
Search Criteria Section
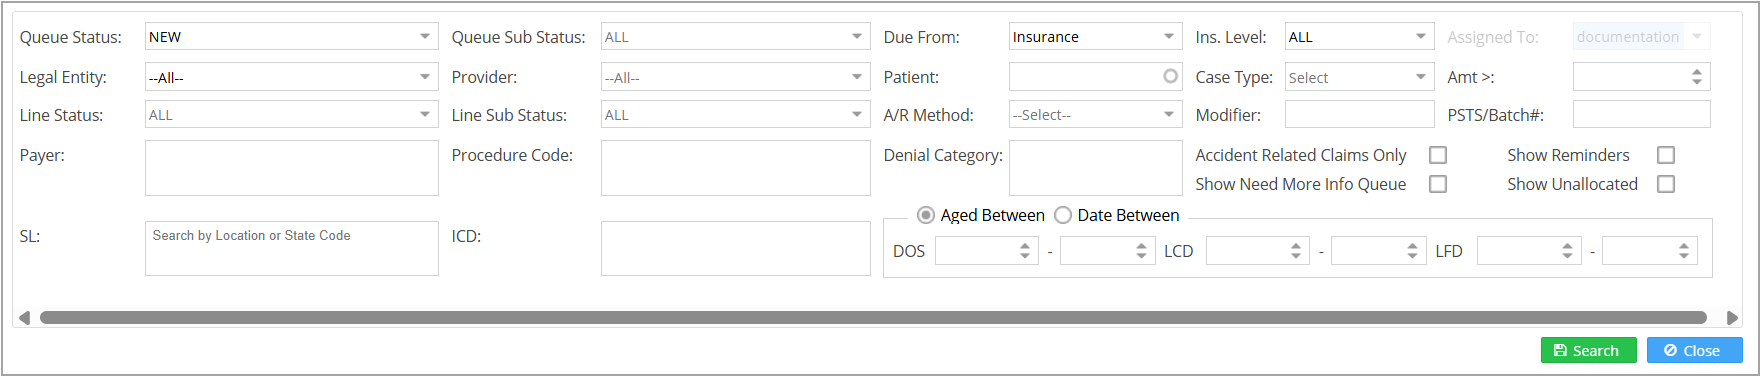
The Work Queue includes expanded search filters, with nearly all the filters in Collections Manager being made available in the module. Users can access these filters by clicking the filter icon ![]() next to the search field, which opens the full range of Work Queue search options. This enables more precise and efficient search functionality within the Work Queue.
next to the search field, which opens the full range of Work Queue search options. This enables more precise and efficient search functionality within the Work Queue.
Note: Queue status and sub-status filters are multi-select.
Workqueue Listing
Click on any category on the left pane to list the corresponding items on the right.
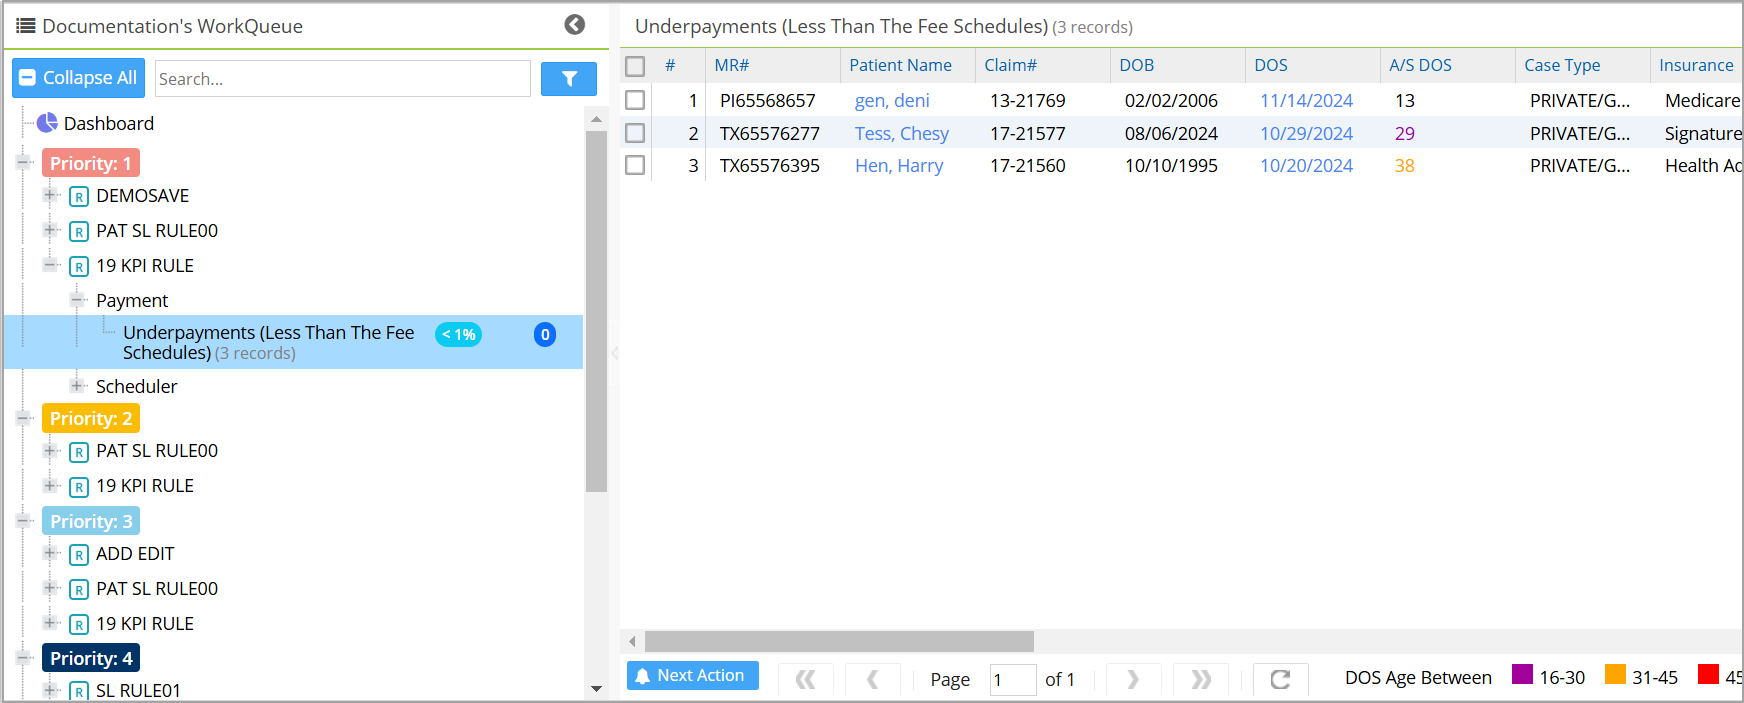
Patient Name is a hyperlink to the Patient demographics, and DOS is a hyperlink to the Charge Master. Click on any other field to move to the Next Action screen.
Note: The ![]() button at the bottom of the main screen is a convenient way to edit or assign tasks related to multiple items in the work queue list in one go. Check the boxes corresponding to the items required, and then click on
button at the bottom of the main screen is a convenient way to edit or assign tasks related to multiple items in the work queue list in one go. Check the boxes corresponding to the items required, and then click on ![]() button. Changes made would then be reflected in all the selected items. Users can push claims from the WorkQueue screen to the Need More Info Queue using the Next Action option. These claims will appear in the assignee user’s Need More Info Queue in the Interoffice messaging screen. In the Work Queue screen, any assigned claims will also appear in a separate Need More Info Queue list.
button. Changes made would then be reflected in all the selected items. Users can push claims from the WorkQueue screen to the Need More Info Queue using the Next Action option. These claims will appear in the assignee user’s Need More Info Queue in the Interoffice messaging screen. In the Work Queue screen, any assigned claims will also appear in a separate Need More Info Queue list.
Next Action Screen
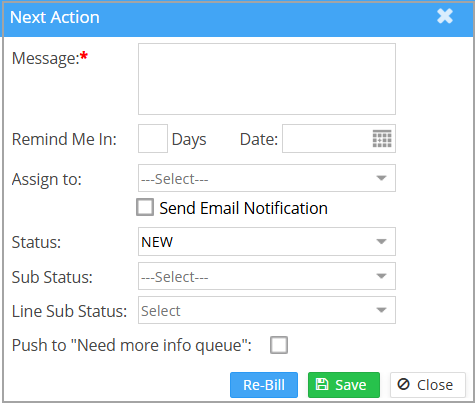
Click anywhere on the claim line (see Image 4) except the patient name and DOS to open the Next Action screen with details of the invoked encounter; see Image 5.
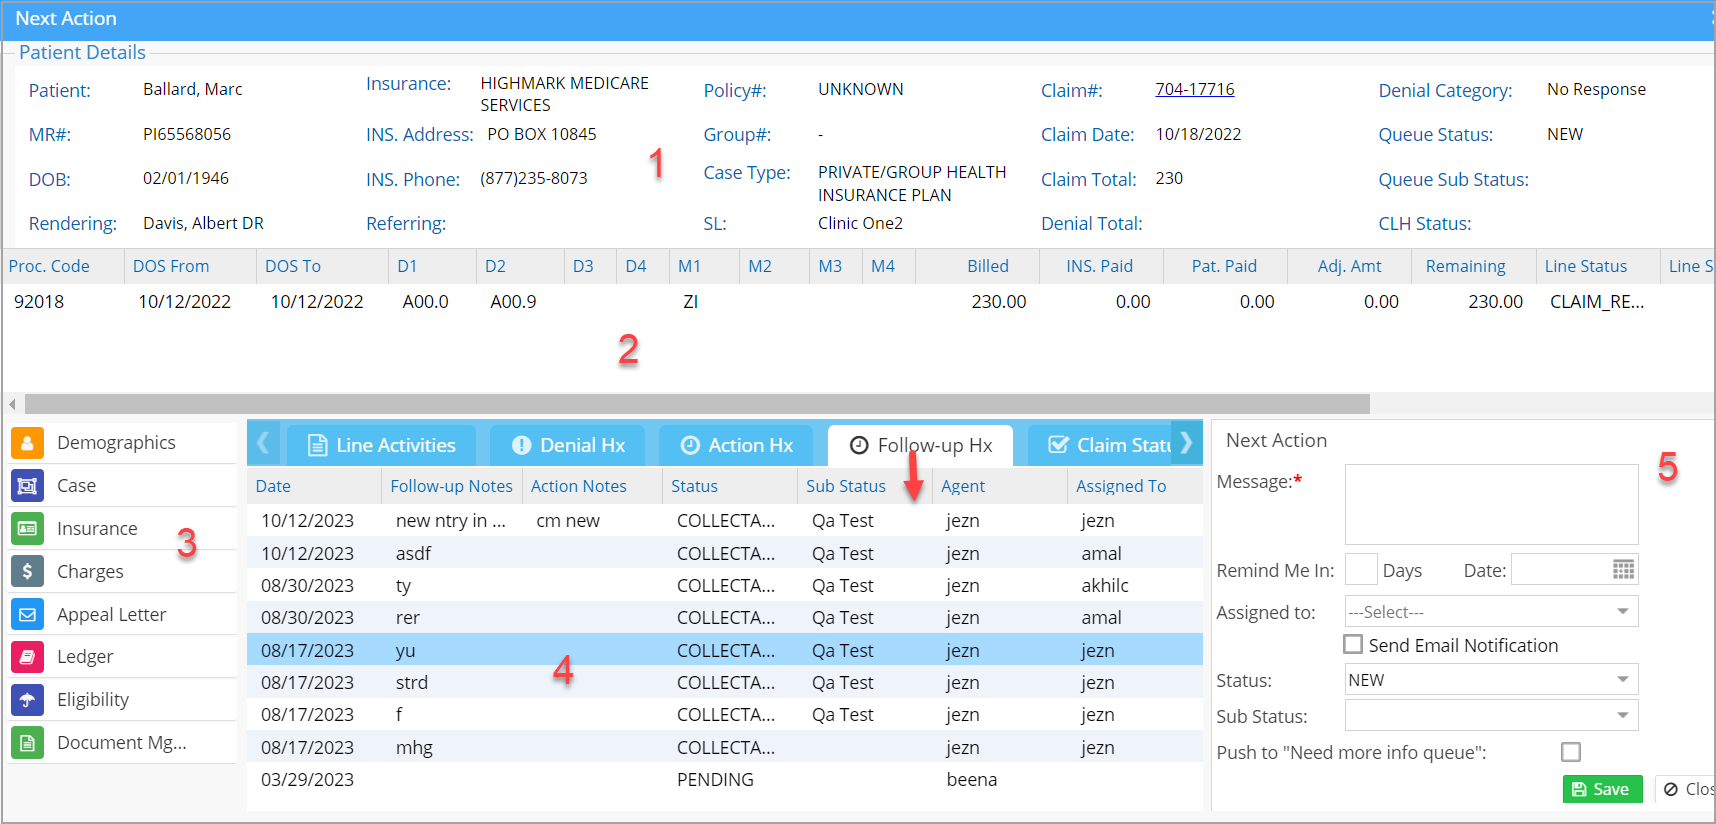
The different sections of the Next Action Screen are numbered (as highlighted in Image 5) and explained below.
1. Patient and Claim details: The header section contains patient demographics and claim details. The claim# on the header is a hyperlink to the claim form. The header also has some recently added fields, such as the MR# of the patient, tax ID, rendering provider, and service location. The fields in the header have been rearranged.
2. Encounter lines and their details: Encounter line details can be found here.
3. Links: Help in navigating to other pages such as patient demographics, case, insurance, Charge Master, ledger, eligibility, and document management.
4. Claim History and Previous Notes: This section has five tabs: Line Activities, Denial Hx, Action Hx, Follow-Up Hx, and Claim Status Hx.
The line activities tab logs all the line-level activities related to the task.
Denial history provides the details of previous denials (if any) for the task.
Action Hx history provides a history of follow-up activities done on the task.
Follow-Up Hx This is the collection manager’s activity history.
Claim status history provides a history of previous claims generated on the present claim and their details.
5. Action notes and status section: This section lets you update action notes, status, and sub-status. We can also tag status and sub-status for future follow-up. Work queue status and sub status mentioned here are not related to collection status and sub status. Tasks can also be assigned from here by selecting a user from the Assigned To drop-down, the task gets loaded in the Need More Info Queue of the recipient’s inbox. If you also need to send an email regarding the work item, check the box Send Email Notification when saving the item.
To prevent accidental updates, when a Line Sub Status is applied, the system displays a notification: The selected Line Sub Status will be applied to all lines within the claim.
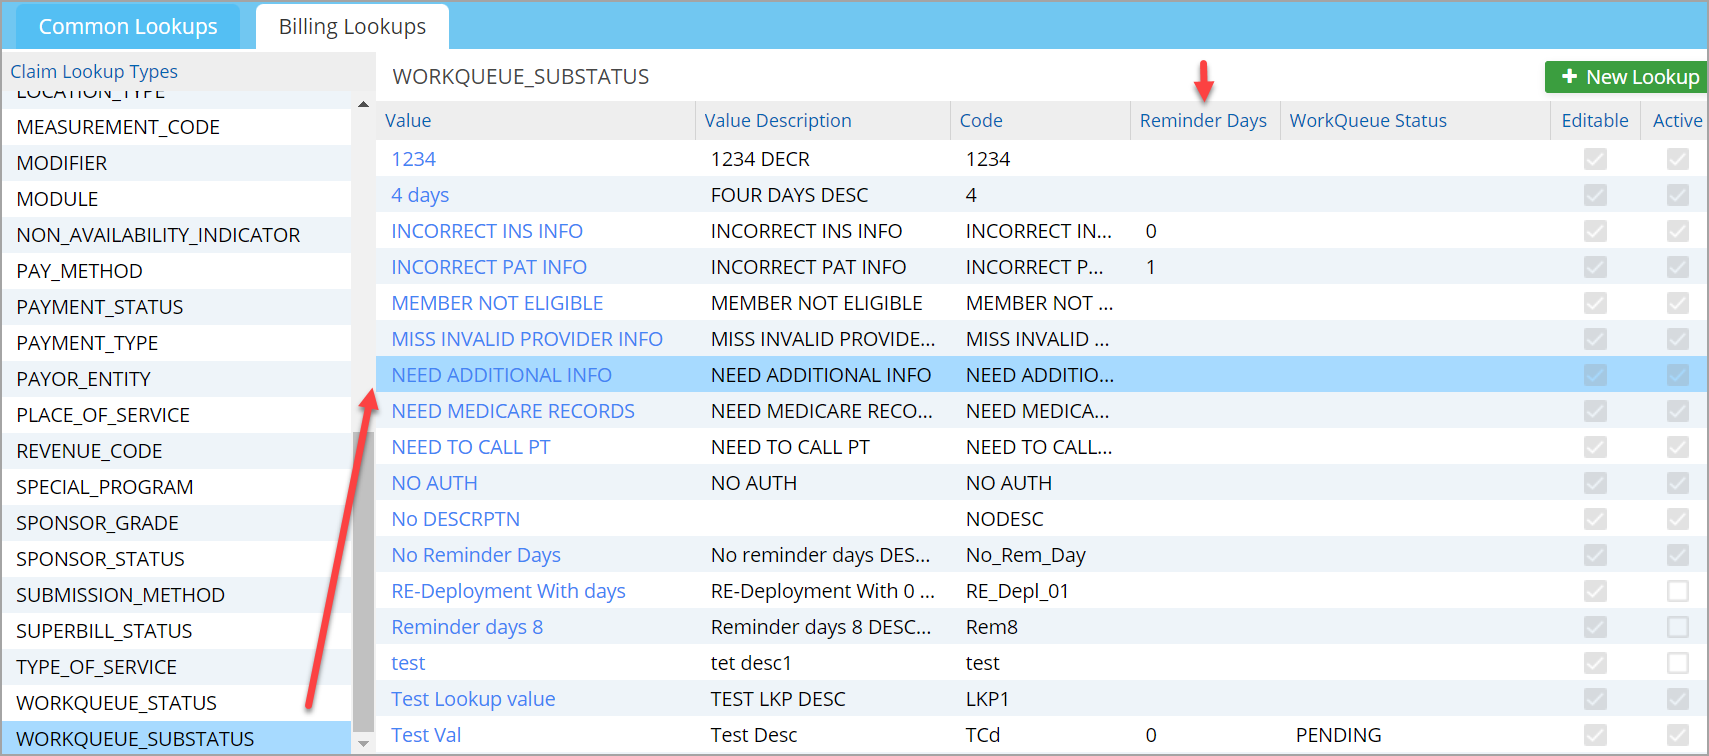
Each work status can be linked to one or more work queue sub-statuses. Selecting a status in the Work Queue screen will bring up a specific set of sub-statuses preset from the Billing Lookups. To link Work Queue status and sub status, go to Advanced Setup ->All Lookups->Billing Lookups. Select the Work Queue sub-status on the left pane. For each sub-status, choose one or more statuses from the Work Queue Status column, which is a multi-select combo box (see Image 7).
Time Frame for Sub Statuses:
Users can now preset the claims follow-up time frame (days) from the work queue’s sub-status lookup and specify the days for each sub-status. Each sub-status can be linked to a specified follow-up time frame. The claims with the sub-status will reappear only after this time frame. This feature will relieve users from setting reminders individually for each claim.
The sub-status and the time frame can be set up from the Advanced Setup ->All Lookups -> WORKQUEUE_SUBSTATUS. Click on the sub-status that needs to be updated and enter the days to remind in the field, Reminder Days. This defaults the reminder days in the work queue for all claims for that sub-status where the days have been preset; however, users can override the days in the work queue screen.