PracticeSuite Release Note
Product Release Version: 23.0.0
EHR Version: EHR-18.0.0
Product Release Date: February 2024
© 2024 PracticeSuite
Disclaimer: All rights are reserved. No part of this work may be reproduced in any form or by any means graphic, electronic, or mechanical, including photocopy, recording, or information storage and retrieval systems – without written permission of the publisher.
The products that are referred to in this document may be either trademarks and/or registered trademarks of the respective owners. The publisher and the author do not claim these trademarks.
While every precaution has been taken in the preparation of this document, the publisher and the author assume no responsibility for errors or omissions or for damages resulting from the use of the information contained in this document or from the use of programs and source code that may accompany it. In no event shall the publisher and the author be liable for any loss of profit or any other commercial damage caused or alleged to have been caused directly or indirectly by this document.
Printed February 2024 at PracticeSuite, Inc., 3206 Cove Bend Dr., Suite A, Tampa, FL 33613
Part 1: Product Enhancements
1.1 EHR
1.1.1 Procedure Code-ICD Mapping for Level 2
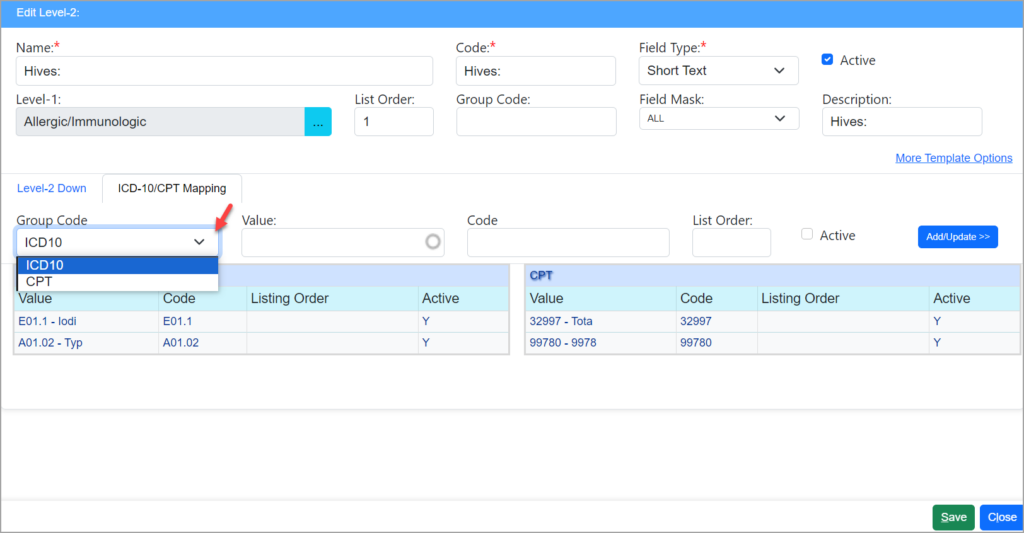
Level-2 items in a chart can be mapped to a specific set of procedure codes and ICDs. A new tab for procedure code/ICD mapping is brought into the Level-2 add/edit screen (see Image 1.1.1) to store Users can enter values as depicted in Table 1.1.1 and save the changes.
Fields for Procedure code – ICD Mapping
| Field | Description |
| Group Code | Select procedure codes or ICD |
| Value | Provide the first 3 characters of the selected procedure codes or ICD. When matching entries emerge, select one |
| Code | This is populated as per the entry in the Value field |
| List Order | Specify the ordering, if any. |
| Active | To delete an entry added, uncheck the ‘Active’ check box. |
Table 1.1.1
While charting, in the Level-2 popup screen, users can view the mapped ICDs and procedure codes with a link icon under other Level-2 downs. Select Level 2 using the check box provided, and save the Level 2 component. The mapped procedure codes and ICDs will appear under the Billing and ICD-10 components of the chart, respectively.
1.1.2 RetroCopy
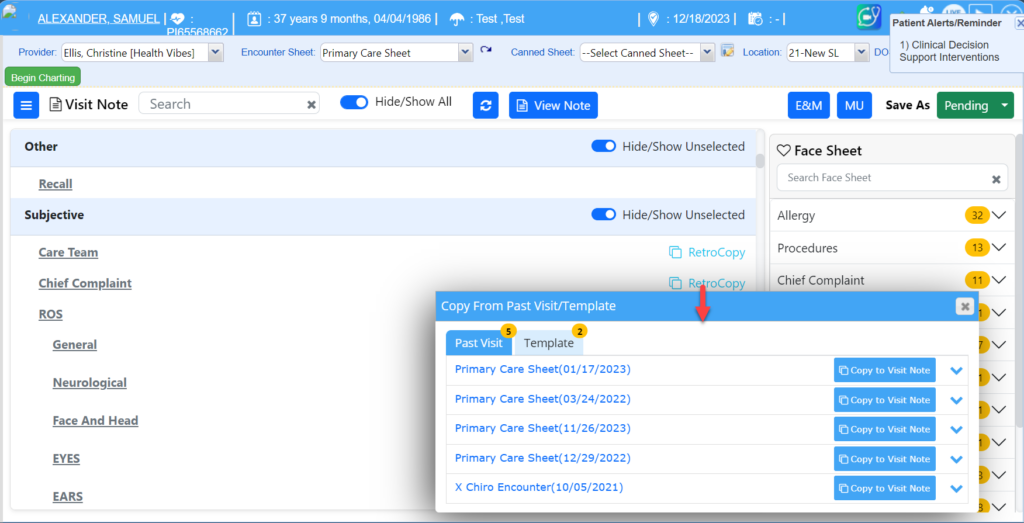
A retrocopy feature has been introduced on the charting screen to copy historical Level-1 data to the current note. Users can either choose to copy from the previous note(s) or a canned sheet template.
Note: The RetroCopy Option will show only those visits that are either in ‘Completed’ or ‘For Review’ status.
Lab Result Copy: Using this feature, the patient’s lab results can be saved for subsequent encounters (refer to Image 1.1.2b). The following conditions are necessary to copy lab results:
A. Level-1 Code should be LAB_RESULT_HX
B. The patient should have a previous lab history.
1.1.3 Copy from History
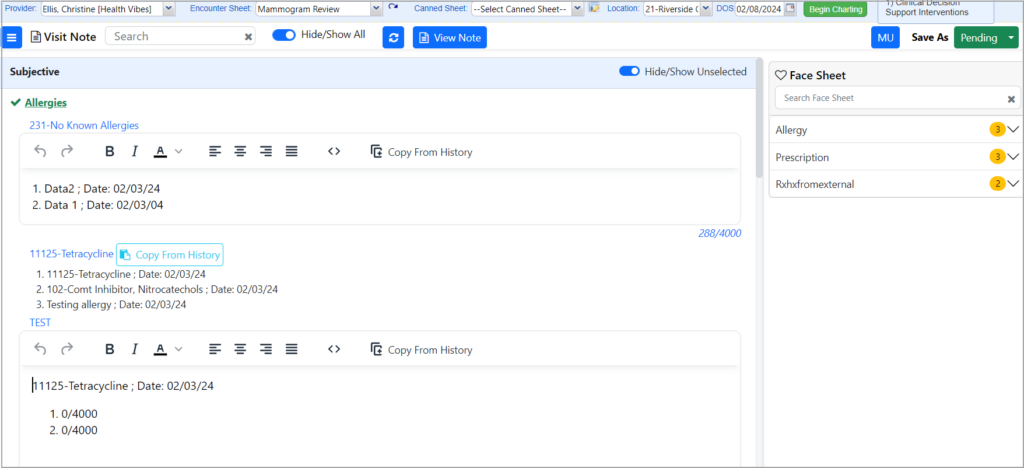
Another copy feature that has been introduced on the charting screen is “Copy from History” and this is to copy from previous Level-2s. Using the option users can copy all data from the corresponding L-2 elements in previous notes or Facesheet regardless of the Level-1. Even the info entered straight into the Facesheet and not present in any of the charts can be copied using this feature.
The field type of the Level-2 component should be either Long text, Ex-para, or Rich Text editor. The new template tags, specifically called button tags, and the corresponding information are given in Table 1.1.3.
| Button Tag | Information |
| MEDICAL_HISTORY | Medications for the patient |
| MEDICAL_HISTORY_IMPORTED | Medications for the patient imported from other systems |
| LAB_RESULT | Lab results for the patient |
| IMMUNIZATION_HISTORY | Complete immunization History of the patient |
| ALLERGY | Complete Allergy list of the patient |
| PROBLEM_LIST | A complete problem list of the patient |
| FAMILY_HISTORY | Family History of the patient |
Table 1.1.3
In the Level-2 add/edit screen in the Template tag drop-down, a new section named ’Button Tags’ has been made available. Select any of the tags described above and save the Level-2 screen. The ‘Copy from History’ button will then show up beside Level 2. Click on the button to fetch the information into the text area, where the user can make the required edits.
1.1.4 Rich Text Editor in Level-2
A new and versatile Rich Text Editor has been made available for the Level-2 field type. The new editor has advanced formatting features and also gives users the ability to upload videos and images when charting.
1.1.5 Rx Refill Request Viewer: Two New fields added
Two additional fields, “Last Visit Date” and “Next Appt. Date”, are added to the refill request viewer. This information can help providers decide whether the refill requests need to be approved instantly or can be deferred. Also, the “Last Seen Date” is a hyperlink that opens to the latest chart.
1.1.6 Completed Charts Now Editable
Edit restrictions on a completed chart have now been removed. All users authorized with admin privileges can hereafter modify a completed chart.
1.1.7 View Void Charts in Visit History
All users can hereafter view charts that were voided from the Visit History tab. Previously only admin users were able to view the voided charts.
1.1.8 Supervising Provider Mapping for Mid-Level Prescribers
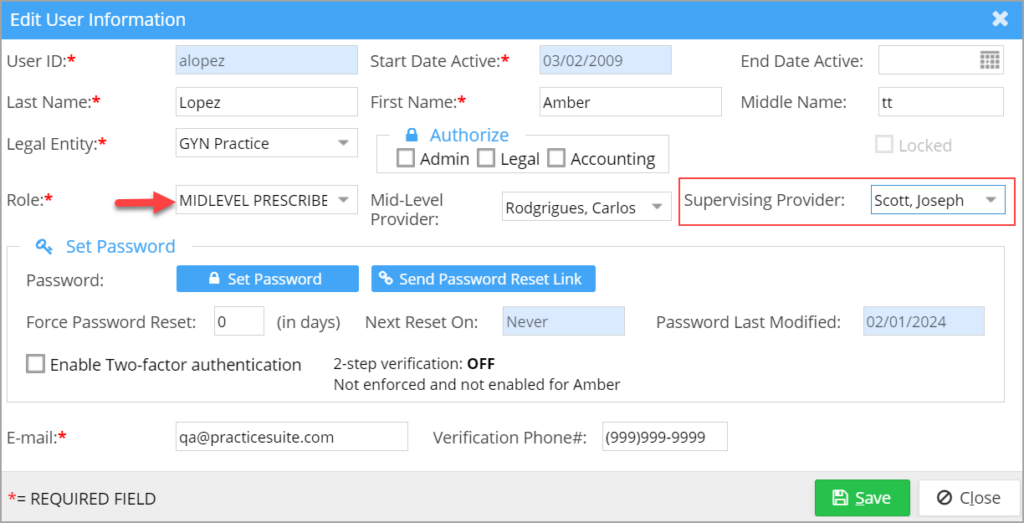
Henceforth, a mid-level prescriber must always be mapped to a supervising provider. Admin users or users with access to the Security menu can assign the supervising providers from the user setup screen. When a user’s role is chosen as “MIDLEVEL PRESCRIBER’, a new drop-down named “Supervising provider” will appear and the appropriate supervising provider will need to be selected from the list before saving the user (see Image 1.1.8).
This mapping can also help mid-level prescribers access the NewCrop site without any restrictions.
1.1.9 Facesheet: Ordering of Problem List
The problem list on the Facesheet can now be ordered according to practice preference. Similar to other items in the Facesheet, the preferred order can be set from EHR Admin->EHR lookups (Lookup type: HIGHLIGHT_VALUE).
1.1.10 Referral Management
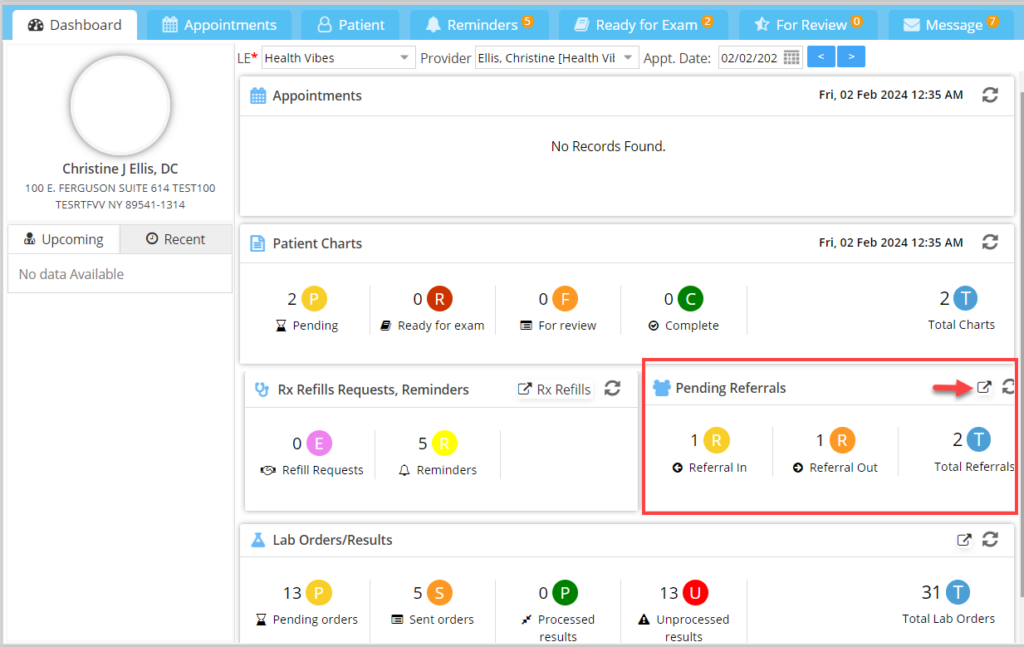
PracticeSuite has brought a new module named Referral Manager to track and manage the referral process. New referrals can be added, and existing referrals updated from this screen.
The referral screen is accessed from the Clinical Desktop which has a Referral section that will provide a count of all the pending referrals in the system, along with the individual counts of referral ins and referral outs.
The pop-up icon ![]() (highlighted in Image 1.1.10a) will take the user to the referral management screen. Referral Ins and Outs are listed in separate tabs. Each tab will have an ‘+Add Referral’ button at the top-right corner to add the respective referrals.
(highlighted in Image 1.1.10a) will take the user to the referral management screen. Referral Ins and Outs are listed in separate tabs. Each tab will have an ‘+Add Referral’ button at the top-right corner to add the respective referrals.
Users can also manage the referral process from encounter sheets. While charting for a patient, use the level-1 item with code ‘REFERRAL_IN’ for adding referrals coming in for the patient, and use Level-1 ‘REFERRAL_OUT’ to add referrals out. Within each, the user can enter the referral details like referral reason and referral notes.
Level-1 Codes: REFERRAL_IN, REFERRAL_OUT
Level-2 Codes: REFERRAL_REASON, REFERRAL_NOTES, REFERRAL_STATUS, REFERRING_PHYSICIAN
Once a user enters data in the referral reason or the notes fields, an entry is automatically created in the referral management screen with the supplied information as per the Level-1 chosen.
1.1.11 Check-out Desk
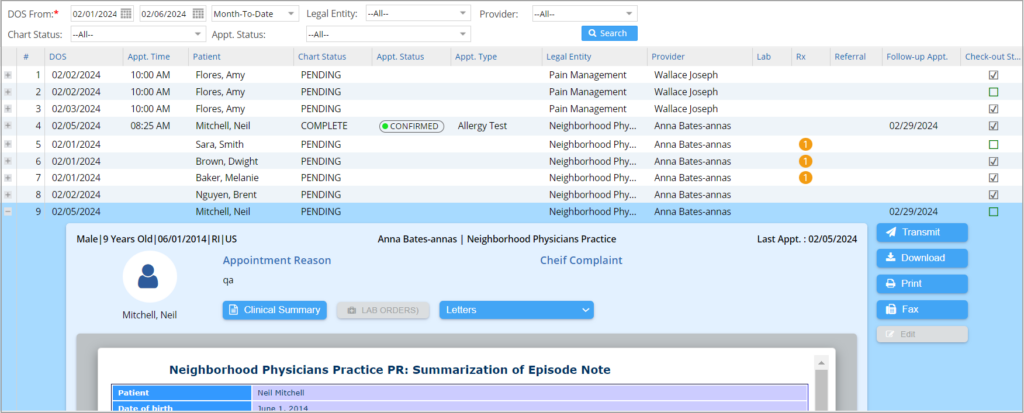
A new check-out module that provides a 360 degree of the patient’s appts, clinical summary, orders, and other relevant info has been introduced in the EHR for a convenient patient check-out process. This module can be accessed from EHR Advanced> Checkout Desk. The listing screen on the check-out page will have fields as shown in Image 1.1.11.
* A tick mark √ on the Check-out status column indicates that the Check-out was completed.
* The plus sign on the left side of the listing, when clicked, will open the patient and appointment details along with the clinical summary, lab orders, and letters (Image 1.1.11). Clicking on the item pulls up the details. Users can also transmit, download, print, or fax using the options provided on the right-hand side of the screen.
Check-out Desk
1.2 Document Manager: Upgraded Scanner Software
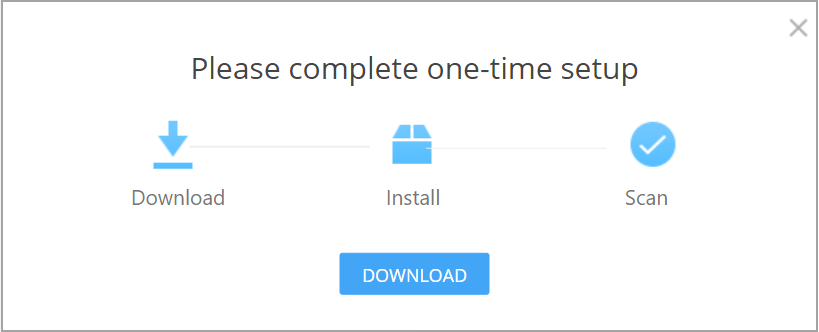
PracticeSuite has upgraded its scanner software to provide a cross-platform document-scanning application for its customers. The new service merely requires a one-time setup during the first access.
Setup
To set up the scanner app, users can go to Patient Demographics->Documents->Document Scan and click on the “Launch” button.
2. The user will be prompted to do a one-time setup of the service. Click on “Download” to download the app installer.
3. Once the installer is downloaded, double-click on it (on Windows and Mac) to install the service. This will take just a few seconds.
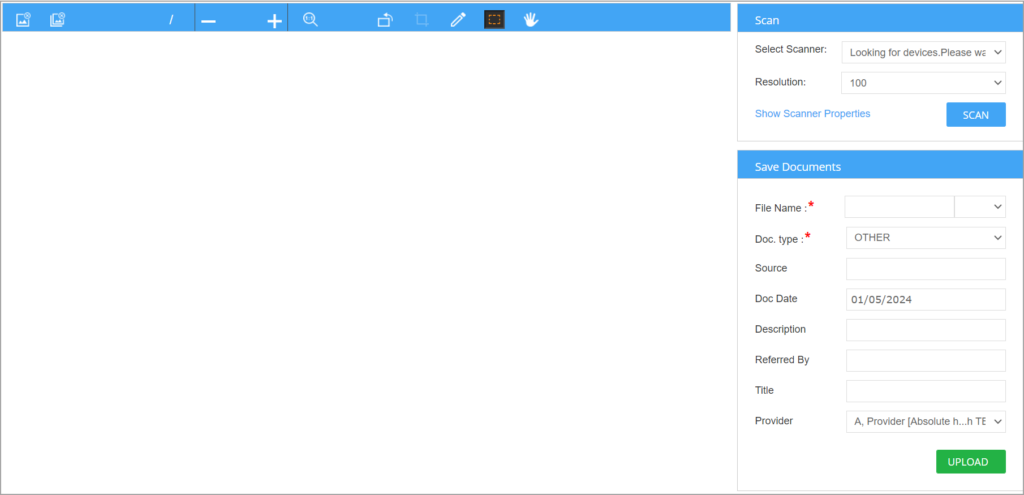
4. Once the scanner is launched, the user will be directed to the user interface as shown below in Image 1.2c. All the scanning-related options will be on the right-hand side of the window and the menu at the top will have the shortcuts.
5. From the “Select Scanner” drop-down, select a scanner and then click on “Scan” to scan the document. Once the required pages are scanned, click on “Upload” to have the document saved. For more help on this, please click here.
1.3 Lab Hub Enhancements
1.3.1 Lab Hub Results Page
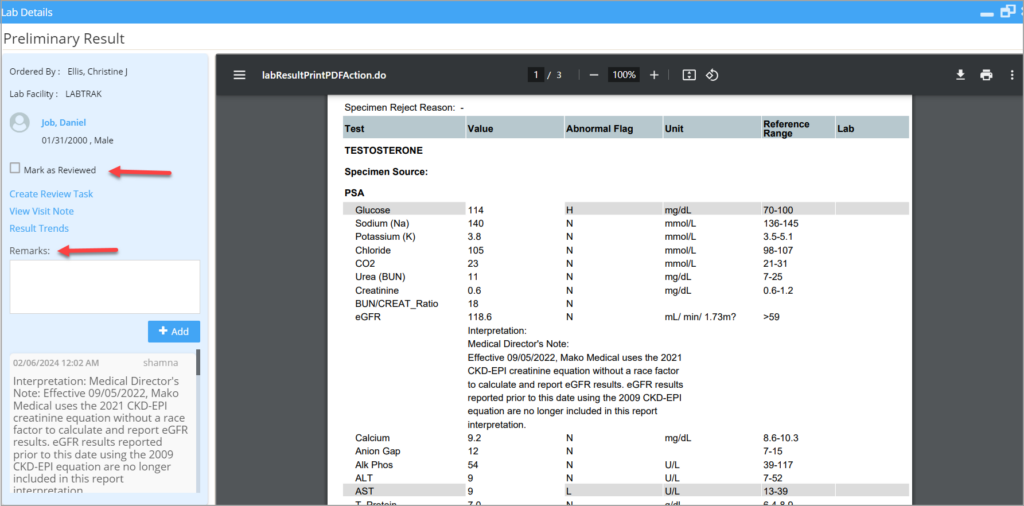
1. The results page can be accessed by clicking the ellipses on the right-hand side of the listing and then selecting “View Result” from the menu.
2. Any remarks entered from here will be saved under a new note type named “Lab Result” in the patient notes (see the top arrow mark in Image 1.3.1).
3. If the user checks the box “Mark as Reviewed” (see Image 1.3.1), then the status of the corresponding Lab_Results HL-7 chart will be automatically updated from “For Review” to “Complete”.
1.3.2 Other Screen Changes in the Lab Hub
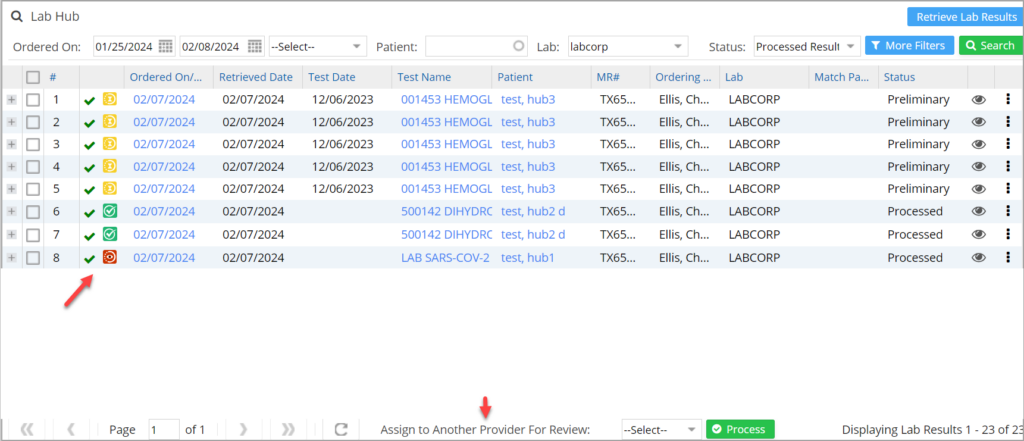
A. Clicking on the ‘Ordered On/DOS’ info in the listing will take the user to the patient’s chart from which the lab order was sent, and a mouse hover will display the chart status.
B. Each line will have a chart status icon, similar to the Appointments tab in the Clinical Desktop.
C. If the result status is ‘Final’ as sent from the lab, the line is colored green. The ‘Results not Available’ message has been changed to ‘No results Available’.
D. If the results are processed in the system, a green tick mark appears near the chart status icon (see Image 1.3.2).
E. ‘Assign it to Different Provider for Review’ now reads ‘Assign to Another Provider for Review’.
F. In the task assignment (‘To Do’) screen, the Due Date and Time fields are no longer mandatory, and the task priority is defaulted to ‘Low’.
1.4 Inter-office Messages- Forward Facility Restored
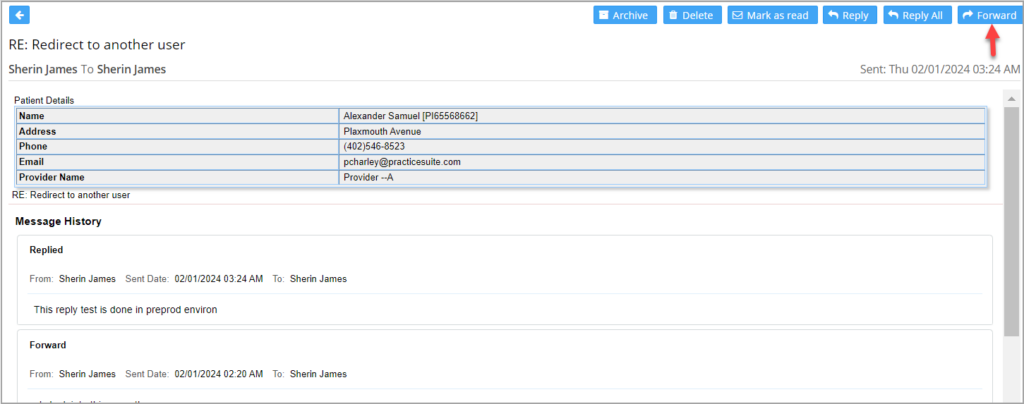
Message forward functionality, which existed in the old UI, is reinstated. Users can forward messages from the ‘Inbox’.
1.5 Authorization Desk: Facility to Add New Authorization
Users can now add new authorizations for patients from the Authorization Desk through the newly created ‘New Authorization’ button.
To create a new authorization from the desk, type in and search for a patient using the Patient Smart Search field provided. This will enable the ‘New Authorization’ button. Click on the button to open the authorization screen for the patient, where new authorization information can be added and saved.
1.6 Patient Portal: Multiple LE-based Payment Process
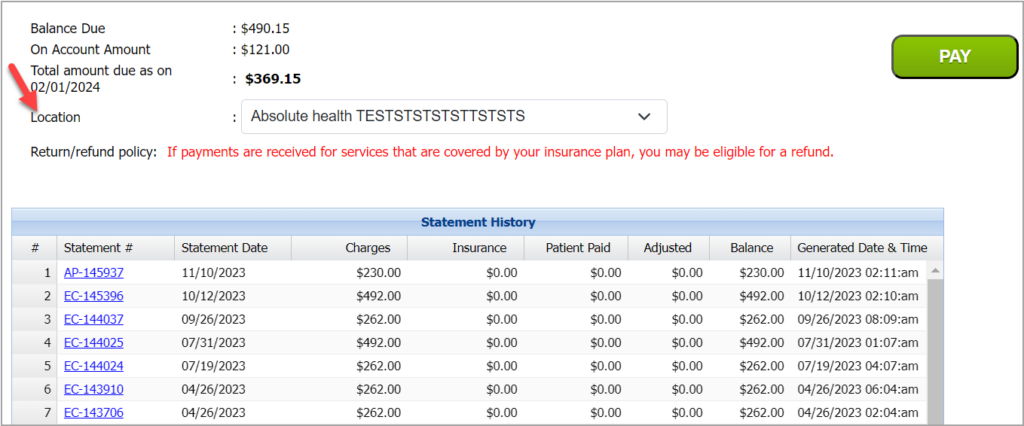
Patients can choose a location (legal entity) while making payments from the patient portal. A new drop-down named ‘Location’ is introduced in the Payment screen of the patient portal (refer to Image 1.6).
If the patient pays through the Quick Pay option, the total outstanding balance of the patient will be displayed. The location will default to the one with the most encounters. For logged-in patients, the drop-down is defaulted to the location that has the most line encounters in the given statement number. In both cases, patients can change the default location to any one of their choice. The location shown will be based on the rules shown in Table 1.6. Users can select another location from the drop-down if required.
| Scenario | Default value in Location |
| A Location L exists with the highest number of line encounters | L |
| If all locations have an equal number of encounters and a primary LE exists, | Primary LE |
| If all locations have an equal number of encounters and no primary LE exists, | The first LE in Alphabetical order |
Table 1.6
1.7 Scheduler – Follow-up Screen Enhancements
Henceforth, for setting up follow-up appointments for patients, users need not provide the exact date of follow-up. Instead, they can provide the count of days after which the follow-up appointment can be taken. This time interval can be provided in days, weeks, or months. The system auto-calculates the exact date of the follow-up, and the available time slots for the selected day are shown in the adjacent drop-down. The user may then choose a convenient time slot for the follow-up.
1.8 eFax: Auto Refresh Feature
The eFax screen is now equipped with an auto-refresh feature. The screen refreshes itself on every update, and the user need not manually refresh the screen for every change.
1.9 One Clinical Quality Measure Added
| Quality ID | Description |
| 177 | Percentage of patients aged 18 years and older with a diagnosis of rheumatoid arthritis (RA) who have an assessment of disease activity using an ACR-preferred RA disease activity assessment tool at ≥50% of encounters for RA for each patient during the measurement year |
1.10 Offline Reporting Feature in D3 Report
Offline reporting feature has been implemented in ‘D3. Summary-Patient/Guarantor Balance and Aging Report’.
1.11 Schedule History: Excel Output Available
The patient’s Schedule History page now offers an Excel output option in addition to the currently existing PDF export.
1.12 Letter master: More Tags included
Appointment Reminder:
Text and email appointment reminders will show the provider’s address along with the provider’s name. The following tags are used to replace the address part:
<<PROVIDER_ADDRESS>>
<<PROVIDER_CITY>>
<<PROVIDER_STATE>>
<<PROVIDER_ZIP>>
Tags for Secondary and Tertiary Insurance
New tags have been added for fetching secondary and tertiary insurance information. If the patient has multiple insurances at the same level, the most recently created insurance will replace the tag.
1.13 Charge Master: Case and Demographics Popup Screens Updated
The case screen and patient demographics pop-up screens from Charge Master have been updated to the new UI.
Part -2 Reports
2.1 ‘A1. Appointment Schedule Report’: Added a Direct CSV Export Option
A direct CSV output has been added to the A1 report, and it will have the following fields:
Patient Last Name, Patient First Name, Cell phone number, Provider Name, Location Name (Legal entity), Appointment Status, Appointment Type, Appointment Date
2.2 ‘I8. Summary Encounter Line Activities Report’: Type of Service Added
Henceforth, the type of service information will be included in the detailed CSV and offline outputs of the I8 report.
Part 3: Resolved Items
3.1 EHR
3.1.1 Issue with In-House Current Medication and Prescription Resolved
The problem wherein in-house current medication information and in-house prescription drugs from the New Crop site did not populate the patient’s chart is now addressed.
3.1.2 Alignment Mismatch Between Preview in Charting and Visit Hx Corrected
Alignment issues found in the charting page preview and Visit Hx preview have been corrected.
3.1.3 Lab Hub: Non-functional Deselect Functionality Corrected
The deselect functionality of the Select/Deselect checkbox in the Lab Hub screen was not functional. This is now rectified.
3.1.4 Facesheet- Error in ‘Show Duplicates’ Fixed
The ‘Show Duplicates’ check box in the Facesheet revealed the duplicates even when unchecked. This is now corrected.
3.2 Claims Workbench
3.2.1 New Paper Bucket Fixed
Previously, the new paper bucket in the Claims Dashboard displayed BILL_TO_PT lines as well. Now the bucket has been updated to show only new paper claims.
3.2.2 Paid Close Claims in Pending Response Bucket
In the Claims Workbench, paid-close claims were wrongly shown in the pending response bucket. This is resolved.
3.3 Count Mismatch in Favorite KPI section Corrected
A couple of reports accessed through the Favorite KPI section on the home screen had record counts that did not match the counts shown in the KPI. This is resolved.
3.4 Collections Manager: Date Filters Corrected
The concern that date filters were not giving accurate search results in Collections Manager has been resolved.


